
Installation Sheet


3
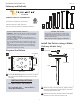
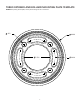
Install the Fixture to Concrete
(or other hard surfaces)
3B
4
5
3
3
4
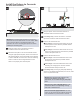
Bring the power wires to the fixture location in
accordance with local electrical codes.
Line-voltage only: connect the fixture to a suitable
ground in accordance with local electrical codes.
Connect the white fixture wire:
Connect the black fixture wire:
Line-voltage only: use the gray and purple dimming
wires for 0-10v dimming application (if not in use, make
sure to cap these wires off).
5
6
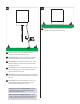
Warning: the mounting plate placement is off-center in
relation to the center of the fixture on some models. Make
sure to place the fixture in the desired location and
determine the correct mounting plate placement before
installing the mounting plate.
Warning: The purple and gray wires are only
used for 0-10v dimming. For all other
applications, do not connect the gray and purple
wires.
Note for In-Line Fuse equipped fixtures: in the
case that the fixture is not operating correctly,
make sure to check the fuse.
Note for Photocell equipped fixtures: at initial
power up, the photocell must calibrate which will
cause the fixture to cycle on/off for a moment.
7
Line-voltage: Connect the white fixture wire to the
neutral power line wire with the provided outdoor
waterproof wire nut.
Low-voltage: Connect the white fixture wire to one
of the low-voltage power line wire with the provided
outdoor waterproof wire nut.
b
a
Line-voltage: Connect the black fixture wire to the
hot power line wire with the provided outdoor
waterproof wire nut.
Low voltage: Connect the black fixture wire to the
remaining low-voltage power line wire with the
provided outdoor waterproof wire nut.
b
a
1
2
Bring the power wires to the fixture location in
accordance with local electrical codes.
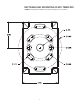
Mount the base plate to an even and smooth surface
using the appropriate template, which can be found on
the following pages. Ensure that length of the lag bolts
or anchor bolts do not exceed .58” from the mounting
surface in order to leave enough clearance for the
fixture to fit properly over the base plate.
3A
.58”
1
2
FIXTURE
BASE PLATE
BASE PLATE