cover 12/05/00 18:36 Page Cov1 Manuel d’utilisation Bedienungsanleitung Manuale di utilizzazione User manual Gebruiksaanwijzing Manual de utilización Manual de utilização Eγχειρί ιο χρήσης ®
cover 12/05/00 18:36 Page Cov2 FRANCAIS . . . . . . . . . . . . . . .F DEUTSCH . . . . . . . . . . . . . . . .D ITALIANO . . . . . . . . . . . . . . . . .I ENGLISH . . . . . . . . . . . . . . . .GB . NEDERLANDS . . . . . . . . . . .NL . ESPAÑOL . . . . . . . . . . . . . . . .E PORTUGUÊS . . . . . . . . . . . . .P EΠΠHNIKA . . . . . . . . . . . . . .GR . Important Précau tions INSTAL LATION confor - Assur me appare à celle indiqu ez-vous que il.
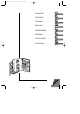
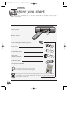
cover 12/05/00 18:36 Page Cov3 1 4 5 3 status showview 2 6 vps 14 s.o.s.
cover 12/05/00 18:36 Page Cov4 1 1 2 1 3
r9-GB3-DAE 12/05/2000 18:38 Page 1 Important Contents Precautions - Ensure that the mains supply in your house complies with that indicated on the identification sticker located on the back of your appliance. Install the video recorder horizontally, away from any source of heat (fireplace) or appliances creating strong magnetic or electric fields. The components of this video recorder are sensitive to heat. The maximum ambient temperature should not exceed 40° Celsius.
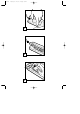
r9-GB3-DAE 12/05/2000 18:38 Page 2 Installation Before you start you for purchasing one or our videos. Unpack the set completely and tear off the J Thank protection films.
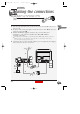
r9-GB3-DAE 12/05/2000 18:38 Page 3 Installation Making the connections the video recorder and television set with this J Connecting cable simplifies set-up and subsequent use, and considerably improves the pictures and sound reproduction quality. GB 1 Disconnect the aerial cable from your TV set and reconnect it to the IN socket of your video recorder. 2 By means of the coaxial cable supplied, connect the video recorder's OUT socket to the television's aerial socket g.
r9-GB3-DAE 12/05/2000 18:38 Page 4 Installation Initial Installation video recorder has not been preset to receive channels from your region, you have to install J Asthethechannels yourself by carrying out the automatic channel installation procedure described below. Auto Installation 1 Switch on the television. 2 Set vcr/dvd/tv on the remote control to vcr a. 3 Switch on your video recorder with button B (1).
r9-GB3-DAE 12/05/2000 18:39 Page 5 Installation 5 Press ▼ (9) to select Reception then choose Aerial (for channels received via roof aerial) or Cable (for cable channels) with C (10) or B (8). 6 Press ▼ (9) to select the Autosearch line, then press C (10) or B (8) several times to search for the programme channel, or you may also directly enter a number with keys 0 to 9 (21). ð When a channel is found, the pictures come up on the screen.
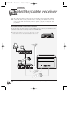
r9-GB3-DAE 12/05/2000 18:39 Page 6 Installation Satellite/cable receiver connection schemes you may adopt for your satellite receiver depend on the available J The sockets and cables in your possession. Prior to connecting your satellite receiver to the video recorder, make sure that the former is capable of properly receiving the cable programmes.
r9-GB3-DAE 12/05/2000 18:39 Page 7 Installation Video recorder settings Switch on your satellite/cable receiver and select channel 1. Set vcr/dvd/tv button on the remote control to vcr a. With key menu (13), call up the SUMMARY menu. With key ▼ (9) select the Installation line and confirm with ok (11). With key ▼ (9) select the Satellite and cable box line and confirm with ok (11).
r9-GB3-DAE 12/05/2000 18:39 Page 8 Installation Other sets J Press the status key (4) to call up the control screen and select the socket AV1, AV2, AV3 or AV4 with key AV (22) of the remote control. Sockets AV1 / AV2 / AV3 / AV4 AV1 - AV2 AV2 AV1 / AV2 / AV4 Decoder DVD AV4 Camcorder Other video recorder TV set Satellite receiver Video disk player The pictures from another set operating in the play mode and connected to AV2 are conveyed to the socket AV1.
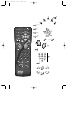
r9-GB3-DAE 12/05/2000 18:39 Page 9 Use The remote control remote control enables you to both control the video J Your recorder and the television set depending on the vcr/dvd/tv button position. There is a risk that the remote control may not be compatible with the television set depending on the model or also that some functions may not be available. Brand of your TV set: Brand code BRANDT . . . . . . . . . . .001-000-010-020 FERGUSON . .001-003-004-000-010-020 NORDMENDE . . . . . . .
r9-GB3-DAE 12/05/2000 18:39 Page 10 Use Controlling the operation On the display Stop - Tape in stop position - Presence of a tape in the video recorder Pr Au 1-2 Play. Au 3 Accelerated play (forward or backward). Au 4 0 23 SA Pause Variable slow motion (forward or backward). Fast forward. Rewind. Record Pause (flashing). Recording under way. Programmed recording.
r9-GB3-DAE 12/05/2000 18:39 Page 11 Use Viewing a tape view a tape and explore the recordings, to view a still J Toimage and retrieve particular scenes in the accelerated play mode, to rewind to the beginning or wind fast forward to the end of the tape. J Jog & Shuttle (outer ring) (on the front side of the video recorder) To view a channel via the video recorder 1 Switch the television set and the video recorder on. 2 Set the vcr/dvd/tv button to tv, then press the key AV (22).
r9-GB3-DAE 12/05/2000 18:39 Page 12 Use Recording can record the pictures and the sound of the TV J You programmes or the pictures and the sound of the unit connected to one of the available AV sockets. Preparing the recording 1 Load a tape and position it to the desired section where you wish to begin the recording with keys REW., F.FWD., STOP, PLAY (23, 25, 27, 24).
r9-GB3-DAE 12/05/2000 18:39 Page 13 Use NAVICLICK function memorises the TV guide pages listed every J The morning by Teletext or NexTView and therefore enables you to display every channel’s programme on your screen and to programme your recordings for the day with a simple click. Before using NAVICLICK J NAVICLICK functions from the day following the first installation of the video recorder. GB Your video recorder must be on standby at 3 a.m. or 8 a.m.
r9-GB3-DAE 12/05/2000 18:39 Page 14 Use Programming a recording You can programme a recording with the S V programming J numbers indicated in your TV magazine or by means of timer HOW IEW® programming if you don't know these numbers. Your video recorder has 8 programming memories. Thus, you'll be able to programme 8 recordings over a 1-year period. Load a tape and position it to the desired section with keys REW., F.FWD., STOP, PLAY (23, 25, 27, 24).
r9-GB3-DAE 12/05/2000 18:39 Page 15 Use • start time of the programme, • end time of the programme, • the date, if the recording is not to take place on the same day. ð You can complete your record timer by selecting the following options: recording triggered by VPS or PDC signals, daily or weekly repeated recording, recording speed, sub-title recording. 5 Switch off the video recorder to put it into standby mode.
r9-GB3-DAE 12/05/2000 18:39 Page 16 Use Tape library TAPE LIBRARY Tape library enables you to create and manage a J The library of 200 tapes, and to automatically find and play a programme you have recorded yourself. DOC Aventures en Montgol j 004 Return ❙ B Play back title Go to title Edit title Delete title Add title to the library New tape 1 Load the tape. 2 Select New tape in the menu which is displayed then press ok (11).
r9-GB3-DAE 12/05/2000 18:39 Page 17 Use Looking for a recorded programme 1 Eject the cassette which is in the video recorder. 2 Select the Tape library line from the SUMMARY menu. 3a Tape library Tape library enables you to display the programme titles recorded in the memory of the video recorder in alphabetical order.
r9-GB3-DAE 12/05/2000 18:39 Page 18 Use Tape control J The tape control function enables you to erase an index, or to go or return to a particular tape position. Tape control also informs you of the overall length of the tape and remaining time. counter remaining 00h00m30s 1h24m L SP E240 TAPE CONTROLS Return Index search Intro search Clear index Go to counter Go to remaining Cassette type Auto Seq. Memory C❙B --h--m --h--m E240 1 Load a tape, then display the SUMMARY menu with key menu (13).
r9-GB3-DAE 12/05/2000 18:39 Page 19 Use Adjusting the sound video recorder receives and records the digital NICAM sound broadcast by some channels J Your in Europe. This sound remains compatible with the analogue stereo sound system broadcast in the other European countries. Adjusting the sound in Play mode. J L You can modify the sound adjustment when you view a HiFi tape. However, in the case of a mono tape, it is not possible to adjust sound.
r9-GB3-DAE 12/05/2000 18:39 Page 20 Use Adjusting the picture the PICTURE menu, you can adjust the video J Through recorder for a better picture quality, a particular colour system detection or recording. PICTURE Return C ❙ B 4:3... Format S-VHS cassette NTSC TV Copy mode Black & white Standard ❑ ❑ ❑ ❑ Mesecam 1 Display the SUMMARY menu with key menu (13). 2 Select Picture with keys ▲ (7) and ▼ (9), then validate with ok (11).
r9-GB3-DAE 12/05/2000 18:39 Page 21 Use S-VHS cassette If you should wish to read a cassette recorded in a S-VHS format, tick a box with the key ok (11) (þ). NTSC TV J To view a cassette recorded in the NTSC 3.58 format on a NTSC TV connected to AV1. Tick the box on the NTSC TV line with the key ok (11) (þ). Copy mode J 1 2 3 4 To improve the copy mode quality from another video recorder or from a camcorder Select the sockets AV1 or AV2. Press key REC (26).
r9-GB3-DAE 12/05/2000 18:39 Page 22 Use Preference adjustments personalise your video recorder, automate certain J Tofunctions, complete your programming or modify settings. 1 Display the SUMMARY menu with the key menu (13) 2 Select Preferences with key ▼ (9), then validate with ok (11).
r9-GB3-DAE 12/05/2000 18:39 Page 23 Use Subtitle record J Some programmes are available with sub-titles. Press on the button text (6) to display them. It is also possible to record these sub-titles when you are recording a programme. Select Yes at the Subtitle option in the RECORD TIMER menu (see page 14) in order to automatically record them for a given programme.
r9-GB3-DAE 12/05/2000 18:39 Page 24 Use Audio Dubbing Ð Auto Sequence Memory Audio Dubbing J The sound dubbing enables you to replace the recorded sound on the mono track of a VHS tape whilst keeping the recorded sound on the HiFi tracks. A unit connected to the AV1, AV2, AV3, or AV4 sockets, or even a microphone connected to the MICRO socket on the front of the video recorder can provide means of dubbing your recordings.
r9-GB3-DAE 12/05/2000 18:39 Page 25 Use Other functions functions explained on this page enable you to lock J The the video recorder, play or record continuously. Electronic lock J To prevent the video recorder from being used, keys on the front can be locked. 1 Hold down the standby key B (3) on the remote control for 10 seconds and put it in a safe place. 2 Press the standby key B (3) on the remote control to unlock the video recorder.
r9-GB3-DAE 12/05/2000 18:39 Page 26 Use More information remote control is a MULTI brand TV model which is compatible with a large J This number of television sets and video recorders. Select the three-digit code from the charts below which corresponds to the make of your television or another video recorder and refer to the instructions on page 9 before controlling one or the other unit. TV code list BRAND OF YOUR TV SET BRAND CODE AKAI . . . . . . . . . . . . . . . . . . . . . .008-020 AKARI . . .
r9-GB3-DAE 12/05/2000 18:39 Page 27 Use Technical data efforts to improve the quality of our products, we reserve the right to change their features. J InTheourinformation contained in these instructions are therefore liable to change and are not contractual.
cover 12/05/00 18:36 AKAÏ ALBA Page Cov5 SX 1000 333, 550, 555, 666, SAT200, SAT300, SAT400, SAT500 ISR7000 ALDES ALLSAT AMSTRAD 13 01 01-13 02 04 SAT100, SAT200, SAT300, SAT520, SR150, SRD400 SRD 500, SRD510/SRD520, SRD540, SRD545, SRD550 SRD600IRD, SRD600E, SRD650E, SRD700, SRD2000 SRX20016Ch, SRX20048Ch, SRX300, SRX310, SRX320 SRX330, SRX340, SRX345, SRX350, SRX360 03 ARMSTRONG 06 BEST 07 B.
cover 12/05/00 18:36 Page Cov6 THOMSON MULTIMEDIA 46 quai A. Le Gallo 92648 Boulogne Cedex France RCS NANTERRE B 322 019 464 http://www.thomson-multimedia.