
Installation Instructions

10
E N
3 Safety instructions
To ensure electrical safety when performing the installation, follow the applicable European
standards and VDE regulations (e.g. VDE 0855, Part 1).
If you are unsure, ask your specialist dealer.
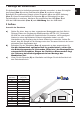
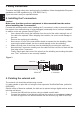
4. Installing the F-connectors
Caution!
Make sure that the receiver equipment is disconnected from the mains
when installing the F-connectors.
Proceed with extreme caution when installing the F-connectors in order to prevent the satel-
lite receiver from malfunctioning or being damaged irretrievably due to incorrect installation.
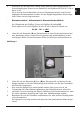
In addition to the text, please consult Figure 3.
> Use a sharp knife to strip the insulation from the end of the cable, leaving 6 mm of
the cable core exposed. When stripping the insulation, be sure to avoid damage to
the core.
> Remove the overlying wire shielding.
> Now remove 10 mm of the outer plastic sheath to expose the wire shielding. When
removing the plastic sheath, be sure to avoid damage to the wire shielding.
> Make sure that none of the wires from the shielding are touching the cable core.
> Now twist the F-connector carefully onto the cable until the core wire is flush with the
front edge of the F-connector.
Finally, check again that none of the wires from the shielding are touching the cable
core. The F connector is now correctly installed.
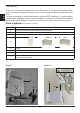
5. Pointing the external unit.
The external unit should be pointed using a meter.
It is also possible to point the unit using the less expensive TechiSat SatFinder (article No.
0000/3045).
Should neither of these be available, the dish can be pointed using a digital receiver and a
television as follows.
1. Connect the LNB with the receiver using a suitable coaxial cable.
2. Connect the receiver to the television and set the receiver to a programme channel
on which a signal from the desired satellite can be received (e.g. ARD for ASTRA).
Screwable
F-connector
20 mm
Wire-free
Wire shielding
Silver foil
6
10
Figure 3