
User manual

The time base for the radio controlled time is a Cesium Atomic Clock operated by the Physikalisch
Technische Bundesanstalt Braunschweig which has a time deviation of less than one second in one
million years. The time is coded and transmitted from Mainflingen near Frankfurt via frequency signal
DCF-77 (77.5 kHz) and has a transmitting range of approximately 1,500 km. Your radio-controlled
Moon Phase Clock receives this signal and converts it to show the precise time in summer or
wintertime. The quality of the reception depends greatly on the geographic location. In normal cases,
there should be no reception problems within a 1500km radius of Frankfurt.
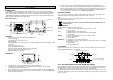
When the time code is received, the DCF tower becomes permanently lit and the time will be
displayed.
If the tower icon flashes, but does not set the time or the DCF tower does not appear at all, then
please take note of the following:
Recommended distance to any interfering sources like computer monitors or TV sets is a
minimum of 1.5 - 2 meters.
Within ferro-concrete rooms (basements, superstructures), the received signal is naturally
weakened. In extreme cases, please place the unit close to a window and/ or point its front or
back towards the Frankfurt transmitter.
During nighttime, the atmospheric disturbances are usually less severe and reception is possible
in most cases. A single daily reception is adequate to keep the accuracy deviation below 1
second.
LCD2- DATE, WEEKDAY, MOON PHASE, SECONDS AND INDOOR TEMPERATURE
Once the DCF time has been received, the date (day and month) , weekday, Moon phase and indoor
temperature will be displayed accordingly.
DATE AND WEEKDAY
The date and weekday will be automatically displayed after the DCF time has been received.
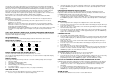
MOON PHASES SYMBOLS:
The Moon Phase Clock will display all 8 Moon phases throughout the year.
New Moon Waxing Crescent First Quarter Waxing Gibbous
Full Moon Waning Gibbous Last Quarter Waning Crescent
INDOOR TEMPERATURE AND SECONDS DISPLAY
The indoor temperature will be displayed and updated every 10 seconds.
The seconds can be displayed when pressing the + key. To return to the indoor temperature display,
press again the + key.
MANUAL SETTING
By pressing and holding the SET key for about 1 second, the following settings can be changed.
1. Time zone setting
2. Language for weekday display setting
3. Time setting (hour and minutes)
4. Calendar setting (year, month, day and weekday)
5. 12 or 24 hour setting
6. Temperature setting in °C (degrees Celsius) or °F (degrees Fahrenheit)
TIME ZONE SETTING
The time zone can be be ajusted between ±12 hours. To change the time zone:
1. Press the + key to set the time zone (default setting 0 hour)
2. Using the SET key to move into the “Language setting” mode. To exit the programming mode,
press the SNOOZE key anytime or wait around 15 seconds to automatically return to normal
display mode.
LANGUAGE FOR WEEKDAY DISPLAY SETTING
The weekday can be shown in seven different languages (D=German, GB=English, F=French,
E=Spanish, I=Italian, NL=Dutch and DK=Danish), and every weekday is shown with 3 letters each
(e.g. MON=Monday=Lundi), except for Dutch (only 2 letters).
1. Press the + key to select the desired language. (default in “D” )
2. Using the SET key to move into the “Time setting” mode. To exit the programming mode, press
the SNOOZE key anytime or wait around 15 seconds to automatically return to normal display
mode.
TIME SETTING
1. After entering into the time setting, the Hour digit in the time section starts flashing
2. Press the + key to set the hours of the current time and then followed by pressing the SET key to
move into the minutes mode.
3. Again, press the + key to set the minutes of the current time (by holding the key down, the digits
are incremented in steps of five).
4. Press the SET key to enter the “Calendar setting” mode or do not touch any buttons for around
15 seconds to confirm the time setting. To exit the programming mode, press the SNOOZE key
anytime. The mode will return to normal.
CALENDAR SETTING
1. The year digit starts flashing (default setting “00”)
2. Press the + key to set the current year, (The range runs from 2000 to 2019, and only last 2 digits
of the year will be displayed. e.g. 2000=00) and then followed by pressing the SET key to move
into the month mode.
3. Again, press the + key to set the current month and then followed by pressing the SET key to
move into the date mode.
4. Press the + key to set the current date and then followed by pressing the SET key to move into
the weekday mode.
5. Once again, press the + key to set the current weekday.
6. Press the SET key to enter the “12/24 hour display setting” mode or do not touch any buttons for
around 15 seconds to confirm the calendar setting. To exit the programming mode, press the
SNOOZE key anytime. The mode will return to normal
12/24 HOUR DISPLAY SETTING
The default time display for the clock is 24 hour, to select 12 hour display:
1. “24” will start flashing on the LCD, press the + key to select “12”
2. Press the SET key to enter the “Celsius or Fahrenheit degree setting” mode or do not touch any
buttons for around 15 seconds to confirm the 12/24 hour display setting. To exit the
programming mode, press the SNOOZE key anytime. The mode will return to normal.
CELSIUS OR FAHRENHEIT DEGREE INDOOR TEMPERATURE SETTING
Following from the 12/24 hour setting mode, the indoor temperature setting display can be changed.
1. “°C” will appear on the LCD (default in “°C”). If “°C” is displayed then the current temperature
reading is set to Celsius. If “°F” is displayed then the current temperature reading is set to
Fahrenheit.
2. To select the temperature setting, simply press the + key.
3. Press SET key to confirm or do not touch any buttons for around 15 seconds or press the
SNOOZE key to exit the programming mode anytime The mode will return to normal.
ALARM SETTING
The maximum alarm duration is 80 seconds. To set the alarm function: