
Operation Manual


7
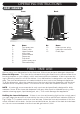
RINSE AID & DETERGENT DISPENSER
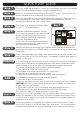
As the rinse aid diminishes, the size of the black dot on the rinse aid level indicator chang-
es, as illustrated below.
Full
3/4 full
1/2 full
1/4 full - recommended to refi ll at this stage
Empty
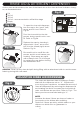
To open the rinse aid dispenser,
turn the cap to the “open” (left)
arrow and lift it out. Refer to
Fig.3a.
Pour the rinse aid into the dis-
penser, being careful not to over-
fi ll. Refer to Fig.3b.
Replace the cap by inserting it
aligned with “open” arrow and
turn it to the closed (right) arrow.
Refer to Fig.3c.
Be careful not to overfi ll the dis-
penser, as this could cause over
sudsing. Wipe away any spills
with a damp cloth. Do not forget
to replace the cap before closing
the dishwasher door.
Attention: Clean up any rinse aid spill during fi lling with an absorbent cloth to avoid excess
foaming during the next wash.
Fig.2
A
B
C
Rinse aid
indicator
Fig.3a
Fig.3b
Fig.3c
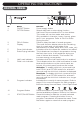
Fig.4
The rinse aid dispenser has six settings. Always
start with the dispenser set on “4”. If spots and
poor drying are a problem, increase the amount of
rinse aid dispensed by removing the dispenser lid
and rotating the dial to increase the rinse aid indi-
cator until dishes are spot-free. Refer to Fig.4. The
factory and recommended setting is “4”.
NOTE:
Increase the dose if there are drops of water or
lime spots on the dishes after washing.
Reduce it if there are sticky whitish stains on your
dishes or a bluish fi lm on glassware or
cutlery.
ADJUSTING RINSE AID DISPENSER