==!"§==Com= T-Home X 300T Bedienungsanleitung
Sicherheitshinweise Beachten Sie die folgenden Hinweise, um sich vor körperlichen Schäden zu bewahren: Niemals das Gerät selbst öffnen. Steckkontakte nicht mit spitzen und metallischen Gegenständen berühren. Verlegen Sie die Leitungen und Kabel so, dass niemand darauf treten oder darüber stolpern kann. Das Gerät nur an Stromsteckdosen anschließen, die den im Typenschild angegebenen Werten entsprechen.
Die Fernbedienung im Überblick Modusanzeige TV: Leuchtet, wenn TV gesteuert wird STB: Leuchtet, wenn Media Receiver gesteuert wird - Direktwahl einzelner Kanäle (im TV-Modus) Direktwahl einzelner Kanäle/Ausfüllen von Eingabefeldern mittels SMS-Eingabe (im STB-Modus) Löscht eine Eingabe (im STB-Modus) Wechselt den AV-Kanal oder zu externen Geräten (im TV-Modus) Bestätigt eine Eingabe (im STB-Modus) Ermöglicht Eingabe zweistelliger Kanäle (im TV-Modus) Zeigt zur laufenden Sendung die entsprechenden Informa
Inhaltsverzeichnis Willkommen 3 Media Receiver in Betrieb nehmen 5 Vorbereitung und Überblick. . . . . . . . . . . . . . . . . . . . . . . . . . . . . . . . . . . . . . . . . . . . . . . . . . . .5 Verpackungsinhalt überprüfen . . . . . . . . . . . . . . . . . . . . . . . . . . . . . . . . . . . . . . . . . . . . . . . . .5 Aufstellungs- und Betriebsort . . . . . . . . . . . . . . . . . . . . . . . . . . . . . . . . . . . . . . . . . . . . . . . . . .5 Die Vorderseite im Überblick . . . . . . . . . . .
T-Home bedienen . . . . . . . . . . . . . . . . . . . . . . . . . . . . . . . . . . . . . . . . . . . . . . . . . . . . . . . . . . 22 Starten von T-Home. . . . . . . . . . . . . . . . . . . . . . . . . . . . . . . . . . . . . . . . . . . . . . . . . . . . . . . . . 22 So navigieren Sie sich durch das Menü. . . . . . . . . . . . . . . . . . . . . . . . . . . . . . . . . . . . . . . . 22 Beenden von T-Home . . . . . . . . . . . . . . . . . . . . . . . . . . . . . . . . . . . . . . . . . . . . . . . . . . . .
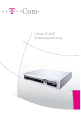
Willkommen Willkommen Einige Worte zu Ihrem Media Receiver T-Home X 300T Vielen Dank, dass Sie sich für ein Produkt von T-Com entschieden haben. Mit dem T-Home Media Receiver können Sie Internet-Fernsehen (IP-TV) und netzbasiertes Video-on-Demand empfangen und über Ihre vorhandene Fernsehausstattung ansehen. Der Media Receiver unterstützt den HDTV-Standard („HD ready“), so dass Sie mit einem geeigneten Fernseher in den Genuss aller Vorzüge dieser neuen, innovativen Technologie kommen.
Willkommen Verwendete Warn- und Hinweissymbole Diese Bedienungsanleitung enthält an zahlreichen Stellen wichtige Warnungen und nützliche Hinweise. Diese Warnungen und Hinweise sind je nach Art und Bedeutung mit drei verschiedenen Symbolen gekennzeichnet: Hinweise mit dem Warnsymbol müssen Sie unbedingt beachten und befolgen! ! ! Andernfalls droht Personen- oder Sachschaden! Hinweise mit dem einfachen Ausrufezeichen sollten Sie beachten und befolgen. So vermeiden Sie Störungen.
Media Receiver in Betrieb nehmen Media Receiver in Betrieb nehmen Vorbereitung und Überblick Dieses Kapitel gibt Ihnen zunächst einen kurzen Überblick über Ihren Media Receiver. In den darauf folgenden Abschnitten begleitet es Sie Schritt für Schritt bei der Inbetriebnahme des Geräts und dem Anschluss Ihrer Video- und Audiogeräte. Verpackungsinhalt überprüfen Für die reibungslose Installation des Geräts ist es wichtig, dass alle Zubehörteile vorliegen.
Media Receiver in Betrieb nehmen Die Vorderseite im Überblick 13 1 12 14 15 16 1. Ein/Standby – Mit dieser Taste schalten Sie das Gerät ein. Drücken Sie ein weiteres Mal, um den Media Receiver in den Ruhezustand („Standby-Modus“) zu versetzen. 2. Back – Mit dieser Taste springen Sie im T-Home Menü eine Ebene zurück. 3. Pfeiltasten – Mit den Pfeiltasten hoch/runter rufen Sie die Vorschau der Sender auf und bewegen sich durch die Fernsehkanäle.
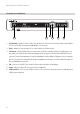
Media Receiver in Betrieb nehmen Die Rückseite im Überblick 7 8 9 12 10 11 13 15 14 16 6 17 18 19 7. HDMI-Anschluss – Schließen Sie hier Ihr HDTV-fähiges Fernsehgerät an. 8. Netzwerk-Anschluss (LAN) – Schließen Sie hier den Media Receiver über die entsprechenden Geräte (z.B. einen Router) an das Internet an. 9. SCART-Eingang – Schließen Sie hier ein Home-Entertainment-Gerät an (DVD-Player, Videorekorder oder ähnliches).
Media Receiver in Betrieb nehmen Installieren und einschalten Die Installation im Überblick Die folgende Abbildung zeigt eine typische Einrichtungssituation: ;M;¥GdYq]j ;M9¥K¥8fl]ff]Ü ©Zall]ÜZ]Y[`l]fÜJa]Ü\]fÜ ?afo]akÜYm^ÜJ]al]Ü~ª Ma\]gj]cgj\]j F;
Media Receiver in Betrieb nehmen ! Bei kopiergeschützten Video-on-Demand-Filmen kann eine verminderte Darstellungsqualität auftreten, wenn der Media Receiver nicht direkt an den Fernseher angeschlossen ist. Schließen Sie Ihren Fernseher deshalb direkt an den Media Receiver an, und nicht etwa durch einen DVD- oder Videorekorder hindurch. ■ Verbinden Sie den Media Receiver und Ihren Router durch das mitgelieferte Netzwerk-Verbindungskabel.
Media Receiver in Betrieb nehmen 3. Schalten Sie Ihr TV-Gerät ein. 4. Wählen Sie auf Ihrem TV-Gerät den richtigen externen Kanal (T-Home kann auf verschiedenen Kanälen erscheinen – je nachdem, über welchen Anschluss Sie den Media Receiver an Ihr TV-Gerät angeschlossen haben). 5. Warten Sie, bis auf Ihrem TV-Gerät der Startbildschirm erscheint. ! Zur Nutzung des T-Home Entertainmentangebots muss eine Internetverbindung bestehen.
Media Receiver in Betrieb nehmen Netzwerk-Anschluss (LAN) verwenden Ihr Media Receiver erhält mit dem Netzwerk-Anschluss (LAN) Zugang zum Internet-Fernsehen (IP-TV). Um sicherzustellen, dass der Media Receiver richtig mit Ihrem Router verbunden ist, beachten Sie die folgenden Hinweise. Wo befindet sich der Anschluss? Den Netzwerk-Anschluss (LAN) finden Sie auf der Rückseite des Media Receivers, links von den SCART-Buchsen.
Media Receiver in Betrieb nehmen HDMI-Anschluss verwenden HDMI („High-Definition Multimedia Interface“) ist eine neu entwickelte digitale Schnittstelle, die an einem einzelnen Anschluss Audio in Digital-Qualität gewährleistet und aktuell eine Videoauflösung bis 1080i ermöglicht. Wenn Sie ein HDMI-kompatibles Gerät besitzen, so können Sie bereits die Vorzüge dieser innovativen Technologie genießen.
Media Receiver in Betrieb nehmen SCART-Anschlüsse verwenden Die SCART-Anschlüsse ermöglichen Ihnen, Peripheriegeräte (z.B. DVD-Player und Videorekorder) über den Media Receiver an Ihren Fernseher anzuschließen. Der SCART-Standard bietet optimale analoge Audio- und Videoqualität, wobei sowohl Audio- als auch Videosignale über denselben Anschluss transportiert werden. Wo befinden sich die Anschlüsse? Sie finden die beiden SCART-Anschlüsse auf der Rückseite des Media Receivers.
Media Receiver in Betrieb nehmen Composite-Video-Anschluss verwenden Composite-Video ist ein Standardformat für Video-Ausgabe. Composite-Video übermittelt ausschließlich Videosignale. Wenn Sie zusätzlich zu diesen Videosignalen auch den passenden Ton hören möchten, müssen Sie an einen der Audio-Ausgänge des Media Receivers einen Fernseher, einen Verstärker oder eine HiFiAnlage anschließen. Weitere Informationen zum Anschluss digitaler Audiogeräte finden Sie auf Seite 16.
Media Receiver in Betrieb nehmen S-Video-Anschluss verwenden S-Video ist ein Standardformat für Video-Ausgabe. S-Video überträgt ausschließlich Videosignale. Wenn Sie zusätzlich zu diesen Videosignalen auch den passenden Ton hören möchten, müssen Sie an einen der AudioAusgänge des Media Receivers einen Fernseher, einen Verstärker oder eine HiFi-Anlage anschließen. Weitere Informationen zum Anschluss digitaler Audiogeräte finden Sie auf Seite 16.
Media Receiver in Betrieb nehmen Digitale Audio-Anschlüsse verwenden Für höchste Audioqualität kann der Media Receiver einfach an jede digitale HiFi-Anlage, jeden digitalen Verstärker oder an vergleichbare Geräte angeschlossen werden. Der Anschluss erfolgt entweder über Koaxialkabel oder über eine optische Verbindung. Wo befinden sich die Anschlüsse? Sie finden die digitalen Audio-Ausgänge (koaxial und optisch) auf der Rückseite des Media Receivers, zentral neben dem USB-Anschluss.
Media Receiver in Betrieb nehmen DVB-T-Anschlüsse verwenden Wo befinden sich die Anschlüsse? Sie finden vier DVB-T-Anschlüsse für Digital-Fernsehen auf der Rückseite des Media Receivers (rechts vom USB-Eingang). Vergleichen Sie mit der Abbildung unten. ;M9¥K¥8fl]ff] 8fl]ff]fcYZ]d Na[`la_ÜM]jZaf\]fÜJa]Ü
Media Receiver in Betrieb nehmen USB-Anschlüsse verwenden Der Media Receiver verfügt über zwei USB-Schnittstellen, die z.B. zum Anschluss von externen USB-Geräten vorbereitet sind. Sie können Ihr USB-Gerät wahlweise an den USB-Eingang auf der Vorderseite oder den auf der Rückseite anschließen. ! Bitte beachten Sie, dass die Betriebssoftware des Geräts derzeit noch keine Unterstützung für externe USB-Geräte aufweist. Die USB-Unterstützung wird laufend ergänzt und verbessert.
Media Receiver bedienen Media Receiver bedienen Die Fernbedienung Dieses Kapitel beschreibt die Arbeitsweise der Fernbedienung in Verbindung mit Menüs und Eingaben. Die hier beschriebenen Vorgehensweisen werden im Verlauf dieser Anleitung nicht mehr in dieser detaillierten Form erläutert. Ausrichten der Fernbedienung Die Fernbedienung sendet Infrarotsignale zum Media Receiver. Der Empfangssensor für diese Signale befindet sich an der Vorderseite des Media Receivers.
Media Receiver bedienen 1. Schalten Sie den Fernseher ein. 2. Drücken Sie die Taste auf der Fernbedienung mindestens zwei Sekunden lang, bis die Kontroll- leuchte „TV“ oben an der Fernbedienung zweimal aufleuchtet. 3. Geben Sie innerhalb von zehn Sekunden die Ziffern „0 0 1“ ein (die Kontrollleuchte „TV“ blinkt zur Bestätigung zweimal). 4. Richten Sie die Fernbedienung auf Ihren Fernseher. Halten Sie die Taste auf der Fernbedienung so lange gedrückt, bis sich Ihr Fernseher ausschaltet.
Media Receiver bedienen 5. Falls sich Ihr Fernseher daraufhin ausschaltet, schalten Sie ihn wieder ein und überprüfen Sie, ob auch die anderen Funktionstasten der Fernbedienung funktionieren. Wenn auch die anderen Tasten funktionieren, haben Sie die Synchronisation erfolgreich abgeschlossen. 6. Falls der Fernseher sich jetzt nicht ausschaltet oder bestimmte Funktionstasten nicht funktionieren, wiederholen Sie die Prozedur ab Schritt 2.
Media Receiver bedienen T-Home bedienen Starten von T-Home 1. Vergewissern Sie sich, dass Ihr Media Receiver und Ihr Fernseher eingeschaltet sind. 2. Drücken Sie die Taste , und wechseln Sie in den TV-Modus. Wenn die Fernbedienung des Media Receivers nicht mit Ihrem Fernseher synchronisiert ist, können Sie für die Einstellung des AV-Kanals auch die Fernbedienung Ihres Fernsehers benutzen. 3.
Media Receiver bedienen 4. Mit der Taste bestätigen Sie die Auswahl des markierten Punktes oder die Daten in einem Eingabe- feld. Mit der Taste springen Sie zum jeweils zuletzt genutzten Menüpunkt zurück. Tipp Beenden von T-Home Drücken Sie , um das Hauptmenü wieder zu verlassen. Es erscheint das Live-Bild Ihres derzeit eingestell- ten Fernsehkanals. Mit schalten Sie den Media Receiver in den Energiesparmodus. Im Energiespar- modus leuchtet außen am Gerät die LED-Anzeige.
Anhang Anhang Gewährleistung Der Händler, bei dem das Gerät erworben wurde (T-Com oder Fachhändler), leistet für Material und Herstellung des Media Receivers eine Gewährleistung von 2 Jahren ab der Übergabe. Dem Käufer steht im Mangelfall zunächst nur das Recht auf Nacherfüllung zu. Die Nacherfüllung beinhaltet entweder die Nachbesserung oder die Lieferung eines Ersatzproduktes. Ausgetauschte Geräte oder Teile gehen in das Eigentum des Fachhändlers über.
Anhang Störungen und Selbsthilfe bei der Fehlersuche Wenn Ihr Gerät sich einmal nicht wie gewünscht verhält, versuchen Sie zunächst, sich mit Hilfe der folgenden Tabelle selbst zu helfen. Problem Mögliche Ursache Es leuchtet keine LED-Anzeige Das Netzkabel ist nicht richtig auf der Vorderseite, kein Netzan- eingesteckt. Abhilfe Stecken Sie das Kabel richtig ein. schluss. Es erscheint keine Anzeige auf Das Gerät ist im Standby- dem Fernseher bzw. Monitor. Modus. Schalten Sie das Gerät ein.
Anhang Besteht das Problem weiterhin, steht Ihnen der Technische Kundendienst von T-Com zur Verfügung (siehe folgender Abschnitt). Technischer Kundendienst Bei technischen Problemen mit Ihrem Media Receiver können Sie sich während der üblichen Geschäftszeiten an die Hotline 0180 5 373 750 wenden. Der Verbindungspreis beträgt 0,12 EUR pro angefangene 60 Sekunden bei einem Anruf aus dem T-Com Festnetz (Stand 04/2006). Bei einem Anruf an die Hotline halten Sie bitte die Seriennummer Ihres Gerätes bereit.
Anhang Die Konformitätserklärung kann unter folgender Adresse eingesehen werden: Deutsche Telekom AG T-Com Zentrale CE-Management Postfach 12 27 48542 Steinfurt Rücknahme von alten Geräten Hat Ihr Media Receiver ausgedient, bringen Sie das Altgerät zur Sammelstelle Ihres kommunalen Entsorgungsträgers (z.B. Wertstoffhof). Das nebenstehende Symbol bedeutet, dass das Altgerät getrennt vom Hausmüll zu entsorgen ist.
Anhang Ihr Händler (T-Com oder Fachhändler) nimmt verbrauchte Gerätebatterien in haushaltsüblichen Mengen in seinem Ladengeschäft kostenfrei zurück und kümmert sich um die umweltgerechte Entsorgung bzw. das Recycling der Materialien. Sollte Ihr Händler nicht in Ihrer Nähe sein, können Sie die verbrauchten Batterien auch zu Ihrem kommunalen Entsorgungsträger (z.B. Batterietonne oder Wertstoffhof) bringen. Diese Stelle ist ebenfalls zur kostenlosen Rücknahme verpflichtet.
Anhang CVBS 1 x RCA USB 2 x USB 2.0 DVB-T 2 x DVB-T Digital Terrestrial TV Tuner Allgemeine Daten Eingangsspannung AC 230 V, 50/60 Hz Schutz getrennte interne Sicherung und Überspannungsschutz Stromverbrauch max.
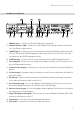
Anhang Hersteller-Codes für Fernbedienung Hersteller Codes A Hersteller Codes ARCON 638 342 409 ACCENT 170 ARISTONA ACTION 297 314 409 587 655 679 ARTHUR-MARTIN 100 ADMIRAL 110 112 127 170 201 301 352 409 518 522 633 ADVENTURA 187 ADYSON 222 305 314 409 AGAZI 301 AGB 219 AIKO 170 AKAI 100 116 170 312 409 AKIBA AKURA 105 120 187 314 413 106 139 196 374 565 110 162 226 375 588 114 164 244 406 655 162 104 126 162 170 261 301 409 ASA Hersteller 272 284 286 290 353 357 518 522
Anhang CYBERTRON 222 ELECTROBRAND 187 CARREFOUR 353 409 CCI 532 CENTURION 409 D CENTURY 229 518 522 DAEWOO CGE 105 118 170 229 281 282 350 353 369 633 DAICHI 170 ELEKTRONIKA 266 406 409 CGM 160 170 DAINICHI 162 ELEMIS 263 CIATE 518 DANSAI 314 ELIN CIE 170 173 230 531 DAVIS 406 100 170 272 284 409 483 CIHAN 404 DAWA 409 ELITE 129 162 283 297 312 314 409 549 555 CIMLINE 170 601 DAYTRON 170 314 548 CIRCUIT CITY 110 187 196 312 314 DCE 410 CITIZEN 297 314 409 5
Anhang FIRST LINE 131 137 170 222 229 409 602 FISCHER 647 FISHER 131 176 222 261 272 306 307 312 348 519 522 548 549 627 651 GOLDY 624 HILINE 170 GOODMANS 170 173 179 184 222 292 313 364 404 409 411 413 465 483 565 635 HINARI 100 162 170 312 313 409 483 HISAWA 162 HIT 518 HITACHI 100 123 150 187 314 409 438 548 569 574 579 584 589 623 GORENJE 261 263 FLINT 409 GPM 162 170 FORCE 536 618 GRADIN 129 162 170 409 FORMENTI 129 148 156 226 353 406 408 409 422 431 522 GRAETZ 100 10
Anhang INTERDISCOUNT 406 679 687 693 INTERFUNK 100 141 229 342 426 523 110 149 261 359 430 633 120 151 262 404 516 679 131 153 278 406 518 139 154 279 409 522 KENNEDY 112 270 664 KENWOOD 314 KIOTA 170 KLH 110 187 196 312 314 655 LUXOR 100 117 130 290 380 490 668 106 120 133 352 387 655 KLOSS 297 LUXOR SALORA 100 136 138 162 222 229 230 261 301 305 622 646 KNEISSEL 268 528 LUXOR/SKANTIC 100 106 KOBIC 170 LXI IRRADIO 162 170 230 347 352 353 356 409 KOLSTER 409 646 KONICHI 170
Anhang MERCURY 170 NESCO 231 ORBITECH 440 MERRIT 100 NEW WORLD 162 ORBITER 261 METEOR 649 NEWTECH 170 409 ORIENT 170 METZ 244 250 409 520 NIKKAI 162 301 314 409 555 655 ORION 110 170 318 406 460 667 MGA 196 MIDLAND 314 MINERVA MINOKA MITSUBISHI MIVAR 245 252 411 522 246 396 466 525 248 249 397 398 516 518 637 244 245 246 249 345 353 NOBLEX 170 176 NOBLIKO 226 347 350 356 646 OSAKI 162 655 232 672 679 OSO 162 100 110 119 131 149 170 359 377 382 388 548 101 111 120
Anhang PENNEY 297 314 348 555 PROVISION 476 PERFEKT 409 PRO-VISION 483 PERFORMANCE 187 312 319 PULSER 170 297 314 409 587 655 679 PYE 406 409 PYMI 170 PERSHIN 347 PHILCO 118 137 149 170 229 262 281 312 350 353 409 518 522 587 633 PHILEX 426 Q PHILHARMONIC 222 PHILIPS 187 356 407 417 432 450 460 587 QTY1 249 370 409 419 439 452 473 655 270 373 413 420 442 453 483 693 312 404 414 430 443 454 502 PHILIPS ITV 404 PHILLIPS 406 PHOENIX 129 409 416 522 342 406 415 431 446 459 522
Anhang SASO 679 SILMA 409 SYLVANIA SATTELITE 381 SILVA 170 SYMPHONIC 110 187 196 312 314 SBR 342 409 SILVA SCHNEIDER 410 448 456 465 478 483 SYNODYNE 413 SILVER 162 312 T SINGER 141 170 229 409 518 522 646 671 TADISTAR 483 TALENT 246 SCHAUB LORENZ 106 139 SCHNEIDER 100 162 270 349 407 422 455 489 112 170 292 350 409 432 469 495 SCHNEIDER/COMPOUTE 131 222 301 368 410 434 478 496 141 230 342 404 412 438 483 497 161 268 348 406 417 441 485 SINODYNE 458 SINOTEC 483 SINUDYNE
Anhang TELETON 110 139 143 222 270 664 TELEVIDEON 129 TELEVISO 671 TELIVA 679 TEMPEST 170 TENSAI 129 137 162 170 222 226 272 284 406 409 483 602 636 646 TENSON 170 TREVI 170 TRIAD 406 TRIAX 487 TRIDENT 222 TRILUX 263 267 406 409 413 TRISTAR 162 TRIUMPH 353 531 TRIVISION 170 404 471 632 TESLA ORAVA 409 UHER TEVION 565 129 188 270 348 353 409 426 646 664 TEXET 222 ULTRA 655 THOMAS 170 187 297 314 409 587 655 679 THOMSON THORN 110 363 403 680 693 100 150 246 312 35
Anhang Rechtliche Hinweise MP3 MPEG Layer-3 Audio-Dekodierungstechnologie unter Lizenz von Fraunhofer IIS und Thomson.
Stichwortverzeichnis A C Akkus. . . . . . . . . . . . . . . . . . . . . . . . . . . . . . 9 CE-Zeichen . . . . . . . . . . . . . . . . . . . . . . . 26 Altgeräte . . . . . . . . . . . . . . . . . . . . . . . . . .27 Composite-Video-Ausgang . . . . . . .7, 14 Anhang . . . . . . . . . . . . . . . . . . . . . . . . . . .24 Anschluss an TV mit HDMI . . . . . . . . . .12 Anschluss an TV mit SCART. . . . . . . . .13 Anschlussbuchsen . . . . . . . . . . . . . . . . .28 Anschlüsse – Composite-Video. . . . . .
H M Hauptmenü. . . . . . . . . . . . . . . . . . . . . . . .22 Media Receiver bedienen . . . . . . . . . . 19 HDMI-Anschluss . . . . . . . . . . . . . . . . 7, 12 Media Receiver zurücksetzen . . . . . . . 21 HDMI-Anschlusskabel . . . . . . . . . . . . . . . 5 Menu-Taste . . . . . . . . . . . . . . . . . . . . . . . 22 HDTV-Standard . . . . . . . . . . . . . . . . . . . . . 3 MP3. . . . . . . . . . . . . . . . . . . . . . . . . . . . . . 38 Hersteller-Codes . . . . . . . . . . . . . . .
S U Sachschaden . . . . . . . . . . . . . . . . . . . . . . . 4 Umgebungsbedingungen . . . . . . . . . . . 5 SCART-Anschlüsse . . . . . . . . . . . . . . . . .13 USB-Anschlüsse. . . . . . . . . . . . . . . . .6, 18 SCART-Anschlusskabel . . . . . . . . . . . . . . 5 USB-Geräte . . . . . . . . . . . . . . . . . . . . . . . 18 SCART-Ausgang . . . . . . . . . . . . . . . . . . . .7 SCART-Eingang. . . . . . . . . . . . . . . . . . . . . 7 Schnellstart-Anleitung . . . . . . . . . . . .
Herausgeber: Deutsche Telekom AG T-Com Zentrale Postfach 20 00 53105 Bonn Stand: Februar 2008