
User Manual

English 16
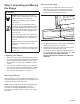
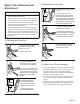
Low Back Installation
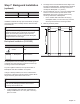
1. Remove the (3) Torx stainless screws in the front face
of the included Zero Clearance Trim.
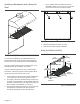
2. Remove the (4) drill point screws securing the trim to
the side panels, and the (3) drill point screws securing
the piece to the back panel. Lift up to fully remove.
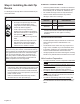
3. Align the back panel of the new accessory with the
flanges on the range side panels right and left rear
corners. The backguard is inserted inside the guide
channels on the back of the range (Figure 16).
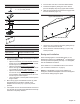
4. Make sure the backguard’s front face is outside the
flange on the front side of the range.
5. Re-install screws removed in Steps 1 and 2.
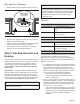
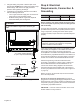
Low Back Parts Included
1 – Low Back panel
8 – T-20 Torx stainless screws
8 – T-20 Torx drill point screws
1 – Installation Guide
Tools Needed
T-20 Torx head screwdriver or drill
Protective Work Gloves
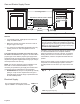
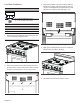
Figure 14: Zero Clearance Trim Front Face Screw Removal
Figure 15: Zero Clearance Trim Rear Screw Removal
Figure 16: Backguard Installation
Figure 17: Low Back Front View