
Installation guide

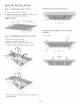


Step
5:
INSTALLATION
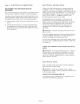
The
hood
is
particularly
suitable
for
installation
in
a
flue
or
chimney.
To
ensure
optimum
extraction
performance
(especially
important
for
kitchen
island
solutions):
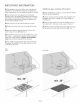
Q)
install
the
hood
as
high
as
possible
within
the
structure
Q1
The
structure
must
cover
the
entire
cooking
area.
rN
CAUTION
—
Ensure
that
the
minimum
distance
between
the
cooktop
and
the
hood
is
maintained
—
30”.
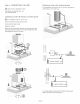
1.
Make
sure
all
connections
(ductwork,
blower,
remote
control,
power
supply)
are
complete.
2.
Remove
the
filter
grill
(see
operating
instructions).
3.
Push
the
hood
up
into
the
installation
opening
until
the
installation
aid
locks
into
position
at
the
front
and
rear.
4.
Mount
the
hood.
Note:
The
screws
must
be
consis-
tently
and
diametrically
tightened.
Note:
If
hood
must
be
removed,
unlock
the
mounting
aids
by
pushing
them
inward.
Step
6:
VERIFY
INSTALLATION,
OPERATION
AND
COOKTOP
ALIGNMENT
Before
performing
this
procedure,
verify
that
all
packing
materials
were
removed
and
that
the
grease
filters
have
been
properly
installed.
Refer
to
the
Care
and
Use
Manual
for
instructions
regarding
filter
installation.
A.
Turn
the
blower
ON
by
selecting
each
of
the
three
speeds
in
turn.
Let
the
blower
run
several
minutes
at
each
speed
to
check
its
operation.
B.
With
the
blower
on
HIGH,
close
the
windows
and
doors
to
the
area
to
ensure
that
fan
does
not
cause
backdrafting
in
any
outlet
vent
for
another
appliance.
C.
Turn
the
light
on
and
off.
D.
Press
the
DELAY
SHUT-OFF
button.
Wait
10
minutes
to
see
if
the
hood
switches
off.
if
the
vent
system
does
not
operate
satisfactorily
during
any
of
the
above
procedures,
review
all
steps
in
these
installation
instructions
to
ensure
that
nothing
has
been
omitted
or
overlooked.
Also
refer
to
the
Care
&
Use
Manual
for
additional
information,
or
call
Thermador
Customer
Support
at
1-800-735-4328.
PAGE
8