
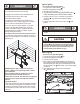
Dimensions


Pa ge 10
General Grill Cleaning
• Do not mistake brown or black accumulation of grease and
smoke for paint. Interiors of gas grills are not painted at the
factory (and should never be painted). Apply a strong solution
of detergent and water or use a grill cleaner with scrub brush on
insides of grill lid and bottom. Rinse and allow to completely air
dry. Do not apply a caustic grill/oven cleaner to painted
surfaces.
• Plastic parts: Wash with warm soapy water and wipe dry.
• Do not use citrisol, abrasive cleaners, degreasers or a
concentrated grill cleaner on plastic parts. Damage to and
failure of parts can result.
• Porcelain surfaces: Because of glass-like composition, most
residue can be wiped away with baking soda/water solution or
specially formulated cleaner. Use nonabrasive scouring
powder for stubborn stains.
• Painted surfaces: Wash with mild detergent or nonabrasive
cleaner and warm soapy water. Wipe dry with a soft
nonabrasive cloth.
• Stainless steel surfaces: To maintain your grill’s high quality
appearance, wash with mild detergent and warm soapy water
and wipe dry with a soft cloth after each use. Baked-on
grease deposits may require the use of an abrasive plastic
cleaning pad. Use only in direction of brushed finish to avoid
damage. Do not use abrasive pad on areas with graphics.
• Cooking surfaces: If a bristle brush is used to clean any of
the grill cooking surfaces, ensure no loose bristles remain on
cooking surfaces prior to grilling. It is NOT recommended to
clean cooking surfaces while grill is hot.
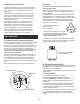
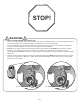
SPIDER ALERT!
CAUTION
INSIDE BURNER
SPIDER AND WEBS
If your grill is getting hard to light or the flame is weak,
check and clean the venturis and burners.
Spiders or small insects are known to create “flashback”
problems by building nests and laying eggs in the grill’s
venturi or burner, obstructing the flow of gas. The back-
up gas can ignite behind the control panel. This
flashback can damage your grill and cause injury. To
prevent flashbacks and ensure good performance the
burner and venturi tube assembly should be removed
and cleaned when ever the grill has been idle for an
extended period of time.
Your burner might be different
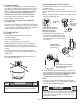
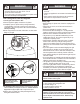
Cleaning the Burner Assembly
Follow these instructions to clean and/or replace parts of
burner assembly or if you have trouble igniting grill.
1. Turn gas OFF at control knobs and LP cylinder.
2. Remove cooking grates and heat tent.
3. Under grill remove grease cup, disconnect ignitor wire from
burner.
4. Inside grill remove burner assembly (A), clean ceramic
portion of electrode with rubbing alcohol and a swab.
5. Clean outside of burner with soap and water. Lay burner
upside down on flat surface, insert garden hose to force
water through tubes. Make sure water comes out of all
burner holes. Open clogged holes with a thin wire. Shake
out excess water and examine holes. Check that the
burners are not damaged. Because of normal wear and
corrosion some holes may have enlarged. If you notice
large cracks or large holes, replace the burner.
6. If grill is to be stored, coat burner lightly with cooking oil.
Wrap in protective cover to keep insects out.
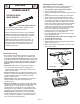
7. If not storing grill after cleaning, replace burner into grill
bottom. See illustration (B).
VERY IMPORTANT: Burner tubes must re-engage valve
openings. See illustration (A).
8. Reattach ignitor wire to electrode.
9. Reposition heat tent and cooking grate. Reattach clean
grease cup to grease clip.
10. Before cooking again on grill, perform a “Leak Test” and
“Burner Flame Check”.
A
Valve
Correct burner-to-valve engagement
Burner Tube
B