Model 28165 DECT 6.0 2-Line, Cordless Handset Speakerphone/ Answering System User’s Guide Need new artwork from packaging!! (To be supplied by packaging dept.
Equipment Approval Information Your telephone equipment is approved for connection to the Public Switched Telephone Network and is in compliance with parts 15 and 68, FCC Rules and Regulations and the Technical Requirements for Telephone Terminal Equipment published by ACTA. 1 Notification to the Local Telephone Company On the bottom of this equipment is a label indicating, among other information, the US number and Ringer Equivalence Number (REN) for the equipment.
Interference Information This device complies with Part 15 of the FCC Rules. Operation is subject to the following two conditions: (1) This device may not cause harmful interference; and (2) This device must accept any interference received, including interference that may cause undesired operation. This equipment has been tested and found to comply with the limits for a Class B digital device, pursuant to Part 15 of the FCC Rules.
FCC RF Radiation Exposure Statement This equipment complies with FCC RF radiation exposure limits set forth for an uncontrolled environment. This equipment should be installed and operated with a minimum distance of 20 centimeters between the radiator and your body. This transmitter must not be co-located or operated in conjunction with any other antenna or transmitter.
Table of Contents TO BE UPDATED!!!!
Table of Contents
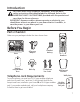
Introduction CAUTION: When using telephone equipment, there are basic safety instructions that should always be followed. Refer to the IMPORTANT SAFETY INSTRUCTIONS provided with this product and save them for future reference. IMPORTANT: Because cordless phones operate on electricity, you should have at least one phone in your home that isn’t cordless, in case the power in your home goes out. Before You Begin Parts Checklist Make sure your package includes the items shown here.
Installation Digital Security System Your cordless phone uses a digital security system to protect against false ringing, unauthorized access, and charges to your phone line. INSTALLATION NOTE: Some cordless telephones operate at frequencies that may cause or receive interference with nearby TVs, microwave ovens, and VCRs. To minimize or prevent such interference, the base of the cordless telephone should not be placed near or on top of a TV, microwave ovens, or VCR.
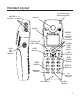
Handset Layout VOLUME 5/6 (volume +/- button) Visual message waiting indicator earpiece display CID/VOL 5/6 (caller ID/ volume +/- button) Soft Key Left (SKL) button PUSH TO TALK (button) Soft Key Right (SKR) button LINE 1 (button) LINE 2 (button) END/ CANCEL (button) *TONE (button) #PAUSE (button) handsfree (button) int (intercom button) microphone redial (button)
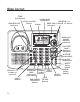
Base Layout *TONE (tone button) Soft Key Right (SKR) button Soft Key Left (SKL) CALLER ID 5/6 button VOICE MAIL (caller ID +/- button) CHARGE IN USE display (indicator) (indicator) Mailbox 1/2 ON-OFF (buttons/ indicators) PLAY/STOP 1 and 2 (buttons/ indicators) 7 REPEAT (repeat button) 8 SKIP (skip button) VOLUME 5/6 (volume +/buttons) LINE 1 (button) 10 INTERCOM/ PAGE (intercom/ page button) REDIAL (redial button) END-CANCEL (end/cancel button) LINE 2 (button) PUSH TO TALK (button) #PAUSE (button)
Installing the Phone Installing the Handset Battery NOTE: You must connect the handset battery before using the cordless handsets. CAUTION: To reduce the risk of fire or personal injury, use only the Thomson Inc. appoved Nickel Metal Hydride (Ni-MH) battery model 5-2721, which is compatible with this unit. 1. Locate battery and battery door which are packaged together inside a plastic bag and are separate from the handset. 2. Locate the battery compartment on the back of the handset. 3.
Installing the Base Station Installing the Backup Batteries on Base Unit To avoid power outage, you can install (four) AAA batteries (not included in sales) into the base as the backup. 1. Remove the battery compartment cover (located on the bottom of the base). 2. Follow the battery installation display and insert (four) AAA batteries inside the compartment. 3. Put the battery compartment cover back into place. Connecting the Base Station 1.
Wall Mounting the Base 1. Turn the base over. 2. Slide the pedestal into the slots on the bottom of the base, and then push the pedestal down until it snaps into place. 3. Slip the mounting holes on the pedestal over the wall plate posts and firmly slide the unit into place. (Wall plate not included.) Base Speakerphone Set Up NOTE: Changing menu settings on the base will only change the settings on the base and changing menu settings on the handset will only change settings on the handset.
9. Press the 5 or 6buttons to select ON or OFF. 10. Press the SELECT Soft Key Left (SKL) to confirm. The corresponding PLAY/STOP indicator/button illuminates. NOTE: The base displays ANS 1OFF/2OFF and the corresponding PLAY/ STOP indicator/button is not illuminated when the Mailbox Answerer is OFF. -ORPress the shortcut keys 1ON-OFF or 2ON-OFF to turn the corresponding answering machine ON and OFF immediately.
Base Date/Time You may program the following items under the Date/Time menu; Date/Time, Set Time, Time Format, Date Format. To access the Date/Time Menu: 1. Make sure your phone is OFF (not in TALK mode). 2. Press the MENU Soft Key Right (SKR) to go to the main menu. 3. Use the 5 or 6 buttons to scroll to DATE/TIME. 4. Press the SELECT Soft Key Left (SKL) to confirm. Date/Time Need information for this section..... Set Time From the Date/Time Menu: 1. Use the 5 or 6buttons to scroll to DATE/TIME.
Tone/Pulse You may program independently for LINE 1 and LINE 2. 1. Make sure your phone is OFF (not in TALK mode). 2. Press the MENU Soft Key Right (SKR) to go to the main menu. 3. Use the 5 or 6 buttons to scroll to SET TONE/PULSE. 4. Press the SELECT Soft Key Left (SKL) to confirm. 5. Use the 5 or 6buttons to scroll to LINE 1 or LINE 2 for setting Line 1 or Line 2. 6. Press the SELECT Soft Key Left (SKL) to confirm. 7. Use the 5 or 6 buttons to select TONE or PULSE. 8.
Base Ringer Volume From the Ringer Menu: 1. Use the 5 or 6 buttons to scroll to RINGER VOLUME. Press SELECT Soft Key Left (SKL) to enter the sub-menu. 2. Use the 5 or 6buttons to select HIGH, MEDIUM, LOW or OFF. 3. Press the SELECT Soft Key Left (SKL) to confirm. NOTE: If you turn the ringer OFF, the ringer off icon shows in the display. Base Ringer Tone From the Ringer Menu: 1. Use the 5 or 6 buttons to scroll to RINGER TONE. 2. Press the SELECT Soft Key Left (SKL) to select. 3.
Base Key Tone From the Ringer Menu: 1. Use the 5 or 6 buttons to scroll to KEY TONE. 2. Press the SELECT Soft Key Left (SKL) to select ON, OFF. 3. Press the SELECT Soft Key Left (SKL) to confirm. Answerer Setup You can program the following items independently for Mailbox 1 and Mailbox 2 under the Answerer Setup Menu; Answer ON/OFF, Outgoing Announcement, Rings to Answer, Security Code, and Forwarding Messages. To access the Answerer Setup Menu: 1. Make sure your phone is OFF (not in TALK mode). 2.
Recording the Outgoing Announcement For best results when recording, you should be about nine the inches from the microphone, and eliminate as much background noise as possible. From the Answerer Setup Menu: 1. Use the 5 or 6buttons to scroll to ANNOUNCEMENT. 2. Press the SELECT Soft Key Left (SKL) to enter the menu. 3. Press the 5 or 6buttons to select RECORD. 4. Press the SELECT Soft Key Left (SKL) to display RECORDING ANNOUNCEMENT. 5. Press the START Soft Key Left (SKL) to record your announcement.
NOTE: If you select Toll Saver (TS) the unit answers after the 3rd ring if there are NEW messages, OR the unit answers after the 5th ring if there are NO new messages. This is allows user to access their the answerer from another location and then hang up after 4 rings to save long distance charges. Security Code From the Answerer Setup Menu: 1. Use the 5 or 6 buttons to scroll to SECURITY CODE. 2. Press the SELECT Soft Key Left (SKL) to enter the menu. SECURITY CODE 123 shows in display. 3.
Forwarding Messages ON/OFF From the Answerer Setup Menu: 1. Use the 5 or 6 buttons to scroll to FORWARD MSG. 2. Press the SELECT Soft Key Left (SKL) to enter the menu. 3. Use the 5 or 6 buttons to scroll to FORWARD ON/OFF. 4. Press the SELECT Soft Key Left (SKL) to enter the menu. ON OFF shows in display. 5. Use the5 or 6 buttons to select ON or OFF. 6. Press the SELECT Soft Key Left (SKL) to confirm. 7. To activate setting, press the MEMO button on the base. FW ANS shows in the display.
Handset Telephone Set Up NOTE: Changing menu settings on the handset will only change the settings on the handset, and changing menu settings on the base will only change the settings on the base. For example, if you change the language on the handset, it will not change the language on the base. Using the Soft Keys On the handset, there are two buttons under the display which represent several Soft Key (programmable) functions. Use these buttons to activate the Soft Key icons that appear in the display.
Handset Ringers You may program the following items independently for LINE 1 and LINE 2 under the Ringer Menu; Ringer Volume, Ringer Tone, VIP Melody and Key Tone. To access the Ringer Menu: 1. Make sure your phone is OFF (not in TALK mode). 2. Press the MENU Soft Key Right (SKR) to go to the main menu. 3. Use the 5 or 6 buttons to scroll to RINGER. 4. Press the SELECT Soft Key Left (SKL) to confirm. 5. Use the 5 or 6buttons to select LINE 1 or LINE 2 for setting Line 1 or Line 2. 6.
Handset VIP Melody This features allow you to assign a specific melody to someone you want to get your attention when the person calls. When a VIP melody is assigned and that person calls, the unit rings the normal ring for the first ring and then follows with VIP melody ring. You may choose from ten different polyphonic melodies or 10 ringer tones. NOTE: This feature ONLY works when the following conditions are met. 1. You have subscribed to Caller ID. 2.
If handset displays PLEASE REGISTER, press the OK Soft Key Left (SKL) on the handset and repeat step 5 above. Handset Name Make sure your phone is OFF (not in TALK mode). Press the MENU Soft Key Right (SKR) to go to the main menu. Use the 5 or 6 buttons to scroll to HANDSET NAME. Press the SELECT Soft Key Left (SKL) to enter the menu. Use the touch-tone pad to enter a name (up to 12 characters). More than one letter is stored in each of the number keys.
6. Press the OK Soft Key Left (SKL) to save the selection. Time Format From the Date/Time Menu: 1. Use the 5 or 6buttons to scroll to TIME FORMAT. Press SELECT Soft Key Left (SKL) to enter sub-menu. 2. Use the 5 or 6buttons to select 12 HOUR CLOCK or 24 HOUR CLOCK. 3. Press the SELECT Soft Key Left (SKL) to save the selection. Date Format From the Date/Time Menu: 1. Use the 5 or 6buttons to scroll to DATE FORMAT. Press SELECT Soft Key Left (SKL) to enter sub-menu. 2.
Basic Operation Charge/In Use Indicator The phone is ON when the LED indicator on the handset and the charge/in use indicator on the base is lit. The handset and base indicators flash when you receive a call. VMWI Indicator on Handset and the Base IMPORTANT: In order to use this unit’s visual Message Waiting (VMWI) feature, you must subscribe to this service from your phone company.
Number Redial You may redial a number up to 32 digits long. To quickly redial the last number you dialed: 1. Press LINE 1, LINE 2, or the handsfree button. 2. Press the redial button. -ORTo choose from the last five numbers you dialed through menu: 1. Press the redial button first, then use the 5 or 6 buttons to select the desired redial number. • Press the 5 button to review the oldest call and scroll toward the most recent calls (higher numbers).
Paging the Cordless Handset This feature helps you locate a misplaced handset. Press and release the INTERCOM/PAGE button on the base. A list of registered handsets show in the display, use the 5 or 6 buttons to select the unit you wish to page, and press SELECT Soft Key Left (SKL) to confirm. The cordless handset beeps intermittently and displays PAGING FROM BASE for about two minutes or until you press OK Soft Key Left (SKL) on the handset or press INTERCOM/PAGE on the base.
NOTE: Handsets can be on cradle or off cradle for room monitoring to work. NOTE: While in room monitoring mode, the listening unit will emit an alert tone approximately every 4 seconds if there is an incoming call. You may press the LINE 1 or LINE 2 button to quit room monitor and answer the call. Is CANCEL NOTE: Press the CANCEL Soft Key or the END/CANCEL button to exit Soft Key Left room monitor mode.
t Intercom Operation A two-way intercom is possible between the base and cordless handset(s) without tying up the telephone line and since the telephone line is not used, you can still receive incoming calls. Making an Intercom Call 1. Make sure the phone is OFF (not in TALK mode). 2. Press the int button. 3. Use the 5 or 6 buttons to select the desired handset or base. NOTE: If you only have one handset registered in the system, it is paged automatically. 4. Press the SELECT Soft Key Left (SKL). 5.
Advanced Intercom Features Receiving an Incoming Call During an Intercom Call If you receive a telephone call during an intercom call, both handsets or base will emit alert tone and remain in intercom mode. Either handset or base user may press the corresponding LINE 1 or LINE 2 button or the handsfree button to answer the call.
NOTE: A handset or base can enter conference mode directly by pressing the LINE 1 or LINE 2 button on the second handset or base during a call. Between a handset or base and external calls on the Line 1 and Line 2 1. During an external call on either LINE 1 or LINE 2, press the HOLD Soft Key Right (SKR) to put the call on hold. 2. If the originating line is LINE 1, press the LINE 2 button. LINE 1 icon flashes and LINE 2 icon shows in the display steadily. 3.
Caller ID (CID) IMPORTANT: In order to use this unit’s Caller ID features, you must subscribe to either the standard Name/Number Caller ID Service or Call Waiting Caller ID Service. To know who is calling while you are on the phone, you must subscribe to Call Waiting Caller ID Service. This unit receives and displays CID information transmitted by your local telephone company. This information can include the phone number, date and time; or the name, phone number, and date and time.
Storing CID Records (In CID Memory) If you are not at home or cannot answer, your telephone’s Caller ID memory stores the data for the most recent 40 calls you received so that you can see who called while you were unavailable. When the 41st call is received, the oldest Caller ID record (1st call) is automatically deleted. You may review the stored information at any time. Calls received since your last review are marked as NEW in the display.
Available formats include: Number of digits Eleven digits Ten digits Seven digits Explanation long distance code “1” + 3-digit area code + 7-digit telephone number. 3-digit area code + 7-digit telephone number. 7-digit telephone number. Example 1-317-888-8888 317-888-8888 888-8888 NOTE: If the telephone number is corrupted, such as an alphabetical character in a number field, you will hear an error tone and the number is not dialed. Unit displays UNABLE TO DIAL.
10. Use the 5 or 6 button or CHANGE Soft Key Right (SKR) to scroll to the desired melody. You will hear a sample of the ringer tone you select. Press SELECT Soft Key Left (SKL) to confirm. 11. Press the DONE Soft Key Left (SKL) to save the record and MEMORY STORED shows in the display. Deleting CID Records Make sure the phone is OFF (not in TALK mode). Press the MENU Soft Key Right (SKR) to access main menu. Use the 5 or 6button to scroll to CALLER ID. Press the SELECT Soft Key Left (SKL) to confirm.
Memory The cordless handset and base each have their own separate memory storage areas. Store fifty 11-character names and 24-digit telephone numbers in the handset and forty 11-character names and 24-digit telephone numbers in the base memories. NOTE: Memory records are stored and searched in alphabetic order.
Inserting a Pause in the Dialing Sequence Press the #PAUSE button on the touch-tone pad twice to insert a delay in the dialing sequence of a stored telephone number when a pause is needed to wait for a dial tone (for example, after you dial 9 for an outside line, or wait for a computer access tone.) A pause shows on the display as a P. Each pause counts as 1 digit in the dialing sequence. If you need a longer pause, press the #PAUSE button twice again. Reviewing a Stored Number 1.
Deleting Records Stored in Memory Make sure the phone is OFF (not in TALK mode). Press the MEMORY Soft Key Left (SKL) to enter the phone book. Use the 5 or 6 button to scroll to desired record. Press the OPTION Soft Key Left (SKL) to access the option menu. Use the 5 or 6 button to scroll to DELETE. Press the SELECT button. DELETE ? shows in the display. 6. Press the YES Soft Key to confirm the deletion. MEMORY DELETED shows in the display. 1. 2. 3. 4. 5. Dialing a Number from Memory 1.
Chain Dialing from Memory Use the “Dialing a Number from Memory” feature to make calls that require a sequence of numbers, such as a frequently used long distance card number. This can be storing the various segments as a phone book record and then memory dialing in the correct sequence. TIP: Wait for the access tones before pressing the MEMORY button or your call might not go through.
Answering System Operation This section discusses the buttons and features on the answering system. Handset Messages Indicator The handset MESSAGES indicator shows you have new messages. It blinks if there are new messages. The 1/2 ON OFF button must be ON in order for the MESSAGES indicator to work. Screening Calls from the Base 1. Wait for the caller to begin leaving a message (to determine who is calling). 2.
6. Press the SELECT Soft Key Left (SKL) to access the option menu. ANSWERER REMOTE ACCESS shows in display and unit announces the following; • Press 2 to play messages. • Press 2 to stop. • Press 0 while playing a message to erase. • Press 1 to review. • Press 3 to skip. • Press 4 to turn OFF/ON. • Press 7 to review menu again. Memory Full When the answering system memory is full, the system answers after 10 rings. You should erase some messages so the answering system may record new messages.
4. Use the 5 or 6 buttons to select the desired mailbox. 5. Press the SELECT Soft Key Left (SKL) to confirm. ANSWERER REMOTE ACCESS shows in display. 6. Press the PLAY/STOP on the handset (the 2 button). The message plays. 7. Press the ERASE (the 0 button) to erase the message during message playback. Leaving a Memo Base Unit 1. Press and hold the MEMO button on the base. You must hold the button until you finish recording the memo. 2. Begin speaking after you hear the beep. 3.
Changing the Battery 1. 2. 3. 4. 5. 6. CAUTION: To reduce the risk of fire or personal injury, use only the Thomson Inc. appoved Nickel Metal Hydride (Ni-MH) battery model 5-2721, which is compatible with this unit. Make sure the telephone is OFF (not in TALK mode) before you replace the battery. Remove the battery compartment door. Disconnect the battery plug from the jack inside the battery compartment and remove the battery pack from the handset.
Display Messages The following indicators show the status of a message or of the unit. BLOCKED CALL/ The person is calling from a name or number that has been BLOCKED NAME/ blocked from transmission. BLOCKED NUMBER BUSY Indicates the system is busy and not able to connect to the system. CALL WAITING Indicates a call is waiting on the line. DELETE ALL? Prompt asking if you want to erase all Caller ID records.
Handset Sound Signals Signal Meaning A long warbling tone (with ringer on) Three short beeps One short beep (every 7 seconds) Signals an incoming call Page signal Low battery warning Troubleshooting Guide Caller ID Solutions No display • Fully charge (for 16 hours) or replace the battery. • If you are using AC (electrical) power, make sure that the unit is connected to a non-switched electrical outlet. Unplug the AC power converter from the unit and plug it back in.
Dial tone is OK, but can’t dial out • Make sure the TONE/PULSE setting on the base is set to the type of phone service you are subscribed to. Handset/Base does not ring • Make sure the handset and base ringer is turned On. • The cordless handset may be out of range. Move closer to the base. • You may have too many extension phones on your line. Try unplugging some phones. • Check for dial tone. If no dial tone is heard, see solutions for "No dial tone.
General Product Care To keep your unit working and looking good, follow these guidelines: • Avoid putting the phone near heating appliances and devices that generate electrical noise (for example, motors or fluorescent lamps). • DO NOT expose to direct sunlight or moisture. • Avoid dropping the handset, as well as other rough treatment to the phone. • Clean the phone with a soft cloth. • Never use a strong cleaning agent or abrasive powder because this will damage the finish.
Warranty Assistance If trouble is experienced with this equipment, for warranty information, please contact customer service at 1-800-448-0329. If the equipment is causing harm to the telephone network, the telephone company may require that you disconnect the equipment until the problem is resolved. Any unauthorized repairs, changes or modifications not expressly approved by Thomson Inc. could void the user’s authority to operate this product.
How you get service: • Properly pack your unit. Include any cables, etc., which were originally provided with the product. We recommend using the original carton and packing materials. • ”Proof of purchase in the form of a bill of sale or receipted invoice which is evidence that the product is within the warranty period, must be presented to obtain warranty service.” For rental firms, proof of first rental is also required. Also print your name and address and a description of the defect.
• Repair or replacement as provided under this warranty is the exclusive remedy of the consumer. Thomson Inc. shall not be liable for incidental or consequential damages resulting from the use of this product or arising out of any breach of any express or implied warranty on this product. This disclaimer of warranties and limited warranty are governed by the laws of the state of Indiana.
Index A To Be Updated!! 53
Index 54
Index 55
Visit the GE website at: www.GE.com/phones Model 28165 00027634 (P0 Draft Dom E) 08-22 Printed in China Thomson Inc. 101 West 103rd Street Indianapolis, IN 46290-1102 © 2008 Thomson Inc.