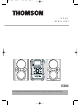
CS806 EN 4/8/06 5:12 PM Page 3 u s e r m a n u a l DELETE CS806 It is important to read this instruction book prior to using your new product for the first time.
CS806 EN 4/8/06 5:12 PM Page 4 Safety Information For UK Only EN CONNECT THE MAIN LEAD INTO A MAINS POWER SOCKET POWER SUPPLY 230V. It must not be connected to D.C. mains. Note: The mains lead of the set is fitted with a molded plug. If the mains socket are not compatible or if for any reason the plug is removed please follow the directions below. The molded plug cannot be rewired and if removed must be disposed of safely.
CS806 EN 4/8/06 5:12 PM Page 5 Safety Information CAUTION! Invisible laser radiation when open. Avoid exposure to beam. Class 1 laser product. This system must be opened only by qualified technicians to prevent accidents caused by the laser beam. LASER λ = 780 nm, P max = 5 mW Rating Information: At bottom/rear of the unit.
CS806 EN 4/8/06 5:12 PM Page 6 Important Information EN Safety Precautions Important Battery Information • Never open the cabinet under any circumstances. Any repairs or internal adjustments should be made only by a trained technician. • Never operate this product with the cabinet removed. • Do not use your System immediately after transporting it from a cold place to a warm place, as condensation may cause the system to malfunction. • Keep your unit away from humid areas and abnormally hot places.
CS806 EN 4/8/06 5:12 PM Page 7 Important Information Headset Safety • Do not play your headset at high volume. Hearing experts warn against extended highvolume play. • If you experience ringing in your ears, reduce volume or discontinue use. • You should use with extreme caution or temporarily discontinue use in potentially hazardous situations.
CS806 EN 4/8/06 5:12 PM Page 8 Table of Contents Safety Information Important Information EN Table of Contents . . . . . . . . . . . . . .1 Getting Started . . . . . . . . . . . . . . . 2 Content of Box . . . . . . . . . . . . . . . . . . . . . . . . . .2 Connections of Antennas , Speakers and Microphone . . . . . . . . . . . . . . . . . . . . . . . . . . . . 2 PC Software Installation . . . . . . . . . . . . . . . . . .3 Microphone Input . . . . . . . . . . . . .12 Connecting your Microphone . . . .
CS806 EN 4/8/06 5:12 PM Page 9 Getting Started Content of Box • • • • • • • • • • • • Using the FM and MW Antennas one main unit (with 2 main speakers); one Music Navigator Remote control*; one FM antenna; one MW loop antennas; one USB cable; one Wireless Musiclink transceiver; one mp3 player; one set of earphones; one user manual; one PC software and driver installation CD-ROM; one safety leaflet; Owner registration Card.
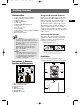
CS806 EN 4/8/06 5:12 PM Page 10 Getting Started PC Software Installation Before you can have remote access to the Windows Media Player Library in your computer via the Wireless Musiclink, you need to install the following software and driver. EN Computer system requirements • • • • • • • Pentium III 500MHz or higher recommended Windows® 2000 (SP6 or higher) or XP Windows Media Player 9 or higher Internet access 200MB free hard disk space for the software 128MB RAM or above USB port (2.
CS806 EN 4/8/06 5:12 PM Page 11 General Controls Main Unit DELETE ON/ECO • Press briefly to turn on and off the unit. • Press and hold in standby mode to enter ECO (power saving, without clock display) mode. The blue standby indicator lights around the button. Tips: In STANDBY mode, press ON/ECO to turn the system on in the previously used mode. Press SOURCE to select the corresponding mode. Look at the display icons to identify the current mode.
CS806 EN 4/8/06 5:12 PM Page 12 General Controls Music Navigator Remote The LCD of the remote mirrors the screen of the main unit. EN / • In CD, Portable Player, USB or MP3/WMA mode - Goes to the previous/next track; searches backward/forward through track. • In Tuner mode - Tunes down/up radio frequency. • In Clock or Timer mode - Decreases/increases hour and minute digit. (PLAY/PAUSE) - In CD, Portable Player, USB or MP3/WMA mode - Starts and pauses playback.
CS806 EN 4/8/06 5:12 PM Page 13 General Controls REPEAT/RDS - In CD mode - Repeats a track, CD or all CDs. In Portable Player, USB or MP3/WMA mode Selects repeat one file, repeat all files mode. In Tuner mode - Shows RDS information. Navigation Buttons Use VOLUME CONTROL dial to select items. EN ADD - Adds the selected item. DELETE - Deletes the selected item. INTRO/CT - In CD, Portable Player, USB or MP3/WMA mode - Turns intro mode on or off to play the first 10 seconds of each track / file.
CS806 EN 4/8/06 5:12 PM Page 14 Settings Showing Demonstration Program Recording Press DEMO to turn on/off demonstration mode. When setting the Timer, select “Rec Tuner” as the source to preset the unit to record radio at the preset time. Make sure the USB device is connected and have enough memory space. EN Setting the Clock 1. Press and hold CLOCK on the remote control until the hour flashes on the display. 2. Press or to set the hour and then press CLOCK to shift to minute digits. 3.
CS806 EN 4/8/06 5:12 PM Page 15 Sound Features Volume Control Using Preset Equalizer Curves Rotate the volume control on the main unit or on the remote control to adjust volume level. Press EQ to toggle among FLAT, ROCK, POP, JAZZ, CLASSIC and CUSTOM. EQ is displayed when EQ is activated. Bass Boost Press B.BOOST to turn on/off boosting the bass frequency. B.BOOST is displayed when it is activated. Muting Audio Press MUTE on the remote control to cut the sound. MUTE flashes on the display.
CS806 EN 4/8/06 5:12 PM Page 16 CD and mp3 Disc Playback Loading Discs 1. Press SOURCE repeatedly to select CD mode. 2. Press DISC 1 /2 /3 / 4 /5 on the main unit to open the desired disc tray. 3. Insert a disc with label face up. 4. Press the same DISC key to close the disc tray, or press a different DISC key to open a different disc tray directly. 5. Repeat steps 2-4 to load discs in all the disc trays.
CS806 EN 4/8/06 5:12 PM Page 17 USB and mp3 Player Playback The playback controls of USB devices and mp3 player are basically the same. Connect the devices first and then you can start playback. Disconnecting the mp3 player from the Main Unit Press eject button on the right side of the unit to disconnect the player. Connecting USB device to the Main Unit EN Insert the the USB device’s USB port into the main unit’s USB connector. Unplug the device to disconnect.
CS806 EN 7/8/06 11:11 AM Page 18 Radio EN Selecting Tuner Band Suppressing Stereo Signal 1. Press SOURCE to enter TUNER mode. 2. Press BAND to select between FM, MW or LW Radio band. Press FM ST on the remote control to toggle between FM mono and stereo mode. Stereo is displayed in stereo mode. Tuning to a Station Press and hold or or to select frequencies. Press to scan frequencies. Using Presets The tuner can be in either TUNE or PRESET mode.
CS806 EN 4/8/06 5:12 PM Page 19 Microphone Input You can connect a microphone (not included) to the unit. The output will be processed from the speaker when you are singing or speaking with your microphone. Connecting your Microphone Connect your microphone to the MIC INPUT Connector at the back panel of the unit. Adjusting Volume • To turn on the power supply of the mic input, rotate the MIC VOLUME dial clockwise until a 'click' sound is heard.
CS806 EN 4/8/06 5:12 PM Page 20 Recording to the mp3 Player/USB Recording to mp3 player or USB device are basically the same. You can record CD, TUNER or AUX files to the mp3 player or USB device. EN Recording CD to mp3 Player Normal/High Speed Recording 1. Connect the mp3 player to the USB port, “USB Connected” will show on the display of the player. 2. In CD stop mode or CD navigation mode, press RECORD-MP3 PLAYER on the main unit or press REC P. PLAYER on the remote control. 3.
CS806 EN 4/8/06 5:12 PM Page 21 Recording to the mp3 Player/USB Recording TUNER/AUX to mp3 Player 1. In TUNER or AUX mode, press RECORD-MP3 PLAYER on the main unit or press REC P. PLAYER on the remote control to start recording. Example: 1. In TUNER mode, select the station to record (refer to page 11 for details). 2. Press RECORD-MP3 PLAYER on the main unit or press REC P. PLAYER on the remote control to start recording. 3. Press , press RECORD-MP3 PLAYER on the main unit or press REC P.
CS806 EN 4/8/06 5:12 PM Page 22 Wireless Musiclink EN Wireless Musiclink allows you to have remote access to the Windows Media Player Library in your computer. Refer to page 3 to install the required software and driver first before you start music playback. Connecting your Unit to the Computer Tip: For the main unit to show CD and Song information, your PC must be turned on connected to the internet.
CS806 EN 4/8/06 5:12 PM Page 23 Advanced Playback Controls In CD and USB mode, advanced playback controls allow you to sample, repeat and random playback files, set up a Program List. In USB mode, allow you to rename tracks. Playing a Program List Sampling Tracks Display Program List Press INTRO/CT on the remote control to play the first 10 seconds of each track on the current disc, all discs in the tray, or turn intro mode off. 1. While CD playback is stopped, press PROGRAM to enter PROGRAM mode.
CS806 EN 4/8/06 5:12 PM Page 24 Advanced Navigation Controls File Navigation Music Navigator Remote Main Unit EN DELETE - Deletes the selected item. SELECT • From stop mode - Enters navigation mode. • In navigation mode - Plays selected track or enters selected folder. BACK • Exits current folder and returns to higher level. • Exits navigation mode after returning to the top layer. / - Moves up/down a list. Use VOLUME CONTROL dial to select items. • From stop mode - Enters navigation mode.
CS806 EN 4/8/06 5:12 PM Page 25 Advanced Navigation Controls Display In navigation mode, the display looks like the following. Selected item is blackened.
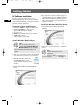
CS806 EN 4/8/06 5:12 PM Page 26 Advanced Navigation Controls Tips on Playback Sequence of Disc • Check that the mp3/WMA disc is created with a single folder structure. Refer to the diagram below for playback sequence details on multi-level folder structure. • For example, folders and songs from level 2 are played before moving on to play folders and songs from level 3. EN LEVEL 1 A LEVEL 2 LEVEL 3 LEVEL 4 D 8 Song 1.1.1 9 Song 1.1.2 Folder 1.1 Folder 1 10 E Song 1.1.3 G Folder 1.
CS806 EN 4/8/06 5:12 PM Page 27 mp3 Player Insert battery into the Player 1. Slide the battery door by following the direction of arrow. 2. Insert a “AAA”(UM4) battery with polarities corresponding to the indications in the compartment. 3. Replace the door to the battery compartment. VOLUME + / - - Increases and decreases the volume level. M - Selects among playback options.
CS806 EN 4/8/06 5:12 PM Page 28 mp3 Player Skipping Tracks • Press EN or Play modes to skip to the previous or the next track. Scan Tracks • Press and hold or to scan backwards and forwards during playback. During playback, press M repeatedly to select among the following playback modes: Normal playback Repeat Track Repeat All Random Playback Repeat Random Playback - Check for Updates Note: If the elapsed time of the playing track is less than 0:04, pressing once will return to previous track.
CS806 EN 4/8/06 5:12 PM Page 29 Troubleshooting Tips Main Unit Problem Solution Problem Solution System will • Check power cord for a secure not turn connection. on • Unplug the unit for a moment, and then plug into power source again. • Check the outlet by plugging in another device. CD sound skips • Clean the disc. • Check disc for warping, scratches, or other damage. • Check if something is causing the system to vibrate. If so, move the system.
CS806 EN 4/8/06 5:12 PM Page 30 Troubleshooting Tips mp3 Player EN Problem Solution Problem Solution The player does not turn on when PLAY button pressed. • Battery may be inserted incorrectly. • Battery may be empty. What does the PlaysForSur e logo mean? Skipping tracks or bad sound quality? • Repeat or random function may be activated. • There may be strong magnetic fields (e.g. too close to TV) near the unit. • Low Battery level. Replace with new one.
CS806 EN 4/8/06 5:12 PM Page 31 Maintenance Disconnect the audio system from the power source before performing any maintenance. Cleaning Clean the exterior of the system using a soft dust cloth. CD Player CAUTION! This system operates with a laser. It must be opened by only a qualified technician. Handling CDs • Do not touch the signal surfaces. Hold CDs by the edges, or by one edge and the hole. • Do not affix labels or adhesive tapes to the label surfaces. • Do not scratch or damage the label.
CS806 EN 4/8/06 5:12 PM Page 2 THOMSON 46, quai Alphonse Le Gallo 92648 Boulogne Cedex FRANCE www.thomson.