THT101 Digital Terrestrial Receiver User manual Bedienungsanleitung Manuel d’utilisateur Manuale utente Manual del usuario Nàvod k obsluze Korisnički priručnik Look, Listen & Live www.thomsonstb.
27 Sep 2011 21:47 1.0 Instruction 1.1 Safety Instructions 1.2 Storage 1.3 Equipment Set-up 1.4 Accessories 1.5 Usage of external USB devices 2 2 3 3 3 4 2.0 Connection 2.1 Connecting to TV and Terrestrial Antenna 2.2 Connecting to a DVD/Video Recorder 2.3 Connecting to a Digital Audio Amplifier 4 4 4 4 3.0 Your Receiver 3.1 Front Panel 3.2 Rear Panel 3.3 Remote Control 3.4 Default PIN- code: 0000 3.5 Installing the Batteries 3.6 Using the Remote Control 4 4 4 5 5 6 6 4.
1.0 Instruction 1.1 Safety Instructions The lightning flash with arrowhead symbol within an equilateral triangle is intended to alert the user to the presence of not isolated dangerous voltage with the inside of the product that may be of sufficient magnitude to constitute a risk of electric shock to persons. The exclamation point within an equilateral triangle is intended to alert the user to the presence of important operating and servicing instructions in the literature accompanying the appliance.
English 1. Liquid has been spilled onto the product or some other object has fallen into the product. 2. The product has been exposed to water. 3. The product does not operate normally despite following operating instructions. Adjust only the controls described in the operating instructions ad improper adjustment of other controls could damage the product and require extensive repair word by a qualified technician. 4. The product has been dropped or damaged in any way. 5.
Note: The batteries should not be recharged, disassembled, electrically short-circuited or be mixed or used with other types of batteries. If rechargeable accumulators instead of batteries are going to be used, we recommend using (e.g. NiMH) types with low self-discharge to ensure long time operation of remote control. 1.5 Usage of external USB devices yy It is recommended to use USB 2.0 storage devices. If your device is not compatible to USB 2.
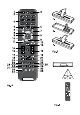
English 6. DVD/VCR SCARTTo connect to a Video or DVD recorder 7. S/PDIF Coaxial To connect your receiver to digital audio amplifier. 8. Power Cord Your receiver requires a voltage of 220 - 240 V AC (Auto-selectable), 50/60 Hz +/-5 %. Make sure to check the power specification before connecting your receiver to the wall outlet. 3.3 Remote Control 1. 2. 3. 4. 5. 6. 7. 8. 9. 10. 11. 12. 13. 14. 15. 16. 17. 18. 19. 20. 21. 22. 23. 24. 25. 26. 27. 28. 29. 30. 31. 32. 33. Fig.
3.5 Installing the Batteries Remove the battery cover from the remote control and put 2xAAA size batteries inside the compartment. The diagram inside the battery compartment shows the correct way to install the batteries. 1. Open the cover 2. Install batteries 3. Close the cover Fig. 5 The batteries should not be recharged, disassembled, electrically short-circuited, be mixed NOTE: or used with other types of batteries. 3.6 Using the Remote Control Fig.
To add selected channel or all channels to a favourite group, press the 1 button. Use the p/q to select a desired group and press OK. With t/u select Yes in the confirmation window and press OK to save. Selected channels will be marked with a folder symbol. English Lock Press 2 to Lock one channel or all channels. Use t/u to select Yes in the confirmation window and press OK to save. Selected channel/s will be marked with the Lock symbol. Skip Press 3 to Skip one channel or all channels.
5.1.3 Delete all Favourites and Groups Use this menu to delete all favourite channels. Select Delete All Favourites with p/q and press OK. Use t/u to select Yes in the confirmation window and press OK to delete or select No to cancel. 5.1.4 Delete all Use this option to delete all channels. Select Delete All with p/q and press OK, then enter the Password (default:0000). In the confirmation window select Yes with t/u and press OK to delete or select No to cancel. 5.1.
5.2.4 LCN Mode English If LCN (Logical Channel Numbering) is activated and LCN signal is provided by the operator, channels will be stored in operator defined order. You can activate/deactivate the LCN function by setting the LCN Mode to ON or OFF. 5.3 Setup This menu allows you to set OSD Language, Subtitles preference, TV System, Region and Time, Timer Setting, OSD Setting, Parental Lock and Auto Standby. 1. Use p/q to highlight the desired menu and press OK to proceed.
5.3.5 Timer Setting Use this menu to setup programme timers or sleep timers. Programme timer Timer Number: Timer Mode: Timer Service: Wake-up Channel: Month/Date/Day: Time: Duration: Auto Record: You can set up to 8 timers Off/Once/Daily/Weekly/Monthly TV Service/Radio Service You can select any channel as wake-up channel. Use p/q to select the start month, date and day. Press OK to input the time with the numeric buttons. When you leave the programme timer, a saving window appears.
5.4.1 Receiver Information English This menu displays relevant receiver information like the Receiver Model, Software version, Signature, and our website www.thomsonstb.net. 1. In Tools menu, select Receiver Information and press OK to open receiver information. 2. Press EXIT/SORTIE to leave. 5.4.2 Game This menu allows you to play games (Tetris, Snake and Othello) on this receiver. 1. Select Game in Tools menu and press OK to enter the game menu. 2.
5.5 Media+ The Media+ menu consists of following submenus: Media Player, Record Manager, Removable Disk Information, Record Settings, Safely remove storage device and Disk Format. 1. Press MENU to enter main menu. Select “Media+” and press OK to enter Media+ menu. 2. Press p/q to highlight desired menu and press OK to enter. 3. Press EXIT/SORTIE to exit. Use the three button rows on the bottom of RCU for player operation. A description for the use of these buttons will be displayed on screen. 5.5.
Standby Mode: Record Recovery: Step to (min): TS/PS (TS mode will record all broadcasted data, including subtitles) ON/ OFF (If set to On, the receiver will go to standby mode when a timed recording has ended.) ON/ OFF (If set to On, the receiver will continue to record after a power cut.) 0.5 / 1 / 3 / 5 / 10 minutes. Defines the jump interval during the playback of a record. English Record Type: 5.5.
From EPG Press the GUIDE button to enter the programme guide. Select an event and channel with the buttons described on screen. Once the desired event is highlighted, press 4 / 4 to plan a timer on this event. The event time will be copied into a free Programme Timer. It is possible to adjust the start and duration time for this timed event. Manual scheduling It is possible to manually set a record via the Timer menu. For details refer to chapter 5.3.5 Timer Setting.
7.0 Trouble Shooting Problem IR sensor light not lit No signal found No picture or sound on TV Scrambled channel message No response to remote control Possible cause Mains lead unplugged/ multipoint connector switched off Mains fuse blown Aerial is disconnected Aerial is damaged/misaligned Out of digital signal area Active antenna requires to switch ON antenna power/ external power Scart is not selected on your TV TV or DVD/VCR is not connected to the mains.
8.0 Specifications Demodulator Demodulator: COFDM; 16-QAM/64-QAM Transmission mode: 2 K - 8 K Video Decoder Profile level: MPEG-2 MP@ML Video resolution: 720 x 576 pixels (PAL), 720 x 480 (NTSC) Decoding & Video Out: PAL & NTSC Aspect ratio: 4:3, 16:9 Audio Decoder MPEG MusiCam Layer II Sampling rate: 32, 44.