
Manual Spec Sheet

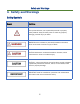
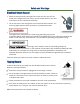

Table Of Contents
- Warnings
- Welcome
- Before You Start
- Safety and Warnings
- Safety Symbols
- Electrical Shock Hazard
- Tipping Hazard
- Explosion Hazard
- Fire Hazard
- Poisoning Hazard
- Hot Surface Hazard
- Other Safety Tips
- Dual Range Overview
- 48-inch dual range sample
- Cooktop Equipment
- Installation Instructions
- On the next figure, item A is:
- Positioning of Range
- Dimensions and Clearances
- Top Hood and Cabinet Specifications
- Important Notes to the Installer
- Important Note to the Consumer
- Important Safety Instructions to the Installer
- Model and Serial Number Location
- Electrical Installation
- Power Supply Cord Kit
- Access to Terminal Block
- Electrical Shock Hazard
- Electrical Connection
- Electric Power Supply Requirements
- Electrical Grounding Instructions
- Gas Supply Requirement
- Connect Range to Gas Supply
- After installation:
- First Use
- Before you start
- Conditioning the oven
- Positioning the shelves
- Cooktop Safety Guidelines
- Surface Burner Ignition
- Simmer and Boil
- Flame Size
- Power Failure
- Cooktop
- Burner Grates
- Oven Burner Use
- Broil Burner Use
- Oven Cooking Safety Guidelines
- Oven Function
- Natural Airflow Bake
- Convection Bake
- Convection Roast
- Convection Defrost
- Defrosting
- Convection Dehydration
- Broiler Operation
- Preheating
- To Broil
- Setting Broil
- Broiling guidelines
- For the models with Griddle
- Before Using the Griddle
- Use of the griddle
- Cleaning Instructions
- Do’s
- Don’ts
- Cleaning Burner Caps and Brass Flame Spreaders
- Cleaning the Control Panel, Door Handle, Control H
- Cleaning Side Racks
- Cleaning Oven Shelves
- Cleaning Broiling Pan and Grid
- Cleaning Bake and Broil Burners
- Cleaning Porcelain Surfaces
- Cleaning Oven Window
- Cleaning Oven Door Gasket
- Cleaning Stainless Steel Surfaces
- Removing and Replacing Oven Door
- Replacing Burner Parts
- Removing Oven Door
- Replacing Oven Door
- Replacing Oven Light Bulb
- Procedure for Checking the Dual Burner Clicking Pr
- Step 1
- Step 2
- Step 3
- Step 4
- Troubleshooting Guide
- Cooktop
- Oven
- Warranty and Service

Safety and Warnings
8
Slide the range forward.
Install the anti-tip device as described in the instruction sheet
Safely tilt the front section of the range and slide the range slowly back against the wall.
The rear pins should slide under the bracket.
Do not use the appliance until it has been secured.
Failure to follow this advice may result in serious injury.
1. Find the two anti-tip brackets and screws placed in the plastic bag with manual.
2. Fasten the two anti-tip brackets to the wall with the screws, two screws for each bracket.
3. Slide range completely back, make sure the fore-end of the brackets withhold the two screws
on side panel of range
Explosion Hazard
If you smell gas, do not use the appliance. Open a window or door to let
the gas escape, then follow the instructions on the inside front cover of
this manual.
Do not use water on grease fires. A violent steam explosion may result.
Turn all burners off, then smother fire or flame with a dry chemical or
foam-type extinguisher. Do not try to smother with flammable blankets.