
Manual Spec Sheet

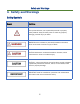
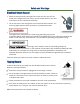

Table Of Contents
- Warnings
- Welcome
- Before You Start
- Safety and Warnings
- Safety Symbols
- Electrical Shock Hazard
- Tipping Hazard
- Explosion Hazard
- Fire Hazard
- Poisoning Hazard
- Hot Surface Hazard
- Other Safety Tips
- Dual Range Overview
- 48-inch dual range sample
- Cooktop Equipment
- Installation Instructions
- On the next figure, item A is:
- Positioning of Range
- Dimensions and Clearances
- Top Hood and Cabinet Specifications
- Important Notes to the Installer
- Important Note to the Consumer
- Important Safety Instructions to the Installer
- Model and Serial Number Location
- Electrical Installation
- Power Supply Cord Kit
- Access to Terminal Block
- Electrical Shock Hazard
- Electrical Connection
- Electric Power Supply Requirements
- Electrical Grounding Instructions
- Gas Supply Requirement
- Connect Range to Gas Supply
- After installation:
- First Use
- Before you start
- Conditioning the oven
- Positioning the shelves
- Cooktop Safety Guidelines
- Surface Burner Ignition
- Simmer and Boil
- Flame Size
- Power Failure
- Cooktop
- Burner Grates
- Oven Burner Use
- Broil Burner Use
- Oven Cooking Safety Guidelines
- Oven Function
- Natural Airflow Bake
- Convection Bake
- Convection Roast
- Convection Defrost
- Defrosting
- Convection Dehydration
- Broiler Operation
- Preheating
- To Broil
- Setting Broil
- Broiling guidelines
- For the models with Griddle
- Before Using the Griddle
- Use of the griddle
- Cleaning Instructions
- Do’s
- Don’ts
- Cleaning Burner Caps and Brass Flame Spreaders
- Cleaning the Control Panel, Door Handle, Control H
- Cleaning Side Racks
- Cleaning Oven Shelves
- Cleaning Broiling Pan and Grid
- Cleaning Bake and Broil Burners
- Cleaning Porcelain Surfaces
- Cleaning Oven Window
- Cleaning Oven Door Gasket
- Cleaning Stainless Steel Surfaces
- Removing and Replacing Oven Door
- Replacing Burner Parts
- Removing Oven Door
- Replacing Oven Door
- Replacing Oven Light Bulb
- Procedure for Checking the Dual Burner Clicking Pr
- Step 1
- Step 2
- Step 3
- Step 4
- Troubleshooting Guide
- Cooktop
- Oven
- Warranty and Service

Safety and Warnings
5
2. Welcome
Thank you for purchasing your HRG dual fuel indoor range. We appreciate your business and we
recommend that you read this entire User’s Manual before operating your new appliance for the
first time.
This manual contains instructions on how to properly install and set up your new range, as well as
insights into the unique features that our product offers. Please keep this manual for future
reference, as it contains answers to questions that you might have as you begin to cook.
Thank you,
Thor Group
This manual applies to the following models’ series:
HRD3001U
HRD3002U
HRD3004U
HRD3031U
HRD3088U
HRD3604U
HRD3605U
HRD3606U
HRD3618U
HRD3620U
HRD4801U
HRD4802U
HRD4803U
HRD4804U
HRD4806U
HRD3031U-A
HRD4804U-A
HRD3618U-A
3. Before You Start
Make sure that the anti-tip device of the range has been properly installed.
Find the model and serial numbers on the CSA label in the bottom right-hand corner of the
backboard. Note these numbers down for future reference in the space provided in section
“Warranty and service.”
Read this guide, taking special note of the “Safety and Warnings” section.
Remove all the packaging from the oven(s) and cooktop. Recycle items that you can. If any
adhesive residue is left on surfaces, remove this using dish washing liquid on a soft cloth. Do
not use any harsh or abrasive cleaners.
Make sure you follow the instructions under “First Use” before using your range for cooking.
Follow the instructions below to reduce the risk of fire, electrical shock, injury, or property damage,
follow the important safety instructions listed below: