
Manual Spec Sheet

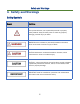
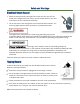

Table Of Contents
- Warnings
- Welcome
- Before You Start
- Safety and Warnings
- Safety Symbols
- Electrical Shock Hazard
- Tipping Hazard
- Explosion Hazard
- Fire Hazard
- Poisoning Hazard
- Hot Surface Hazard
- Other Safety Tips
- Dual Range Overview
- 48-inch dual range sample
- Cooktop Equipment
- Installation Instructions
- On the next figure, item A is:
- Positioning of Range
- Dimensions and Clearances
- Top Hood and Cabinet Specifications
- Important Notes to the Installer
- Important Note to the Consumer
- Important Safety Instructions to the Installer
- Model and Serial Number Location
- Electrical Installation
- Power Supply Cord Kit
- Access to Terminal Block
- Electrical Shock Hazard
- Electrical Connection
- Electric Power Supply Requirements
- Electrical Grounding Instructions
- Gas Supply Requirement
- Connect Range to Gas Supply
- After installation:
- First Use
- Before you start
- Conditioning the oven
- Positioning the shelves
- Cooktop Safety Guidelines
- Surface Burner Ignition
- Simmer and Boil
- Flame Size
- Power Failure
- Cooktop
- Burner Grates
- Oven Burner Use
- Broil Burner Use
- Oven Cooking Safety Guidelines
- Oven Function
- Natural Airflow Bake
- Convection Bake
- Convection Roast
- Convection Defrost
- Defrosting
- Convection Dehydration
- Broiler Operation
- Preheating
- To Broil
- Setting Broil
- Broiling guidelines
- For the models with Griddle
- Before Using the Griddle
- Use of the griddle
- Cleaning Instructions
- Do’s
- Don’ts
- Cleaning Burner Caps and Brass Flame Spreaders
- Cleaning the Control Panel, Door Handle, Control H
- Cleaning Side Racks
- Cleaning Oven Shelves
- Cleaning Broiling Pan and Grid
- Cleaning Bake and Broil Burners
- Cleaning Porcelain Surfaces
- Cleaning Oven Window
- Cleaning Oven Door Gasket
- Cleaning Stainless Steel Surfaces
- Removing and Replacing Oven Door
- Replacing Burner Parts
- Removing Oven Door
- Replacing Oven Door
- Replacing Oven Light Bulb
- Procedure for Checking the Dual Burner Clicking Pr
- Step 1
- Step 2
- Step 3
- Step 4
- Troubleshooting Guide
- Cooktop
- Oven
- Warranty and Service

Safety and Warnings
7
Electrical Shock Hazard
Before removing a faulty oven light bulb, make sure you turn OFF the
power to the range at the main fuse or circuit breaker panel. If you don’t
know how to do this, contact an electrician.
Do not remove the kick strip grate. Due to electrical wires behind it, the
kick strip grate should only be removed by a qualified technician.
This appliance is equipped with a three-prong grounding plug for your
protection against shock hazard and should be plugged directly into a properly grounded power
outlet. Do not under any circumstances cut or remove the grounding prong from this plug.
Proper Installation – The range, when installed, must be electrically grounded in
accordance with local codes or, in the absence of local codes, with the National Electrical Code,
ANSI/NFPA 70. In Canada, the range must be electrically grounded in accordance with
Canadian Electrical Code. Be sure the range is properly installed and grounded by a qualified
technician.
Failure to follow this advice may result in death or electrical shock.
Tipping Hazard
A child or adult can tip the range over and be killed. Verify that the anti-tip
bracket is securely installed.
Ensure the anti-tip bracket is engaged when the range is moved.
Do not operate the range without the anti-tip brackets in place. Failure to
follow the instructions in this manual can result in death or serious burns
to children and adults.
Check the below for the proper installation and use of anti-tip brackets.
Even after the safety device is installed, do not step, lean or sit on the oven door or place any
heavy objects on it. Doing so may result in personal injury.
Make sure anti-tip device is installed as follows: