
Instructions / Assembly

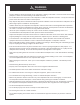
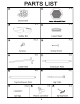
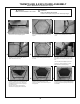
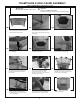
Table Of Contents

6
TRAMPOLINE & ENCLOSURE ASSEMBLY
Refer to PARTS LIST for identification of parts.
WARNING:
CHOKING HAZARD - Small Parts
!
WARNING:
ADULT ASSEMBLY REQUIRED
Contains small parts, sharp points and sharp edges.
!
1.
4.
2. 3.
5. 6.
Connect the 6 Lower Rails(#G) together. They form an hexagon frame after connecting
together.
Insert the 6 Leg Tubes(#J) into the Lower
Rails.
After securing all 6 Leg Tubes(#J), turn the
frame over so that the legs point downward,
as shown.
7.
8. 9.
To keep the tension on the mat balanced, link
the first 2 springs to one corner with Spring
Hook(#M), and then the 3
rd
and 4
th
spring to
the opposite corner.
Now you have 4 evenly spaced springs
sttached to the jumping mat and the frame.
Repeat the step to attach the 5th - 12th
springs to the frame, and make sure they are
evenly spaced.
Continue to hook the rest Springs(#M) between
the previously attached springs until all springs
are installed.
1
3
5
6
4
2
Align the hole on the Leg Tube(#J) and Lower
Rails(#G), secure with Screw(#E). Do NOT
OVER-TIGHTEN at this step.
Lay out the Jump Mat with Pad(#B) in the center
of the frame, and then attach one end of the
Spring(#M) to the triangular ring sewn to the
mat.
(The Jump Mat and Pad(#B) are pre-sewn
together. For ease of reference, we have
separated them in assembly steps.)
1
3
4
2
1
3
5
6
4
2
7
8
9
10
12
11