
Installation Sheet


RDQCI5214 Rev. 0 Page 5 Cered 06/01/2016
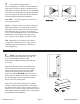
1 The Continuous Hinge Shower
Door is completely reversible and may be installed
hinge-right or hinge-left. Refer to the illustration to
determine the best hinge position for your installation.
For maximum waterproofing, the hinge jamb should
always be opposite the shower head. The following
instructions depict a hinge-left installation.
CAUTION: For safety purposes, the door must
always open outward!
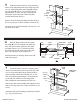
NOTE: To allow for this unit to be reversible, the
hinge jamb extends 9/16” beyond both ends of the
door panel. Once the hinge-side of the door has been
determined (see above), the 9/16” extension can
be cut off from the TOP only for a more streamlined
finished look. (If this is done, don’t forget to cut
9/16” off the top of the longer wall jamb as well).
TIP: Temporarily cover the drain on the inside
of the shower with some tape or a large peice of
cardboard to prevent small screws, drill bits, etc
from disappearing.
RDQCI5214 Rev. 0
Page 4 of 8 Certified 06/20/16
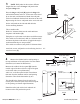
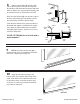
2 NOTE: The shower door may be installed
without using the provided sloped curb [A]. It’s
use is recommended for positive water
control when installed on shower sills with little
or no slope.
Measure the finished wall to wall opening at the
shower sill and cut the curb to that exact length.
File the ends of the curb as necessary to fit the
corners of the opening. Place the curb on the
shower sill, with the RAISED side to the exterior
of the enclosure. Make sure the curb is centered on
the sill and lightly mark its’ position, both inside
and out, on the sill with a pencil.
Remove the curb from the sill and run two beads
of silicone inside of the pencil marks on the shower
sill. Place the curb back in the exact same position as
marked. Use a few pieces of tape, placed over the curb
from inside to outside, to hold the curb in place during
the remainder of the installation.