BASE’N BENCH® - INSTALLATION INSTRUCTIONS The Redi Bench® is designed to be installed exclusively with Tile Redi® shower pans (known as Redi Base®, Redi Trench®, Wonder Drain®, WonderFall Trench®, Bathtub Replacement™, Redi Free®, and Redi Your Way®) using the Redi Flash® flashing system.
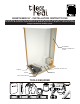
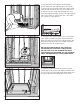
Ø 6-7” 1. The shower stall will need to be framed out as an assembly of the Redi Bench and the Tile Redi shower base, with the framed out opening equal to the outside dimensions of the shower base plus an additional 12 inches on the side of the shower base where the Redi Bench is to be installed to accommodate the depth of the Redi Bench. The bore hole needs to be a minimum 6”, but not more than 7” diameter opening*.
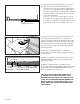
4. This step depends on whether there is access to the drain connection from below the subfloor: a. If there is access from the subfloor below, then cut a section of drain pipe (PVC, as applicable to the type of drain) which is long enough to extend below the subfloor and easily make a connection to the waste water pipe. b.
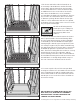
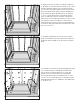
6. Spread your mortar base (should be a milk shake consistency), evenly across the subfloor at the thickness calculated in Step 5. 7. Offset the mortar base 1“ from each outside edge of the pan with exception of the curb side. Mortar will protrude out from under the curb, run the finishing trowel along curb face to backfill any excess mortar. Mark a line on a shim denoting the distance calculated in Step 5. Use the shim as a depth gauge to verify that the mortar bed is the depth you need. 1” 8.
9. Place the pan in the mud base and firmly but gently shimmy the pan (applying pressure in drain location first) into the mud so that (i) the drain is fully supported by mud at the bore hole in the substrate, and (ii) the ribs are completely filled with the mud alternately applying hand pressure to the right and left sides of the pan floor until the pan ribs come within 1/8” clearance of the subfloor. Push to back wall Lower into drain 10.
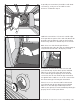
12. Apply Loctite PL Premium construction adhesive to all surfaces of the bench frame which are in contact with the Redi Bench when it is placed in the frame (i.e., the top of the frame and the vertical frame studs above the splash wall.) Then, install the Redi Bench by securely placing the Redi Bench on the framing so it is in contact with all the seat and leg support areas containing Loctite PL Premium construction adhesive.
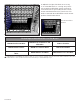
15. Adjust the height of the drain as necessary to accommodate the floor covering. Set your tile using a white modified thin-set/tile mortar and a notched trowel as specified by the thin-set/tile mortar manufacturer based on your tile size. Tile Redi recommends the modified thin-set/tile mortar products found in table below. Tile the rest of the shower.
436 East 36th Street, Charlotte, NC 28205 800.232.6156 | sales@tileredi.com www.tileredi.com Tile Redi® trademarks and logos are owned by and the Intellectual Property of Tile Redi, LLC. ©2023 Tile Redi, LLC. All Rights Reserved. PATENT: www.TileRedi.com/PatentMarkings 2023.03.