
Installation Guide


2023.03.08
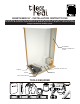
Ø 6-7”
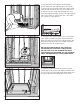
1. The shower stall will need to be framed out as
an assembly of the Redi Bench and the Tile Redi
shower base, with the framed out opening equal
to the outside dimensions of the shower base plus
an additional 12 inches on the side of the shower
base where the Redi Bench is to be installed to
accommodate the depth of the Redi Bench. The bore
hole needs to be a minimum 6”, but not more than
7” diameter opening*. Ensure that the shower pan
subfloor is level, and that the walls are level, plumb,
and square. Place the square in the corners to ensure
they are square and straight.
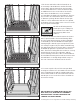
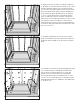
2. Install the Redi Bench frame between the shower
base footprint and the shower wall framing. Either
wood or metal framing may be used as required by
local building codes. The Redi Bench framing (the
framing height is based on personal preference, but
it is usually a height of 18”) should be installed along
the appropriate side of the shower base so that it will
be butted up against the splash wall of the shower
base. The bench framing will then need to be securely
attached to the shower floor substrate, and the
shower framing on the three sides of the Redi Bench.
The Redi Bench framing will need to be level because
the Redi Bench is already designed with a slope so
the seat of the bench will drain into the shower.
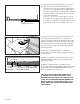
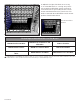
3. To ensure a perfect fit, test fit shower pan drain
housing into subfloor bore hole. Make sure the shower
pan is aligned properly and fits snuggly against the
shower frame studs on all sides and corners. Ensure
that the pan is level on the floor. There should be no
movement or bulge.
DO NOT NAIL OR SCREW INTO THE PAN. DO
NOT SAND, CUT, OR MAKE ANY CHANGES/
MODIFICATIONS TO THE SURFACE OF THE
SHOWER PAN WHATSOEVER.
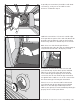
Sweep up any debris from
subfloor.
All walls and framing must be
plumb prior to proceeding. The
floor must be level within 3/8”.
*Creating a bore hole larger than 7” would void any warranty.