
Installation Guide


2023.03.08
WASTE WATER PIPE
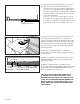
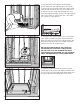
4. This step depends on whether there is access to
the drain connection from below the subfloor:
a. If there is access from the subfloor below, then
cut a section of drain pipe (PVC, as applicable to
the type of drain) which is long enough to extend
below the subfloor and easily make a connection
to the waste water pipe.
b. If there is no access from the subfloor below,
then make sure the drain pipe stubbed up from
the subfloor is adjusted to a height suicient to fit
properly into the shower pan drain connection.
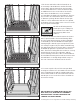
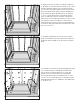
5. Turn the shower pan over and note that there are
ribs under the shower pan floor. To calculate the
amount of mortar needed, you will need to know the
depth of the deepest point in between the ribs. Once
you have that value, calculate the thickness (depth)
of your mortar base (Type N or S Mortar) using the
following formula:
Redi Trench® / WonderFall Trench® / Redi Free®
Trench Pans: See Step 5 image for mortar thickness
for Trench pans.
Redi Base® / Redi Free® (Non-Trench) Pans: (Left or
Right Drain ONLY) Subtract 1/4” from deepest rib
measured in Step 5.
Redi Base® / Wonder Drain® / Redi Free® (Non-
Trench) Pans (Center Drain ONLY): Subtract 1/8” from
deepest rib measured, PROVIDED that the mortar
base should always be at least 1/2”.
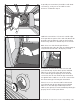
DO NOT PLACE THE MORTAR DIRECTLY ON
A WOOD OR GYPCRETE SUBSTRATE. FIRST,
WATERPROOF THE WOOD SUBSTRATE WITH A
FLUID APPLIED WATERPROOFING MEMBRANE,
OR NO. OR NO. ROOFING PAPER SO THE
WOOD DOES NOT ABSORB THE WATER FROM
THE MORTAR.
TRENCH DRAIN
1/2” DEEP
MORTAR BED
SUBTRACT 1/2” FROM DEEPEST RIB
MEASURED IN STEP 4