
Installation Guide


2023.03.08
1”
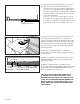
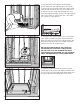
6. Spread your mortar base (should be a milk shake
consistency), evenly across the subfloor at the
thickness calculated in Step 5.
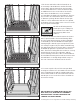
7. Oset the mortar base 1“ from each outside edge
of the pan with exception of the curb side. Mortar will
protrude out from under the curb, run the finishing
trowel along curb face to backfill any excess mortar.
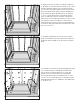
Mark a line on a shim denoting the distance
calculated in Step 5. Use the shim as a depth gauge to
verify that the mortar bed is the depth you need.
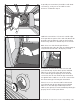
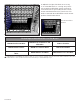
8. If there is access from the subfloor below and
you followed Step 3a, then brush primer and PVC
adhesive on the inside of the drain and outside
of the cut drain pipe and quickly insert into drain
connection, then be sure the drain pipe extends far
enough below the subfloor so it can be connected to
the waste water pipe following the installation.
If there is no access from the subfloor below and
you followed step 3b, then brush primer and PVC
adhesive on the drain pipe stubbed up from the
subfloor, then quickly insert the stubbed-up drain pipe
properly into the shower pan drain.**
**Pipe adhesion code standards can vary. Please check local plumbing codes.