
Installation Guide


2023.03.08
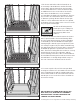
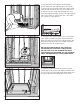
9. Place the pan in the mud base and firmly but
gently shimmy the pan (applying pressure in drain
location first) into the mud so that (i) the drain is fully
supported by mud at the bore hole in the substrate,
and (ii) the ribs are completely filled with the mud
alternately applying hand pressure to the right and left
sides of the pan floor until the pan ribs come within
1/8” clearance of the subfloor.
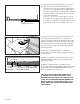
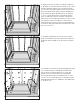
10. Using the level, ensure that the pan is level left to
right, and front to back along the splash walls. Also
make sure the pan is level left to right along the curb.
Allow the mortar bed to dry in accordance with the
instructions of mortar manufacturer.
DO NOT USE THE INSIDE OF THE PAN AS AN
INDICATOR SINCE THE PAN IS PREPITCHED.
DO NOT STEP INTO THE SHOWER PAN ONCE
THE SHOWER PAN HAS BEEN SET AND LEVELED
UNTIL THE MORTAR HAS CURED COMPLETELY.
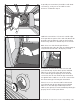
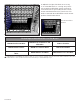
11. Install the Redi Flash flashing system along the
splash walls of the shower pan. Apply a bead of 100%
silicone to the top of the Redi Flash flashing that runs
along the splash wall alongside the bench frame.
Push to back wall
Lower into
drain