
Installation Guide

Page 6
TimberTech
®
Square Shouldered Boards
Important Information
To get information on other TimberTech products, visit
timbertech.com or ask your dealer for these installation guides:
• TimberTech boards are intended to be installed embossed
side up. The unembossed surface is not to be used as a
walking surface. This applies to all decking surfaces.
• The serrated bottom side of TwinFinish is great for accents
like benches and flower boxes.
• In areas with obstructed airflow such as roofs and
on-grade applications, a minimum of 1-1/2” sleeper system
supported by and connected to the substructure over which
the deck is built is required.
• To aid water run-off, the deck should slope 1/2” for every 8’
away from the house.
• To further minimize expansion and contraction, proper
ventilation and airflow should be considered.
• For best practices in climates with extreme temperature
cycles, limiting the length of the deck board and avoiding
affixing to the rigid length of the joist in applications such as
picture framing or parting boards can help avoid movement
and screw shear.
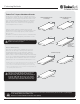
Square Shouldered Board Installation
Instructions
• Always be sure to check and cut the factory cut ends of all boards
to ensure they are square.
• Install from the outside edge of the deck and work toward
the house.
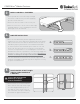
• Fasten no closer than 3/4” from the outside edge of each board,
using two screws per joist including end joints.
• For gapping requirements, see page 3.
• The ends of the boards must fall on a joist. Always double joists
at butt seams. Do not toe screw deck boards as this will cause
splitting.
• Always install fasteners perpendicular to board surface and drive
flush. Do not overdrive or splitting and mushrooming
will occur.
• Pre-drilling is required when within 1-1/2” of the ends of the
board and for temperatures below 45 degrees Fahrenheit to avoid
end splitting and screw shear.
• TimberTech Cortex requires pre-drilling with a 3/16” bit for ALL
applications in TimberTech Pro Tropical, Pro Legacy, and EDGE
Premier
Special conditions will require an engineering inspection and/or
reduced spans. Always consult local building codes.
Maximum Joist Spacing
90° Angle 30° Angle 45°Angle
100psf 24" 24" 24”
90° Angle 30° Angle 45° Angle
100psf 20" 18" 16"
100psf 16" 14" 12"
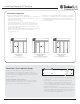
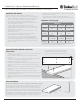
TwinFinish
TimberTech PRO, TimberTech EDGE, and Reliaboard
DockSider
3/4”
3/4”
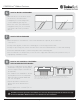
Directional Notch
TwinFinish, ReliaBoard, DockSider, TwinFascia and TwinRiser Boards:
The surfaces of these products are directional in manner. A notch has
been added to one side of the boards. When installing boards, this
marked edge must be laid to the same side for the entire installation
for a consistent appearance. The TwinFascia board has one long edge
beveled on the front and back. To ensure a consistent appearance from
board to board when installing the TwinFascia, the beveled edge must
be laid to the same side. If you rip a piece of TwinFascia be sure to note
the location of the bevel on the ripped piece to ensure consistency.
Identification
Mark
Bevel
Bevel
•
If installed without proper 3/16” Pre-drill,
mushrooming will occur. Cortex or TOPLoc
fasteners are recommended for best results.
• On-grade decks must have additional provisions for drainage
beneath the deck structure.
•
For best practices, decking should not be installed in
applications where ventilation and airflow cannot be achieved.
TimberTech PRO
™
, TimberTech EDGE
™
, TwinFinish
®
, ReliaBoard
®
, and DockSider
®