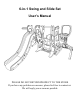
6-in-1 Swing and Slide Set User’s Manual PLEASE DO NOT RETURN PRODUCT TO THE STORE If you have any problem or concerns, please feel free to contact us. We will reply you as soon as possible.
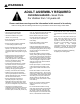
WARNINGS ADULT ASSEMBLY REQUIRED CHOKING HAZARD - Small Parts For children from 1-8 years old. Please read these warnings and the information in this manual in its entirety. Failure to comply with the following instructions may increase the risk of serious injury and/or death: • This unit must be assembled and disassembled by ADULTS ONLY. • This Slide is suitable for use by most children 1 to 8 years of age. • Never use this product in any manner other than its intended use.
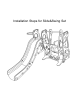
Installation Steps for Slide&Swing Set
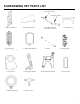
SLIDE&SWING SET PARTS LIST Long Slide Armrest Short Slide Armrest A. Slide Side Board*3 E. Slide Steps*4 B. Slide Main Board*1 F. Slide Extend Board*1 I. Swing Seat* 1 J. Swing Upper Board*2 M.Basketball Hoop*1 N. Swing Armrest C. Long Slide Armrest*2 Short Slide Armrest*2 G. Stick*1 K. Swing Bottom Board*2 D. Swing Base*2 H. Swing Pedal*1 L.
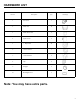
HARDWARE LIST Description Part No Qty 1 Iron Screw 1 2 Plastic Nut 15 3 Plastic Flower Nut 2 4 Square Screw 6 5 十 Shaped Nut 26 6 Nut for armrest 1 7 Insert small nut 6 8 Clip 4 9 Stopper 2 10 Rectangle Screw 2 Drawings Note: You may have extra parts.
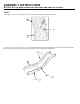
ASSEMBLY INSTRUCTIONS NOTICE: Don’t tighten screws until all screws and parts are in place. STEP1. Use 1*part 1 iron screw to connect the part F extend board and the part B slide main board. B ① F Use 18 * part 5 nut to connect part C (2 * long slide armrest and 2 * short slide armrest) and the main board( part B and part F) on both sides, and then use 2 * part 10 rectangle screw to tighten the middle nuts.
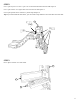
STEP2. Use 1* part 4 square screw and 1* part 7 nut to connect slide armrest and one side of part A. Use 1* part 3 flower nut to tighten slide main board and one side of part A Use 4* part 2 plastic nut to connect 4 * part E steps and part A Tips: If you want make the slide lower, you can install 3 steps and there are lower holes for lower slide. A ④&⑦ ③ ② STEP3. Put 3* part L between two stair treads.
STEP4. Use 4 * part 2 plastic nut, 1* part 4 square screw, 1* part 7 nut and 1*part 3 flower nut to connect one other part A and the other side of the steps and the slide. ④&⑦ A ③ ② STEP5. Use 2 * part 2 plastic nut to connect 2 * part D swing bases and part A A ② ⑨ D Tips:You can add water into the bases (there are holes on the bases) to make the entire swing heavier and more stable. And you can use 2*part 9 stoppers to block the holes.
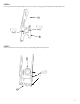
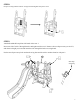
STEP6. Use 2 * part 7 nut and 2* part 4 square screw to connect part J swing upper board and part K swing bottom board J ④&⑦ ④&⑦ K STEP7. Use 8 * part 5 nut to connect part I swing seat, part H swing pedal and swing boards.
STEP8. Put part N swing armrest between swing boards and tighten with part 6 screw. ⑥ STEP9. Attached basketball hoop M to side board with screw 2. Insert one side of stick G through board A and tighten with screw 2. Remove the non-slip accessory on stick G, and choose a height you want and insert the stick through the holes on swing board. Put the non-slip accessory back and attach swing base and the stick to another board A with part 2.
STEP10. Insert clips part 8 into the holes on stick to hold the swing.
Installation Steps for Basketball Stand 9
BASKETBALL STAND PARTS LIST A. Base/Goal * 1 D. Holder *1 G Basketball Net *1 J. Soccer Ball * 1 B. Base Stand * 2 E. Backboard *1 H. Soccer Net * 1 K. Ball Pump * 1 C. Supporting Pole * 1 F. Basketball Hoop *1 I. Basketball * 1 L.
HARDWARE LIST Description Part No Qty 1 Net hook 8 2 Nut 4 3 Stopper 2 Drawings Note: You may have extra parts.
ASSEMBLY INSTRUCTION Pour water or sand into each part B base stand and then seal the hole with part 3 stopper. This will add extra weight to the base. 3 STEP1. Use 2*part2 nut to connect part A base and part B base stand.
STEP2. Use 8 * part 1 net hooks to connect the base and the part H soccer net. NOTE: When attaching the net hooks, make sure their openings are facing outward. ① ① STEP3. Use part D ring holder to connect part C supporting pole and the base. Fix them with one part 2 nut. D \ L ② 13
STEP4. Inset the part F basketball hoop into the part E backboard Use part 2 nut to connect the hoop and part C supporting pole. Install part G basketball net. Tips: The supporting pole allows for height adjustment, just tightening the nut where you want the hoop to be. E F ② C STEP5. Use part K ball pump to inflate part J soccer ball and part I basketball. Then the basketball stand is ready to use.
STEP6. Finally, put the basketball stand and the slide swing set together. All assembly steps have been completed.