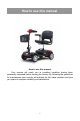
Owner’s Manual (M1)
How to use this manual How to use this manual Your scooter will reach you in excellent condition having been personally inspected before leaving the factory. By following the guidelines for maintenance your scooter will maintain its first class condition and give you years of complete reliability and satisfaction.
Contents 1.Introduction ………………………………………………………………page3 2.General Warnings ………………………………………………………page4 3.Quick Start Guide ………………………………………………………page5 4.Features ………………………………………………………………page7 5.Getting On or Off your Scooter ………………………………………page8 6. Control Panel……………………………………………………………page9 7.Tiller control function …………………………………………………page11 8. Freewheel Mechanism ………………………………………………page12 9.Seat Removal and Adjustment………………………………………page13 10.Tiller and Battery and Charging ……………………………………page14 11.
1.Introduction With over 8 years’ experience, we are one of the longest established mobility equipment manufacturers in the China. All of our Scooters, Wheelchairs and Power Chairs undergo rigorous tests to ensure they meet our requirements for comfort, safety and durability. Our success is based on the strong traditions of quality, value for money and genuinely caring for our customers.
2.General Warnings DO NOT OPERATE THE SCOOTER BEFORE READING AND UNDERSTANDING THIS INSTRUCTION MANUAL. IF YOU ARE IN DOUBT ABOUT THE MEANING OF THESE INSTRUCTIONS, OR ANY OF THE CAUTIONS AND WARNINGS, PLEASE CONSULT YOUR HEALTHCARE PROFESSIONAL, DEALER OR RELEVANT TECHNICAL PERSONNEL. FAILURE TO FULLY UNDERSTAND THE SCOOTER OPERATION MAY RESULT IN ANUNEXPECTED RESPONSE FROM THE EQUIPMENT WHICH CAN IN TURN LEAD TO POSSIBLE INJURY OR DAMAGE.
3.Quick Start Guide Assembly When lifting always keep the back straight, bend the knees and use the lifting handles provided. Ensure your freewheel mechanism is fully engaged, so your scooter can not move while assembling. Set the tiller by rotating the Tiller folding knob while moving the tiller upwards. Remove the basket from the footboard and place on the bracket located on the front of the tiller. Lift the seat onto the seat post and press down to ensure it is fully engaged.
On/ Off Switch, Battery Gauge, Speed Control, head Light, Horn and Directional Control Levers. If you have previously used or owned a scooter before you MUST still read the Owners Manual carefully to fully understand the controls and safety warnings. If you are in any doubt of their functions then please turn to pages13 and 16 of this manual. Transporting Your scooter may be disassembled quickly and simply for transportation: 1. Lift off the front basket. 2.
4.
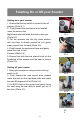
5.Getting On or Off your Scooter Getting on to your scooter 1. Ensure that the key switch is turned to the off position (Photo 5.1). 2. Push forward the seat swivel lever located under the seat on the Right-hand side and rotate the seat to face you (Photo 5.2). 3. Put the armrests into the fully down position and use them to steady yourself as you gently lower yourself Into the seat (Photo 5.3). 4. Push forward the seat swivel lever and gently swivel the seat to face Forward (Photo 5.4). 5.
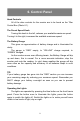
6. Control Panel Hand Controls All of the drive controls for the scooter are to be found on the Tiller Control Box (Photo 6.1). The Preset Speed Knob Turning this knob to the left, reduces your available maximum speed. Turning it to the right, increases the available maximum speed. The Battery Gauge This gives an approximation of battery charge and is illuminated for clarity. The gauge is “RED” empty, to “YELLOW” charge required, to “GREEN” charged.
P6.
7.Tiller Control Functions Throttle Lever The throttle lever offers finger-tip control of your scooter. It controls the speed as well as forward and reverse motion. To move the scooter in a FORWARD motion PULL the lever with the RIGHT HAND or PUSH the lever with the LEFT THUMB (Photo 7.1). To move the scooter in a REVERSE motion PULL the lever with the LEFT HAND or PUSH the lever with the RIGHT THUMB. The lever will return by itself when released and the scooter will slow to a stop (Photo 7.2).
Make sure that this switch is in the OFF position BEFORE Getting on or off the scooter. Remove the key to make sure The scooter is OFF (Photo 7.5). Turning the key to OFF whilst driving will cause the scooter To stop very abruptly. This is not recommended except in Emergency stop, as continual use of this function could Result in damage to the scooter. Off Board Charging Socket The socket to connect the off-board charger is located on the battery pack (Photo 7.6).
9.Seat Removal and Adjustment Removing the Seat Please note that these instructions are to be used as a guide only. 1. Lift armrests upwards for ease of access (Photo 9.1). 2. Stand behind the seat and fold the backrest down(Photo 9.2). 3. Grasp the seat base and keeping a firm grip, lift the seat vertically, keeping your back straight. Bend knees ifrequired (Photo 9.3). 4. Place seat at desired location for stowage, keeping back posture straight at all times, bend knees where required (Photo 9.4).
Armrest Adjustment 1. Pull the lock-pin out from the seat base(photo 9.7), 2. Loose the adjustable bolt(photo 9.8). 3. Moving the armrests to the desired position andre-tightening the thumbwheel knobs to adjust the width of the armrest. P9.7 P9.8 10.Tiller, Battery and Charging Tiller Adjustment The scooter features an infinitely adjustable tiller which allows you to lock the tiller in the most comfortable driving position.
Remember to keep the knees bent and the back straight. Battery Replacement To replace the batteries reverse the sequence above Important: Remember to keep the knees bent and the back straight. When reassembling the scooter, remember to insert the locking pin, because failure to do so may result in the batteries disengaging during use. Ensure the battery wells are free from dirt and grit - this will affect the performance of the battery contacts.
driven off during charging. If your scooter fails to respond to normal control after a charging period, please check that the battery charger has been completely disconnected from the scooter. The off-board charger must be kept dry in temperatures between 25°C and 40°C and not be subjected to mechanical damage. In all cases, the charger must only be repaired by an authorized dealer. WARNING! You can only use the original charger from our company.
11.Transportation Packaging We package the mobility scooter may prevent it from removing in the package, shaking in the package or any scratch, by following the below steps: 1, put the scooter into the prepared carton (Photo 11.1), like the position in Photo 11.2. 2,Cover the carton and fix the whole carton with professional ropes for packaging.(Photo 11.1 and Photo 11.2). (P11.1) (P11.2) (P11.3) (P 11.4) Important Our cartons comply with GB/T4857.18(equals to ISO4180/2): 1.
Transportation Your scooter may be disassembled quickly and simply for transportation. 1. Switch off the scooter, make sure the motor is engaged. 2, Remove the basket. 3. Remove the seat, leaving the seat stem in position. 4. Place the basket on the floor mat appropriately(photo 11-1). 5. Lower the tiller, using the folding knob, to its lowest setting locking in the basket. Make sure that there is at least 30mm between Tiller and battery pack(photo 11-5). 6.
12.Guidance for Safe Operation and Use Basic Driving Caution! It is advisable during the first few sessions of operating your scooter that the area around you is clear of obstacles and pedestrians. Before operating your scooter, ensure the seat height and position has been adjusted to your satisfaction and the tiller angle has been set for optimum safety and comfort. Please see the “General Warnings”, “Getting on Your Scooter” and “Tiller Adjustment” sections in this handbook. 1.
15minutes the scooter will go into “sleep mode”. To reset this, switch the scooter OFF and then back ON again. Note: The user’s visual standards must be higher than 0.5. Hill climbing This scooter has been tested to climb an incline of no more than 10°with a maximum user weight of up to 120kg (264 lbs) (Photo 12.1). Do not attempt to climb inclines in excess of this. Always reduce your speed when reversing on slopes.
Note: Automatic braking is not instantaneous and will engage within 1/2 a wheel turn once the scooter has stopped. Emergency Braking In the unlikely event of an unwanted movement of the scooter or other emergency, switching off the key switch will bring the scooter to a stop. Though very effective, emergency braking is extremely abrupt and must never be used under normal circumstances. Letting go of the throttle lever will slow the scooter to a controlled stop.
Note: Low speed settings are recommended when traveling down hill, particularly in reverse. Also, reduce your speed when turning corners. The anti-tip devices fitted to the scooter must not be removed. Turning corners Always reduce your speed when turning corners, particularly when travelling downhill. Disregard of this advice could lead to your scooter tipping over. Use of mobile phones Mobile telephones or two way radio devices must not be used while operating the vehicle.
13.Battery and Charging Information General information Batteries are the power source for almost all of the modern mobility products available today. The design of batteries used in mobility products is significantly different from the batteries used to start a car for example. Car batteries are designed to release a large amount of power over a short period of time, whilst mobility batteries (commonly called deep cycle batteries) release their power evenly over a long period of time.
It is recommended that the batteries are always transported and stored upright. Only use batteries supplied by an authorized dealer. Battery care We have set out a battery care plan for maintenance free batteries. If a different care plan is followed, this may result in lower than expected performance from your mobility vehicle. Note: Do not expose any part of the battery to direct heat and when charging always place on a hard surface in a room with good ventilation.
Caution! Take care not to short circuit the battery terminals. Remove all conductive jewelry (e.g. watches, necklaces etc.) before checking the batteries. 9. Following all the eight points above should result in a healthier battery, greater range for the vehicle user and a longer life for your batteries. The range of your vehicle Most manufacturers of mobility products state the range of their vehicles either in the sales literature or within the Owner’s Manual.
14.General Warnings PERSONAL & OPERATIONAL GUIDELINES Drive profiles should only be adjusted by healthcare professionals and approved agents/dealers, who are totally conversant with the process. They must also fully understand the user’s capabilities and the user’s ability to operate the scooter safely. Incorrect settings may cause injury or damage to the user, bystanders, the scooter and/or nearby property.
DO NOT use your mobility scooter without the anti-tipper wheels attached. DO NOT attempt to fit parts, accessories or adapters that are not authorized. DO NOT mount or dismount your mobility scooter without first withdrawing the ignition key. This will ensure that the power is off and the scooter cannot move unexpectedly. DO NOT leave the ignition key in your scooter whilst it is unattended. Children or inexperienced people may attempt to drive your scooter which may result in damage or personal injury.
checking that it is LOCKED into position. Attempting unsafe transfers can result in bodily injury and/or damage. DO NOT drive your scooter if the seat is not LOCKED in the FORWARD position. The seat must be secured in the FORWARD facing position BEFORE and DURING operation of the scooter. Attempting to operate the scooter with the seat not secured in the front facing position, could result in damage and/or bodily injury.
Electric Wheelchairs.” The test provides the scooter user or their attendant, sufficient time to remove the mobility scooter from a rain storm, whilst retaining normal operation of the mobility scooter. DO NOT operate your mobility scooter during an electrical storm. DO NOT leave your mobility scooter in a rain storm of any kind. DO NOT use your mobility scooter in a shower or leave it in a damp bathroom or sauna. DO NOT leave your mobility scooter in a damp area for any length of time.
15.EMC (EMI) Warnings CAUTION: IT IS VERY IMPORTANT THAT YOU READ THIS INFORMATION REGARDING THE POSSIBLE EFFECTS OF ELECTRO MAGNETIC CONTAMINATION, (EMC) ON YOUR MOBILITY SCOOTER. SOMETIMES THIS EFFECT IS ALSO KNOWN AS ELECTRO MAGNETIC INTERFERENCE (EMI). EMC (EMI) FROM RADIO-WAVE SOURCES.
Note: Other types of hand-held devices such as cordless phones, laptop computers, AM/FM radios, TV sets, CD players, cassette players and small appliances, such as electric shavers and hair dryers, are not likely to cause any EMC problems to your mobility scooter. Mobility scooter electromagnetic contamination (EMC). EM energy rapidly intensifies the closer one moves to the transmitting antenna, the source.
Warnings This device or system should be kept away from other equipments. If they must be put together, pls check whether the device or system can run normally. You should consider the original manufacturer of the device or system as the sole supplier. Failure to do so may cause EMC increase and or decrease anti-EMC ability. Attachments: Guidance and manufacturer’s Declaration– electromagnetic emission (SW-1000Sscooter)is intended for use in the electromagnetic environment specified below.
Guidance and manufacturer’s Declaration–electromagnetic emission (SW-1000Sscooter)is intended for use in the electromagnetic environment specified below. The customer or the user of the (SW-1000Sscooter) should assure that it is used in such an environment. Complia nce level electromagnetic environment-guidanc e ±6 kV contact ±8 kV air ±6 kV contact ±8 kV air Floors should be wood, concrete or ceramic tile. If floors are covered with synthetic material, the relative humidity should be at least 30%.
Voltage dips, short interruptions and voltage variations on power supply input lines. IEC 61000S-4-11 <5 % UT, (>95% dip in, UT )for 0.5 cycle 40 % UT (60% dip in, UT)for 5 cycles 70 % UT, (30% dip in, UT)for 25 cycles <5 % UT, (>95% dip in, UT)for 5 sec Power frequency (50/60Hz) magnetic field IEC 61000S-4-8 3A/m Mains power quality should be that of a typical commercial or hospital environment.
Conducted RF IEC 61000S-4-6 Radiated RF IEC 61000S-4-3 3 Vrms 150 kHz to 80 MHz 3 Vrms 3 V/m 3 V/m 80 MHz to 2.5 GHz Portable and mobile RF communications equipment should be used or closer to any part of the (SW-1000Sscooter), including cables, than the recommended separation distance calculated from the equation applicable to the frequency of the transmitter. Recommended separation distance d = 1.2 P d = 1.2 P 80 MHz to 800 MHz d = 2.3 P 800 MHz to 2.
NOTE 1:At 80MHz and 800MHz, the higher frequency range applies. NOTE 2: These guidance may not apply in all situations. Electromagnetic propagation is affected by absorption and reflection from structures, objects and people. a. Field strengths from fixed transmitters, such as base stations for radio (cellular/cordless) telephones and land mobile radios, amateur radio, AM and FM radio broadcast and TV broadcast cannot be predicted theoretically with accuracy.
100 12 12 23 For transmitters rated at a maximum output power not listed above, the recommended separation distance d in meters (m) can be estimated using the equation applicable to the frequency of the transmitter, where P is the maximum output power rating of the transmitter in watts (W) according to the transmitter manufacturer. NOTE 1 At 80 MHz and 800 MHz, the separation distance for the higher frequency range applies. NOTE 2 These guidelines may not apply in all situations.
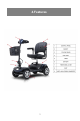
16.Specifications MEASUREMENTS ARE FOR GUIDANCE ONLY. SMALL DIFFERENCES MAY OCCUR PARAMETER LENGTH REAR WIDTH HEIGHT MAX. USER WEIGHT BATTERY CAPACITY MAX SAFE SLOPE TURN RADIUS NARROWEST FOR TURNNING SEAT - BASE HEIGHT MAX SPEED WHEEL DIAMETER FRONT WHEEL DIAMETER REAR CHARGER OFF-BOARD RANGE OVERALL WEIGHT SEAT WEIGHT BATTERY WEIGHT FRONT BASKET WEIGHT GROUND CLEARANCE CONTROLLER (Dynamic) According to prevent electric shock category classification A.1.
17.Routine Maintenance Maintenance, fault finding and servicing k l yt D ai lye There is no service manual available. e r l yu a l l Y The following table gives an indication as to when routine maintenance checks should be made. should be carried out by an authorized dealer unless otherwise indicated The checks below can be carried out by the user Battery charge check (Fig. C) ● Look at battery charge indicator on tiller before use to ensure batteries carefully charged.
Clean and protect with petroleum jelly. Ensure parking brake (where fitted) is correctly ● adjusted Check stabilizer wheels for wear ● Inspect motor brushes ● Full service by dealer ● Fig.A Fig.B Fig.C Storage When storing your scooter for long periods (in excess of one week), charge batteries for 12 hours and then disconnect the batteries to minimize battery discharge.
18.Service History This section is designed to assist you in keeping a record of any service and repairs to your scooter. Should you decide to sell or exchange your vehicle in the future, this will prove most helpful to you. Your Service Agent will also benefit from a documented record and this manual should accompany the scooter when service or repair work is carried out. The Service Agent will complete this section and return the manual to you.
Discharge Forwards test Motors Reverse Wiring Emergency Stop Noise Left turn Connection Right turn s Brake Up/down slope Brushes Over obstacle Chassis Parking brake (where fitted) List items repaired/adjusted Condition Steering Electrics Connection s Lights(wher e fitted) Dealer stamp Dealer stamp Date: Date: Signed: Dealer stamp Date: Signed: Dealer stamp Signed: Date: 42 Signed:
19.
Battery pack not engaged properly Motor runs irregularly and/or noisily Check battery pack is fully engaged onto connectors Charger plugged in Unplug charger Button on battery pack Reset circuit-breaker popped out button Disconnected loom or Check all plugs & plugs looms Control system fault Contact dealer Electrical malfunction Contact dealer Control system fault Contact dealer DO NOT ATTEMPT TO OPEN ANY PARTS OF THE SCOOTER CONTROL SYSTEM, BATTERY PACK, LOOMS, PLUGS OR BATTERY CHARGER.
4 5 electric current over limit Freewheel level issue electric current over limit of motor The freewheel level is on Check motor and relative wiring connections Switch off and wait a fewminutesand Switch on.
20.Guarantee Warranty condition 1. The repair or replacement will be carried out by an authorized Dealer/Service Agent. 2. To apply the warranty conditions should your scooter require attention under these arrangements, notify the designated Service Agent immediately giving full information about the nature of the difficulty.
(iii) The scooter or part having been altered from the manufacturer’s specifications, or repairs having been attempted prior to the Service Agent being notified. Please keep a note of your local Service Agent’s address and telephone number in the space provided. In the event of a breakdown, contact them and try to give all relevant details so they can help you quickly. The scooter shown and described in this manual may not be exactly the same in every detail as your own model.