
Paint Sprayer User Manual

2. Test your repair before regular operation of the sprayer to
be sure that the problem is corrected. If the sprayer does
not operate properly, review the repair procedure to
determine if everything was done correctly. Refer to the
Troubleshooting Charts to help identify other possible
problems.
3. Make certain that the service area is well ventilated in
case solvents are used during cleaning. Always wear
protective eyewear while servicing. Additional protective
equipment may be required depending on the type of
cleaning solvent. Always contact the supplier of solvents
for recommendations.
4. If you have any further questions concerning your TITAN
Airless Sprayer, call TITAN:
Customer Service (U.S.) .......................1-800-526-5362
Fax ................................................1-800-528-4826
Customer Service (Canada)..................1-800-565-8665
Fax ................................................ 1-905-856-8496
Customer Service (International)...........1-201-337-1240
Fax ................................................1-201-405-7449
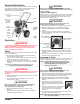
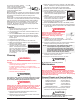
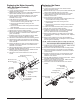
Replacing the PRIME/SPRAY Valve
Perform the following procedure using PRIME/SPRAY valve
replacement kit P/N 800-915.
1. Push the groove pin out of the valve handle.
2. Remove the valve handle and the cam base.
3. Using a wrench, loosen and remove the valve housing
assembly.
4. Make sure the gasket is in place and thread the new
valve housing assembly into the filter block. Tighten
securely with a wrench.
5. Place the cam base over the valve housing assembly.
Lubricate the cam base with grease and line up the cam
with the filter block using the dowel pin.
6. Line up the hole on the valve stem with the hole in the
valve handle.
7. Insert the groove pin into the valve handle and through
the valve stem to secure the valve handle in position.
Gasket
Dowel Pin
Cam Base
Valve Stem
Filter
Housing
Valve Housing
Assembly
Valve
Handle
Groove Pin
8©Titan Tool Inc. All rights reserved.
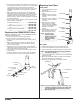
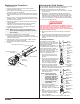
Replacing the Filters
Pump Filter
1. Loosen and remove the filter
body by hand.
2. Slip the filter off of the core
spring.
3. Inspect the filter. Based on
inspection, clean or replace
the filter.
4. Inspect the o-ring. Based on
inspection, clean or replace
the o-ring.
5. Slide the new or cleaned
filter over the core spring
with the filter spring adapter
in place. Push the filter into
the center of the filter
housing.
6. Slide the filter body over the
filter and thread it into the
filter housing until secure.
Gun Filter
1. Move the gun trigger lock to the unlocked position.
2. Loosen and remove the handle from the gun body.
3. Turning clockwise, unscrew the filter from the gun body.
4. Turning counterclockwise, screw the new or cleaned filter
into the gun body.
5. Make sure the handle seal is in position and thread the
handle into the gun body until secure.
6. Move the gun trigger lock to the locked position.
NOTE: For more detail, part number information, and
assembly drawings at larger scale, please see
the LX -80 Professional Airless Gun Owner's
Manual (#313-012).
Gun Body
Handle Seal
Filter
Handle
NOTE: Left-handed threads require turning the filter
clockwise to remove.
NOTE: The filter body
should be hand-
tightened, but make
sure it is seated
fully into the filter
housing.
Filter Body
Filter Spring
Filter Spring
Adapter
Core Spring
Filter
O-ring
Filter Housing