Operator’s Manual PGD2000 & PGD3200
Table of Contents Introduction......................................................................................................2 Safety Warnings ..............................................................................................3 Operating Instructions.....................................................................................5 Service and Maintenance.................................................................................9 Servicing of Hammer and Anvil ....................
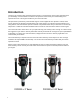
Introduction Thank you for choosing Titan Gas-Powered Post Drivers. The performance of this tool is dependent upon your knowledge of the information contained in this operator’s manual and your understanding of the operation and care of the engine installed on your Titan Post Driver. This post driver is powered by a Honda GX35 engine. Honda supplies its own operator’s manual, which covers all aspects of operating and maintaining your Honda engine.
Safety Warnings This post driver is intended for use by informed adults only. Never allow children or uninformed persons to operate this machine. Never let your post driver run unattended. When not in use, turn the driver off to prevent unauthorized persons from using it. DO NOT use the Titan Post Driver for any purpose other than driving posts or rods into the ground. Misuse may result in serious injury to yourself or others, as well as damage to your driver or other surrounding property.
Vibration Hazard Warning Prolonged use of a power tool exposes the operator to vibrations, which may cause white finger disease or carpal tunnel syndrome. These conditions reduce the ability of the hands to feel and regulate normal temperature, produce numbness and burning sensations, and may even cause nerve and circulation damage.
Operating Instructions Your Titan Post Driver is designed to be as effective and efficient as possible, while being extremely powerful and lightweight. It is very important to understand that your post driver is a powerful machine. With proper use and maintenance, your Titan Post Driver will provide you with many years of service. To reduce the risk of serious injury or death, you must read and understand the safety and operating instructions in this operator’s manual.
Always follow these guidelines before you start your machine! • • • • • • Add engine oil. THE OIL IS NOT FILLED WHEN THE POST DRIVER IS ASSEMBLED. Honda suggests adding less than 80 cm2 (2.7 US oz., 2.8 Imp. oz.), then checking. Add oil if required to fill to the bottom edge of the oil fill hole. Use 10W-30 oil. DO NOT OVERFILL. Always hold driver in upright position to check oil level. Proper oil level is essential for the correct operation of the post driver.
Driving a Post • • • • Put on personal protective equipment as outlined in this manual. Start the engine safely as outlined on page 6. Take a firm stance with weight evenly distributed on both feet. Keep both feet securely planted at a minimum of shoulder width apart. ALWAYS maintain a solid balance while driving posts. Lift the post driver onto the post, and ensure that the driver is sitting level and the post is centered up in the barrel of the post driver.
Refueling • • • • Always turn the engine off and allow adequate time for it to cool before refueling. ONLY USE UNLEADED FUEL WITH 86 OCTANE OR HIGHER. NEVER refuel your driver with the engine hot, running, or in an unventilated area. Fuel vapors are extremely flammable and can cause severe injury or death if ignited by a spark or excessive heat from a hot engine. Fill the tank on level ground and avoid spilling the fuel on the motor. Always allow any spilled fuel to evaporate before restarting the engine.
Service and Maintenance The Titan Gas-Powered Post Driver has been manufactured and designed to give you years of trouble-free post driving. Always refer to the Honda GX35 manual for service and maintenance guidelines on your engine. The following maintenance guidelines will keep your machine in top-performing condition. Be sure to properly store your Titan Post Driver. DO NOT lay it horizontally on the driver side or resting on the engine.
• Every 4 months or 50 hours of use: 1. Remove the crank housing cover to check the EP 0 grease level. The crank area should look clean and grease should be visible around the crank area and top of the piston. There should be a ring of grease collected against the wall of the crank case. 2. If the ring of grease around the crank case wall measures less than ¼”, it is an indication that the grease level is low. Add no more than a few tablespoons of EP 0 grease.
• Every 12 months or 250 hours of use: 1. Follow the above regularly scheduled maintenance guidelines for every 3 months or 25 hours of use on page 9. 2. Follow the above regularly scheduled maintenance guidelines for every 4 months or 50 hours of use on page 10. 3. Remove and service the hammer and anvil according to guidelines in the section of this manual titled Servicing of Hammer and Anvil on page 12. 4. Replace all O-rings and housing seals.
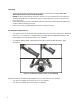
Servicing of Hammer and Anvil (Rebuild) Bottom Driver Body • • • • Wear eye protection. Remove the 6 bolts on the bottom half of the lower driver body. Be aware that the handle tubes have anti-vibration springs that are installed under tension. The damper assembly washer will sometimes be removed with the lower driver body, or it may remain in place in the upper driver body. Remove the damper section and inspect the rubber O-rings and steel components for wear or debris.
Top Driver Body • • • • Wear eye protection. To remove the hammer, gently tap the main cast housing vertically down on a soft bench top, and it should slide out of the barrel. Locate the Viton O-ring and replace it at this time. The hammer is made of high-quality, hardened-tool steel and should not show any signs of wear. Thoroughly clean the hammer.
Reassembly • After thoroughly cleaning and drying the hammer components and the cylinder, reassembly can be done. 1. Wear eye protection. 2. Apply a wipe of EP 0 grease around the O-ring and outside of the piston, and gently push it back into the housing using a soft dolly. 3. Add a small amount of EP 0 grease to the crank pin shoulder and reassemble. Be careful to keep grease off of the crank pin threads. Remember it is left-hand thread. Torque the crank pin to 228 inch-pounds.
7. Install the metal damper washer back over the anvil. 8. Install the bottom guide section back into the main housing. Be sure to install the new bottom housing O-ring. 9. Insert the anti-vibration springs back into the handlebars and reinstall them into the upper and lower handle cups. When parts are inserted correctly, there will be resistance from the springs to seat the lower driver body. This is normal. 10. Reinstall the bottom housing bolts with new Loctite.
Troubleshooting 1. If your driver sounds like it is running fine, but the anvil is not hammering as it should, make sure your anvil is fully engaged. There is a safety that will disengage the anvil if it is dry-fired or misfired. To reengage the anvil, simply pick the driver up off the post, and place it back down on the post with a bit of force to hit the anvil against the post. AVOID REPEATED DRY-FIRE by maintaining 10-12 pounds of down-pressure at all times. 2. Check the type of grease in the crank.
Warranty Titan Post Drivers will warrant to the original purchaser, who purchases the equipment in new condition and in its original packaging from an authorized dealer, that its gas-powered post driver will be free from defects in workmanship and materials for a period of one (1) year. This warranty period will commence on the date of retail purchase by the original purchaser. Titan Post Drivers provides no warranty on the Honda engine.
PGD2000 Parts Diagram Part NO. Part Name QTY WPD-1 M8*15 BOLTS 2 WPD-2 M8*20 TOP HANDLE BOLTS 4 WPD-3 UPPER HANDLE 1 WPD-4 FIXED PLATE 1 WPD-5 HANDLE CUP 2 WPD-6 M5*20 HEXAGONAL BOLTS 4 WPD-7 COVER FOR CRANKCASE 1 WPD-8 O RING 76*2.65 1 WPD-9 CRANK PIN 1 WPD-10 CRANK SHAFT 1 WPD-11 M6*30 HEXAGONAL BOLTS 6 WPD-12 POST DRIVER BODY 1 WPD-13 CYLINDER 1 WPD-15 CONNECTING ROD 1 WPD-16 12 RETAINER 1 WPD-17 WRIST PIN 12*32 1 WPD-18 PISTON 1 WPD-19 O RING 37.5*3.
WPD-40 GEAR 1 WPD-41 6201-2RS BEARING 1 WPD-42 HEXAGONAL BOLTS M6*30 4 WPD-43 CLUTCH HOUSING 1 WPD-44 CLUTCH DRUM 1 WPD-46 ALIGNMENT PIN 2 WPD-47 GASKET 1 WPD-48 CLAMP W/SCREW 1 WPD-49 OIL SEAL 1 19
PGD3200 Parts Diagram Part NO Part Name QTY MPD-1 M8*15 BOLTS 2 MPD-2 M8*20 TOP HANDLE BOLTS 4 MPD-3 UPPER HANDLE 1 MPD-5 HANDLE CUP 2 MPD-6 M5*20 HEXAGONAL BOLTS 4 MPD-7 COVER FOR CRANKCASE 1 MPD-8 O RING 76*2.65 1 MPD-9 CRANK PIN 1 MPD-10 CRANK SHAFT 1 MPD-11 M6*30 HEXAGONAL BOLTS 6 MPD-12 POST DRIVER BODY 1 MPD-13 CYLINDER 1 MPD-15 CONNECTING ROD 1 MPD-16 12 RETAINER 1 MPD-17 WRIST PIN 12*32 1 MPD-18 PISTON 1 MPD-19 O RING 42.5*3.
MPD-40 GEAR 1 MPD-41 6201-2RS BEARING 1 MPD-42 HEXAGONAL BOLTS M6*30 4 MPD-43 CLUTCH HOUSING 1 MPD-44 CLUTCH DRUM 1 MPD-46 ALIGNMENT PIN 2 MPD-47 GASKET 1 MPD-48 CLAMP W/SCREW 1 MPD-49 OIL SEAL 1 21
Contact: Hours: Monday-Friday 8 AM to 5 PM CST Address: 713 E Austin Blvd, Nevada, MO 64772 Phone: (702) 293-4262 Email: info@titanpostdrivers.
Maintenance Records and Notes: ------------------------------------------------------------------------------------------------------------------------------------------------------------------------------------------------------------------------------------------------------------------------------------------------------------------------------------------------------------------------------------------------------------------------------------------------------------------------------------------------
Tl1'AN POST DRIVERS