
Instruction Manual


7
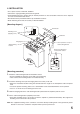
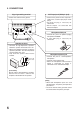
6. OPERATIONS
First, check to confirm that the power switch is set to OFF, and each volume control to the 0 position after
connection completion. Then, connect the power cord to the wall outlet and set the power switch to ON. The
power indicator lamp will light.
6.1 When using the microphone
When the microphone is equipped with a talk switch, turn on the switch and then adjust the volume rotating
the microphone volume control slowly.
6.2 When using the AUX input
Adjust the volume rotating the AUX volume control slowly. (Adjust the output level of connected equipment as
well.)
Making an announcement at the microphone automatically decreases the volume of other broadcast, such as
background music, from equipment connected to the AUX input. The interrupted broadcast is automatically
restored after announcement completion.
7. SPECIFICATIONS
Power Source 220 – 240 V AC, 50/60 Hz
Power Consumption 30 W
Rated Output 10 W
Distortion Under 3% (1 kHz, rated output)
Frequency Response 100 – 12,000 Hz within ±3 dB
Input Microphone input: 600 Ω, –60 dBV, unbalanced
Phone jack x 1, 5-pin DIN jack x 1 (Phone jack is given
priority.)
AUX input: 50 kΩ, –10 dBV, unbalanced
RCA pin jack x 2
Speaker Output High impedance, 1 kΩ
S/N Ratio Over 60 dB
Internal Chime Generator Single-tone chime, 330 Hz (remote operation by PM-600D's talk switch)
Muting Circuit AUX input automatically attenuates when microphone announcement is
made, and is automatically restored upon announcement completion.
(Attenuation level: 25 – 30 dB, restoration time: 4.5 seconds)
Operating Temperature –10°C to 50°C
Dimensions 180 (W) x 71 (H) x 180 (D) mm (projection excluded)
Weight 1.8 kg
Finish Case: ABS resin (off white)
Chassis: Steel plate/paint (black)
Note: The design and specifications are subject to change without notice for improvement.
• Accessories
Instruction manual ............................................. 1
Warranty card .................................................... 1
Wall mounting bracket ....................................... 1
Machine screw for wall mounting bracket .......... 2
Mounting screw (tapping screw) ........................ 3