
Use and Care Manual


Safety Instructions
A. Only authorized, experienced or properly trained individuals should operate this equipment.
B. Operating personnel should be equipped with proper safety protection.
C. Rotating and moving parts will cause injury if contacted. Ensure guards and safety devices are in
place before this machine is operated. Make sure engine is shut down and spark plug is
disconnected before servicing your SURFACE PREPAPATION UNIT. Never leave a machine
unattended when it is running.
D. Be careful to avoid contact with the muffler when the engine is hot as it may cause severe burns.
E. When using a DUST CONTROL UNIT avoid hose contact with the TSCAR-8H muffler as the muffler
may burn a hole in the hose.
F. Do not operate the machine in an explosive atmosphere, near combustible materials or where gas
fumes may not be properly dispersed. Repair any fuel leaks. Remove accumulated dust frequently
from air filter system.
G. Do not run the air motor without sufficient oil in the lubricating system. Lubricant levels should be
checked regularly on gas and air powered units. Refer to manufacturer’s manual for amounts.
H. Before starting your unit, always raise the cutter cage assembly using the hand knob adjustment, so
that the cutters do not contact the surface.
Assembly
Your SURFACE PREPARATION UNIT has been shipped partially assembled with the exception of
the handle assembly. The gas powered units require only filling with fuel and a brief check of lubricant
levels in preparation for operation. Engine crankcase is not pre-serviced with oil at factory; levels
should be checked.
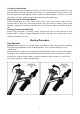
Handle Assembly
A. To attach the handle, first remove the pin from the handle assembly. Align the lift plate and re-insert
the top pin. Place flat washer on pin. Insert spring clip through hole in pin. Feed threaded bolt end of
cable through hole on lift plates.
B. Tighten cable by attaching nut.
C. Remove the four bolts and lockwashers from the machine housing. Match up the holes on the handle
assembly and the machine housing and insert the bolts and the washers. Tighten bolts corner to
corner. Before final tightening, place the machine on a flat surface to ensure that all wheels contact
the surface.
3