TomTom Runner & Multi-Sport Reference Guide 1.
Contents Welcome 4 What's new 5 What's new in this release ...................................................................................................................5 Getting started 6 Your watch 7 About your watch .................................................................................................................................7 Wearing your watch .............................................................................................................................
Adding sensors 33 About sensors....................................................................................................................................33 External Heart Rate Monitor ..............................................................................................................33 Cadence or Speed Sensor ................................................................................................................
Welcome This Reference Guide explains everything you need to know about your new TomTom GPS Sports Watch. If you want a quick read of the essentials, we recommend that you read the Getting started page. This covers downloading TomTom MySports Connect and using the desk dock. After that, if you have a smartphone, you will probably want to download the TomTom MySports app for free from your usual app store or by going to tomtom.com/app.
What's new What's new in this release New Freestyle activity type For TomTom Multi-Sport owners, you can select a freestyle, GPS enabled activity type for any non-running, cycling or swimming activities, so you keep a clean history/totals for the main activity types. To learn more, go to About activities in this guide. New Race This feature Race against a specific activity using the MySports Race this button. To learn more, go to Race in this guide.
Getting started Before you start training, it's a good idea to charge your watch, download any software updates and download QuickGPSfix. Note: QuickGPSfix helps your watch get a GPS fix and find your location quickly. 1. Download TomTom MySports Connect from tomtom.com/getstarted/sports and install it on your computer. TomTom MySports Connect is available for free. 2. Place your watch in the desk dock and connect the dock to your computer. Follow the instructions that TomTom MySports Connect gives you.
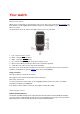
Your watch About your watch When you use your watch, you start from the clock screen. This screen shows the time and date. The hour number is shown slightly dimmed and the minutes are shown brighter so you can see the precise time more clearly. Use the button to move up, down, left or right to other screens on your watch. 1. 2. 3. 4. 5. 6. Left - opens the Status screen. Down - opens the Settings menu. Right - opens the Activities menu. Up - from the clock, moving up doesn't open another screen.
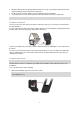
Wear the watch in the normal way, with the watch face on top of your wrist and the bottom of the watch touching your skin, away from the wrist bone. Do the strap up so that it is tight to your wrist without being uncomfortable. You get the most accurate results from the heart rate monitor when you are warmed up. Cleaning your watch It is recommended that you clean your watch once a week if you use it frequently. Wipe the watch with a damp cloth as needed.
Wear the watch in the normal way, with the watch face on top of your wrist and the bottom of the watch touching your skin, away from the wrist bone. Do the strap up so that it is tight to your wrist without being uncomfortable. You get the most accurate results from the heart rate monitor when you are warmed up. Note: The monitor cannot measure your heart rate while swimming.
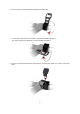
2. Place the strap on your handlebar and wrap it around the bar. 3. Use the clip on the bottom of the holder to attach the handlebar strap to it. The strap should now be attached securely around the handlebar. 4. Remove your watch from the wrist strap and place it in the holder. Make sure it clips securely into place.
5. Close the handlebar strap over the top of the watch, attaching it to the top of the holder using the clip. Watch status From the clock screen, move left to open the status screen. The status screen shows the following information: Battery - the battery power left on your watch. To charge the battery, place the watch in the desk dock and connect the dock to your computer. Storage - the amount of free space available on your watch. If you are running out of space, connect your watch to your computer.
Performing a reset Soft reset A soft reset is performed each time you disconnect your GPS Sports watch from a wall charger or computer. To perform a soft reset on your watch, follow these steps: 1. Connect your watch to a wall charger or computer. Wait until your watch shows a battery symbol. If you are using a computer, wait until MySports Connect finishes updating your watch. 2. Disconnect your watch from the wall charger or computer. The software on your watch restarts.
MySports Connect installs the software on your watch. 5. Keep your watch connected when the window for MySports Connect opens again. 6. Follow the instructions in MySports Connect to setup your watch. Note: The settings for exportin and uploading activities in MySports Connect are stored on your watch. If you had set up your watch to transfer activities to additional sports websites or file formats, you need to set these up again on the UPLOAD & EXPORT tab.
Activities About activities In the activities menu, you can start one of the activities available on your watch: Run Cycle Swim Treadmill Freestyle Stopwatch Note: Not all activities are available on all watches. When you select Run, Cycle or Freestyle, your watch uses its internal GPS receiver to measure your speed, and to record the route you have taken. If your watch has a heart rate monitor and the heart rate sensor is set to ON, your heart rate is shown during your activity.
For Cycle activities, if you are using a cadence sensor, once your watch is connected to the sensor, your watch shows the message GO. The cadence sensor is then used to provide speed and distance information about your activity. Your watch may not have a GPS fix at this point. If you would like to track the route of your activity, wait until the GPS icon stops flashing before starting your activity.
2. 3. 4. 5. Select Metrics, then move right. Select Display, then move right. Select Left or Right to set the metric shown on the left or the right. Select the metric to be displayed from the list. The metrics that are available depend on your current activity. Some examples of metrics available: Pace - your current pace. Average pace - your average pace for the current activity. Lap time - the length of time taken for the current lap. Lap distance - the distance covered in the current lap.
Settings for Running activities Before you start an activity you can choose a training program and also decide what information you would like to see as you train. There are a wide range of metrics that you can choose to see while running including calories, heart, heart rate zone and distance. Note: To get help on choosing which metrics you want to see during an activity, see Choosing which metrics to display.
The Wrist setting for the wrist you wear your watch on. As you swim, your watch registers your strokes and the number of turns you make in the pool. To calculate the distance you have swum and your speed, your watch uses the pool size and the number of turns you have made. If the pool size is not accurate, the metrics for your swimming activity cannot be worked out correctly. Your watch needs to know which wrist you wear your watch on so it can register your strokes.
Calibrating your watch at the end of a Treadmill activity Every time you finish a Treadmill activity, your watch asks you if you want to calibrate the distance measurement your watch has made with the distance measurement shown by the treadmill. Select Yes to calibrate the distances. If you calibrate the distance, your activity record is more accurate and the metrics for your training are more accurate.
Training programs About training programs For each type of activity, the following training programs are available: None Goals Intervals Laps Zones Race From the clock screen, do the following to see the list of training programs: 1. 2. 3. 4. Move right and then select your choice of activity. Move right. Move down and select Training. Move right and choose a training program.
This screen shows the percentage of your target you have reached and the remaining distance, time or number of calories. Tip: When running, you can head away from home until your progress reads 50% and then turn and come back again. Progress alerts When training to a goal, your watch alerts you at these stages: 50% 90% 100% 110% Intervals How to get there: Activity screen > Move Down > Training > Intervals > Warmup, Work, Rest, # Sets, or Cooldown. Select this option to use interval training.
You see the name of what you are doing, and how long this part of the set is in either time or distance. You are also warned with beeps and buzzes when you need to switch to the next stage in your interval training. Laps How to get there: Activity screen > Move Down > Training > Laps> Time, Distance, or Manual. Select this option to measure your activity against set lap times, distances or by manually recording when you complete a lap.
Setting a zone for Heart and Pace If you want to set up a custom heart rate zone or a pace zone, choose a minimum and maximum as shown below: Setting a zone for Speed and Cadence If you want to set up a speed or cadence zone, choose a target value and allowed percentage to deviate as shown below: Monitoring your progress From the activity progress screen, move right to see a graphical overview of how close your training is to the zone you set.
Heart rate zones Note: For your watch to be able to measure your heart rate, it must be connected to a Heart Rate Monitor. Your watch uses heart rate zone boundaries based on your age. Using TomTom MySports, you can adapt these heart rate zone boundaries and they are then synchronised with your watch. To train using a heart rate zone, do the following : 1. 2. 3. 4. 5. 6. Move right from the clock screen and then select your choice of activity. Move right. Move down and select Training.
This graph, shown above, is a heart rate zone summary. It shows the percentage of time spent in each zone with your current zone highlighted in white. This graph shows your heart rate over the last 2.5 minutes of activity. Tip: You can view your progress in a heart rate zone even when you are using a Graphical Training Partner like Race or Goal. During training, from the screen showing a main metric, move right to see the graphical training screen.
Note: If your watch is already connected to the website and you make changes to your races, the changes won’t get synchronised automatically - you need to disconnect and reconnect your watch. The activity or race from the MySports website consists of a distance and a time. When you use the Race training program, you can see if you are ahead or behind in the race and by how much, as you train. On your watch, move right from the activity screen to see a representation of the race.
3. Move right to start the stopwatch. The stopwatch starts and shows the elapsed time. 4. To pause the stopwatch, move left. Move right to resume counting. Tip: When paused, to see more of your previous laps, move down and move up. 5. To mark each lap, touch the right side of the watch screen while the stopwatch is running, or move right. The big number is the total elapsed time of all your laps added together. Your current lap time, for example lap 12 below, is shown under the total elapsed time.
Settings About settings From the clock screen, move down to open the Settings menu. These settings determine the overall behaviour of your watch. For each activity, there are also settings related to that activity.
Heart - this is a built-in or external heart rate monitor. Bike - this is a cadence and speed sensor. Tip: To help your watch last for up to 20% longer on a battery charge, turn off sensors that you are not using. Your watch keeps searching for sensors even if you are not using a sensor. You can check if a heart rate monitor or sensor are working without having to start an activity. See Testing a heart rate sensor.
When pairing has been completed, you see a "Connected" message on your watch. As long as you have the mobile app active or running in the background on your phone or mobile device, the watch automatically tries to connect when it has a new activity to upload or when the QuickGPSfix data is out-of-date. If you open the MySports app on your phone and it is trying to connect to your watch, you may need to wake up your watch by moving away from the clock screen. Move down, left or right from the clock screen.
Options From the clock screen, move down to open the Settings menu, then select Options and move right to open the Options menu. Units Select Units to set the distance and weight units used on your watch. You can select any combination of miles or kilometres, and pounds or kilogrammes. Click Select Click to set what your watch does as you move through menus. Your watch can do the following: Make a clicking sound. Vibrate/buzz for short time. You can turn both on or off, or turn only one on.
Standards To see certification information on your watch, move down from the clock screen to open the Settings menu. Select Standards and then move right to scroll through the certification information.
Adding sensors About sensors Sensors are external devices which you can link to your watch to provide information about your activity. Two types of sensors can be used with your watch: External Heart rate monitor - this measures your heart rate as you train. The external TomTom Heart Rate Monitor is included in some products and available as an accessory for others. Cadence/Speed sensor - this measures your cadence and speed as you cycle.
5. Select Heart, then move right to turn it on. 6. When you begin an activity, your watch connects to the monitor and you see a heart icon at the bottom of the screen. When your watch is trying to connect to the monitor, the heart flashes. The first time your watch tries to connect to your monitor, if it finds more than one monitor, your watch doesn't know which monitor to connect to. Move to a place where there are no other monitors within range of your watch.
Important: The smaller part of the sensor needs to face the crankarms and should not be attached to the top of the chainstay. You may have to tilt the main body of the sensor towards the wheel depending on your bike. You should make this adjustment after you have attached the spoke magnet. 2. Attach the spoke magnet to one of the spokes on your bike. The magnet should face the chainstay where you attached the chainstay sensor. 3.
4. Attach the crankarm magnet to one of the crankarms on your bike. The magnet should face the chainstay where you attached the chainstay sensor. Tip: Make sure the different parts of the Cadence/Speed Sensor are lined up correctly on your bike. The spoke magnet should pass the main body of the chainstay sensor and the crankarm magnet should pass the tip of the sensor. 5. 6. 7. 8. 9. 10. Once you have adjusted the sensors to the right position, tighten the cable ties so they are held securely in place.
When you have connected to your sensor once, your watch always reconnects to your sensor. When the chainring icon has stopped flashing, your watch is ready to measure your speed and cadence. For proper GPS tracking, wait until the GPS icon has also stopped flashing before you start your cycle activity. While you train, you can choose to show your current cadence or change the display to see your cadence. You can also use a training program to train to a target cadence zone.
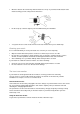
TomTom MySports account Your TomTom MySports account is a central storage location for all your training and fitness information. To create an account, click the button in TomTom MySports Connect, or go directly to the website: mysports.tomtom.com As you can see from the diagram below, you can transfer your activities to your MySports account using either TomTom MySports Connect or the TomTom MySports app.
TomTom MySports Connect TomTom MySports Connect does the following: Helps you set up your watch. Updates the software on your watch when new versions become available. Transfers your activity information to your TomTom MySports account or another sports website that you choose. We can currently transfer activity information to Endomondo, Strava, MapMyFitness and RunKeeper. TomTom MySports Connect can also transfer activity information to your computer in a number of file formats.
TomTom MySports mobile app The TomTom MySports mobile app does the following: Transfers your activity information to your TomTom MySports account automatically when in range of your phone. Note: You cannot use the MySports app to transfer activity information to other sports websites. Transfers any settings you make on TomTom MySports to your watch. Updates the QuickGPSfix information on your watch.
Addendum Warning Always consult a physician before starting an exercise program. If you have a pacemaker or other implanted electronic device, consult your physician before using this product. The use of this product while exercising might distract from your surroundings or your activity. How TomTom uses your information Information regarding the use of personal information can be found at tomtom.com/privacy.
FCC information for the user THE DEVICE COMPLIES WITH PART 15 OF THE FCC RULES Federal Communications Commission (FCC) Statement This equipment radiates radio frequency energy and if not used properly - that is, in strict accordance with the instructions in this manual - may cause interference to radio communications and television reception.
Operation is subject to the condition that this device does not cause harmful interference. This Class B digital apparatus complies with Canadian ICES-003. The Country Code Selection feature is disabled for products marketed in the US or Canada. Equipment is certified to the requirements of RSS-210 for 2.4-GHz. IMPORTANT NOTE IC Radiation Exposure Statement: This equipment complies with IC RSS-102 radiation exposure limits set forth for an uncontrolled environment.
Copyright notices © 2014 TomTom. All rights reserved. TomTom and the "two hands" logo are registered trademarks of TomTom N.V. or one of its subsidiaries. Please see tomtom.com/legal for limited warranty and end user licence agreements applying to this product. Linotype, Frutiger and Univers are trademarks of Linotype GmbH registered in the U.S. Patent and Trademark Office and may be registered in certain other jurisdictions.