SHOWER DOOR Shower Door Installation Instructions CON Reversible For a Left or Right Door | | Please Do Not Return the Product to the Store. | | Contact us with any questions.
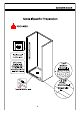
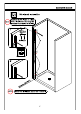
SHOWER DOOR Model Specific Preparation A REQUIRED: Installation wall must be plumb o nL 3/8” (10mm) Out-of-Plumb Adjustment within the Wall Profile; Verify threshold and walls with a level Threshold must be level 2 3/8" minimum | threshold | resold
SHOWER DOOR PACKAGE CONTENT PACKAGE CONTENT PART# DESCRIPTION QTY PART# DESCRIPTION QTY Magnetic Seal A Bottom Gasket 2 G Aluminum channel 1 B Door panel-1 1 H U channel 1 C Wall Jamb 1 | Alu.
SHOWER DOOR PACKAGE CONTENT Wall anchor Screw @6x38mm ST4*30 Fitting ST4*10 | Wood 7 pcs 7 pcs PCs 7 pcs 2 pcs A 1 piece for each as spare part.
SHOWER DOOR TOOLS REQUIRED Drill Bits Screw Driver Drill AN 5 dia.
SHOWER DOOR SAFETY INFORMATION CAUTION Please carefully read the following important safety information before handling or installing this shower. There is a risk of serious injury while handling this product. To minimize these risks, please note: * Always wear safety glasses and gloves while handling. + Always follow the installation instructions. * Inspect glass for damage before installation.
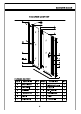
SHOWER DOOR Model Dimensions configuration dimensions: Product Height | Model width | Installation width | © (Opening) 30" 30" ~31 3/8" 2217/32" Jon 32" 32" ~33 3/8" 2417/32" 3/8" 26 17/32" 3/8" 28 17/32" adjustment 3" max| adjustment 1" max adjustment 1" max ‘adjustment 3" max Ler vol I | Io Vol I | | Vol If vol I I If Vol I i — shower head. i i = grower head Left pivot NOTE Right pivot This model is reversible for right or left-hand door installation.
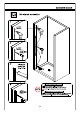
SHOWER DOOR Wall Jamb Installation Confirm the Wall jamb is plumb with a level before marking the location of the holes for drilling. NOTE, Ras ki a HN NOTE] | Center the Wall jamb (C) on the Threshold.
SHOWER DOOR Wall Jamb Installation 3 silicone the back of the Wall Profile Stud is present behind the wall: drill a hole up to the stud, 7 | drill an pilot hole into the stud and NOTE | use the ST4.0 x 30mm Pan Head Screws (bb) Stud is present behind the wall: drill a @1/4” (6mm) hole and insert the Wall Anchors (aa) and use the ST4.0 x 30mm Pan Head Screws (bb).
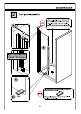
SHOWER DOOR Door panel Installation The Door panel Profiles can be adjusted up to 3/8” within the Wall Jamb for overall width or to correct for out-of-plumb conditions within the model size. Screw them together after making final adjustments. Place wood shimmed) onto the threshold to provide proper spacing beneath the door glass. Make any final adjustments to the door so that it is level and plumb in the opening.
SHOWER DOOR Glass-to-Glass Hinge Assembly Installation outside Double sides of hinge part install to the B door panel-1. NOTE | outside . Ensure the orientation of both Hinge Assemblies are the same. Make sure the Hinge Assemblies (B) are square and flatly installed on the glass To prevent glass-to-metal contact, confirm the gaskets are present between the Hinge Assemblies and the Door Glass.
‘NOTE ] outside Ensure the orientation of both Hinge Assemblies are the same. Make sure the Hinge Assemblies (K) are square and flatly installed on the glass 11 Glass-to-Glass Hinge Assembly Installation SHOWER DOOR Place wood shimmed) onto the threshold to provide proper spacing beneath the door glass. Make any final adjustments to the door so that it is level and plumb in the opening. To prevent glass-to-metal contact, confirm the gaskets are present between the Hinge Assemblies and the Door Glass.
Magnetic Seal 2 Aluminum channel v1 U channel vO Keep flush SHOWER DOOR Magnetic strip Install to door panel-2 TN 1. Magnetic strip Install to door panel-2. NOTE | | 2. PutF,G,H together before fasten the glass Ne i 7 door,make all these parts keep flush.
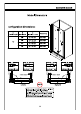
SHOWER DOOR Fasten the door panel r——" After final adjustments, drill @1/8” holes in the Wall Jap (C). ee i fir Drill only through the first layer of the Door panel Profile and NOTE | | install the ST4.0x10mm Pan Head Screws (dd) using the Decorative Covers and Washers (cc) Adjustment 3" max; Adjustment 1" max L__"7 | Keep flush Inside View Include the washers when ro Ie ~ installing the ST4.0x10mm um NOTE, Pan Head Screws (dd) and | Decorative Caps (cc) .
Determine the G & H position NOTE 14 SHOWER DOOR Pencil Put F,G,H together, keep flush, mark the position on the wall. Center the Magnetic Seal Aluminum channel(G) and U channel (H) on the Threshold.
SHOWER DOOR U channel Installation U channel eo If a Stud is present behind the wall: drill a hole up to the stud, TTT drill an pilot hole into the stud and / 5 | use the ST4.0 x 30mm Pan Head Screws (bb NOTE | or (bb) Stud is present behind the wall: oT drill a hole and insert the Wall Anchors (aa) and use the ST4.0 x 30mm Pan Head Screws (bb).
SHOWER DOOR Magnetic Seal Wall Jamb Installation ST4X10mm Include the washers when Pan Head Screw installing the ST4.0x10mm | | Make sure the magnetic Pan Head Screws (dd) and seals close properly! Decorative Caps (cc) .
NOTE Attach the Vertical Gasket (J)to the inside edge of the Door Glass that is on the same side as the shower head so that the flexible fin is pointing away from the water source.
11 NOTE Measure "X" and cut the Bottom Gasket same length as "X". Bottom Gasket Installation SHOWER DOOR I "X1" is from pivot channel to glass edge.
SHOWER DOOR Alu. Threshold Installation ass and NOTE | "X" wall to wall width. NOTE | cut the alu threshold NU same length as 27mm [1 1/16 ~~ | The large curved lip of the dam strip is NOTE | | intended to face toward the outside of | the shower to ensure the flow of water is redirected towards the drain.
SHOWER DOOR SEALING NOTE | The surfaces need to be clean and free of debris before applying silicone. | 7 i Ensure that the Shower door closes tightly and opens smoothly. NOTE Apply a good quality silicone sealant along the wall Water seal Allow 24 hours for the silicone to cure before using the shower. | Apply Silicone supplied).
SHOWER DOOR This troubleshooting guide is for general aid only. For service and installation issues or concerns, please contact us. Troubleshooting Problem/Symptom Suggested Solution Page(s) *Check all shipping/packaging material for missing Co parts/components. Missing parts 2.3 *If not found, please contact us to order factory part replacement. *Check the magnetic seal (F)and pvc seal (J) for proper trimming and installation.