TOPFIELD TF 6000 PVR User Guide Digital Satellite Receiver Personal Video Recorder
iii Contents Contents 1 Introduction 1 1.1 1 1.2 1.3 2 Features . . . . . . . . . . . . . . . . . . . . . . . . . . . . . . . Controlling the digital receiver . . . . . . . . . . . . . . . . . . 2 1.2.1 The front panel . . . . . . . . . . . . . . . . . . . . . . . 3 1.2.2 The remote control . . . . . . . . . . . . . . . . . . . . . 4 What is common interface? . . . . . . . . . . . . . . . . . . . . 7 Setup 8 2.1 Unpacking . . . . . . . . . . . . . . . . . . . . . . . . . . . . . .
iv CONTENTS 4 Television standard . . . . . . . . . . . . . . . . . . . . 19 3.2.2 Color model . . . . . . . . . . . . . . . . . . . . . . . . . 19 3.2.3 Video cassette recorder . . . . . . . . . . . . . . . . . . 20 3.2.4 Television aspect ratio . . . . . . . . . . . . . . . . . . . 20 3.2.5 Sound mode . . . . . . . . . . . . . . . . . . . . . . . . 21 3.3 Local time setting . . . . . . . . . . . . . . . . . . . . . . . . . . 22 3.4 Parental control . . . . . . . . . . . . . . . . . . . . .
v 6 7 Listing Services 6.1 Editing the service list . . . . . . . . . . . . . . . . . . . . . . . 47 6.2 Editing the favorite list . . . . . . . . . . . . . . . . . . . . . . . 49 6.3 Transferring receiver data . . . . . . . . . . . . . . . . . . . . . 50 6.4 Editing channel data on your computer . . . . . . . . . . . . . 51 6.4.1 Editing satellite and transponder list . . . . . . . . . . 53 6.4.2 Editing television and radio service list . . . . . . . . . 54 6.4.3 Editing favorite list . . .
vi CONTENTS 9 Accessing The Digital Receiver 9.1 77 Configuring the router . . . . . . . . . . . . . . . . . . . . . . . 78 9.1.1 To access indoors . . . . . . . . . . . . . . . . . . . . . . 78 9.1.2 To access from outdoors . . . . . . . . . . . . . . . . . . 78 9.2 Configuring the digital receiver . . . . . . . . . . . . . . . . . . 80 9.3 Accessing the web server . . . . . . . . . . . . . . . . . . . . . 84 9.4 Accessing the FTP server . . . . . . . . . . . . . . . . . . . . . .
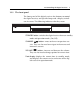
1 Chapter 1 Introduction The TF 6000 PVR digital receiver is fully compliant with the international Digital Video Broadcasting (DVB) standard, and can receive digital broadcasts. For its operation, you need an antenna, which must be installed appropriately. NOTE In general we equate a channel with a frequency. However, unlike analog broadcasts, digital broadcasts are not all assigned to their own frequencies; instead, multiple television and radio broadcasts are transmitted through a single frequency.
2 Introduction • Can store up to 5000 television and radio services. • Has an electronic program guide that provides an overview of program schedules for next few hours. • You can edit the service list. • You can make a favorite list with your favorite channels. • You can view the information of the current television or radio program. • You can update the firmware of the digital receiver to the latest version, which will be provided by the manufacturer.
1.2 Controlling the digital receiver 1.2.1 3 The front panel The front panel of the digital receiver has buttons to control the digital receiver, and specific lamps and a display to indicate its status. The following indicates what they mean: STANDBY button switches the digital receiver between standby mode and operation mode. (On/Off) ac CHANNEL , buttons move to the next or previous service. They are also used to navigate in the menus and interactive screens.
4 Introduction 1.2.2 The remote control 1 button switches the digital receiver between standby mode and operation mode. (On/Off) 2 button mutes the sound. Press again to switch it back on. 3 UHF button is not used in this model. 4 5 9 10 11 button switches the output of the TV SCART socket between the digital receiver and the device connected to the VCR SCART socket. See § 3.2.3 for more description. button sets a sleep timer.
1.2 Controlling the digital receiver 13 5 V+ , V− buttons increase and decrease the volume. They are also used to change options for a menu item. 14 P+ , P− buttons move to the next or previous service. They are also used to navigate in the menus and interactive screens. 15 OK button displays the service list. It is also used to select menu items. 16 17 18 19 FAV button displays the favorite list. button is used to select a subtitle track.
6 Introduction 28 29 button changes the position of the sub-screen clockwise. SAT button displays the satellite list with their service list, and swaps the sub-picture with the main picture. See § 5.6 for more description. 30 button displays, minifies or hides the sub-screen. See § 5.6 for detailed description. 31 button makes a bookmark on playback or time shift. 32 33 button plays from the next bookmark position. button is used to edit a recording.
1.3 What is common interface? 1.3 7 What is common interface? Some broadcasts are scrambled so that only paid subscribers can enjoy them. Scrambled services can only be viewed with a Conditional Access Module (CAM) and a subscription card belonging with the scrambling system. Common Interface (CI) is an interface for conditional access modules. The front of the digital receiver has two common interface slots. To watch a pay service, you should take the following steps: 1.
8 Setup Chapter 2 Setup 2.1 Unpacking Before going any further, check that you have received the following items with your digital receiver. • Remote control unit • Two batteries for the remote control (AAA 1.5 V) • One power cord • One WLAN antenna • A copy of this user guide 2.2 Safety precautions Please read the following safety precautions carefully. • The mains power must be 90 to 250 volt. Check it before connecting the digital receiver to the wall outlet.
2.3 Rear panel connections 9 • Do not expose the digital receiver to any moisture. The digital receiver is designed for use indoors only. Use dry cloth when cleaning the digital receiver. • Place the digital receiver on a firm and level surface. • Do not place the digital receiver close to heat emitting units or in direct sunlight, as this will impair cooling. Do not lay any objects such as magazines on the digital receiver.
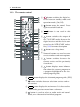
10 Setup 14 1 5 7 3 15 9 VIDEO WLAN ANT Y LNB 1 IN LNB 2 IN IF 1 OUT IF 2 OUT Pr R 2 4 TV Pb L AUDIO S-VIDEO 6 8 VCR 10 RS-232 S/PDIF 12 11 13 USB Check up what connections your television set has in comparison with the digital receiver. 1 LNB 1 IN Broadcasting signal input socket for the first tuner. 2 IF 1 OUT Broadcasting signal output socket from the first tuner 3 LNB 2 IN Broadcasting signal input socket for the second tuner.
2.4 Connecting up your digital receiver 11 11 S/PDIF Dolby digital output socket for the audio system. 12 RS-232 Serial port for firmware update and data transfer. 13 USB USB port for firmware update and data transfer. 14 WLAN ANT Antenna for wireless local area network. 15 AC INPUT Power cord socket. Table 2.3: Connectors specification VIDEO AUDIO S-VIDEO YPbPr TV VCR S/PDIF RS-232 USB 2.
12 Setup ceiver to your television antenna so that it can receive digital television services. Connect the antenna cable to the LNB 1 IN socket on the back panel of the digital receiver. However your digital receiver is connected to the television, you must ensure that there is a connection to both the LNB 1 IN and LNB 2 IN connectors on your digital receiver, so that both tuners work properly. Normally you do that by using a loop cable to link from the IF 1 OUT connector to the LNB 2 IN connector.
2.4 Connecting up your digital receiver 13 quality. If your television does not have the matching connector then use the next connector in the following order for best picture quality. 1. 2. 3. 4. SCART connector (TV) Component connector (YPbPr) S-Video connector (S-VIDEO) Composite connector (VIDEO) You should configure audio and video settings after connecting up the digital receiver. See § 3.2 for detailed description.
14 Setup To use the component video connector Y Pb Pr You will need to obtain a component video cable (RCA cable) to use the component video connector. Plug one end of the cables into the Y (green), Pb (blue) and Pr (red) sockets on the digital receiver, and the other ends into the matching sockets on your television. To use the S-Video connector You will need to obtain a S-Video cable to use the S-Video connector.
2.4 Connecting up your digital receiver 15 To connect the audio connectors You will need to obtain an audio cable (RCA cable) to connect the audio connectors. Plug one ends of the cable into the AUDIO L (white) and AUDIO R (red) sockets on the digital receiver, and the other ends into the matching sockets on your television or audio system. To enjoy Dolby digital audio, your television or audio system must be able to decode Dolby digital audio, and you will need to obtain a S/PDIF cable.
16 Setup If the digital receiver no longer reacts properly to remote control commands, the batteries may be flat. Be sure to remove used batteries. The manufacturer accepts no liability for damage resulting from leaking batteries. NOTE Batteries, including those which contain no heavy metals, may not be disposed of with household waste. Please dispose of used batteries in an environmentally sound manner. Find out about the legal regulations which apply in your area.
17 Chapter 3 Preference Settings 3.1 Language settings You can designate languages for menus, audio tracks and subtitle tracks. Select the System Setting > Language Setting menu. Menu language The digital receiver supports a lot of menu languages: Dutch, English, German, French, Italian, Russian, Turkish and so forth. Set the Menu Language option to your choice.
18 Preference Settings lect a language, the menu will be immediately displayed in the selected language. Subtitle language Set the 1st Subtitle Language and the 2nd Subtitle Language options to your choices. When you watch a program, if the program has the subtitle track of the langauge which is designated at the 1st Subtitle Language, it will be displayed. If the first laguage is not available but the second language is available, the subtitle of the second language will be displayed.
3.2 Video and audio settings 19 To configure the video and audio settings, select the System Setting > A/V Output Setting menu. 3.2.1 Television standard The digital receiver supports two types of television standard. One is the PAL standard, and the other is the NTSC standard. PAL was adopted in European countries while NTSC is adopted in USA, Canada, Mexico and so forth. If you have a PAL television, you have to set the TV Type option to PAL.
20 Preference Settings should set the Video Output option to your desired color model. If you have connected them by RCA connector at which VIDEO reads on the back panel of the digital receiver, you do not have to set this option because the digital receiver outputs CVBS video through RCA connector independent of SCART connector. However, If you have connected them by S-VIDEO connector, you have to set this option to S-Video because the output through S-Video connector comes from the SCART interface.
3.2 Video and audio settings 21 You can enjoy well both wide-screen programs and normalscreen programs with your wide-screen television as the above figures show. The left figure shows a wide picture displayed in the wide screen, and the right figure shows a normal picture displayed in the wide screen. If you have a normal-screen television, set the TV Aspect Ratio option to 4:3. You cannot fully enjoy wide-screen programs with your normalscreen television as the above figures show.
22 Preference Settings enjoy only one source or both of them in either stereo or mono. Set the Sound Mode option as you desire. Apart from this setting, you can change the sound mode with the button. See § 5.2.3 for detailed description. 3.3 Local time setting You should set your local time for timer events. If you did not set the local time right, the program time table provided by the electronic program guide may also be distrustful. Refer the electronic program guide to § 5.3.
3.3 Local time setting 23 Table 3.
24 Preference Settings make sure time doesn’t include daylight saving. 3.4 Parental control In general a television program is labeled a rating according to the level of violence, nudity and language of its content. When you are watching a program, you can check its program rating on the information box. Refer the information box to § 5.2.2. You can prevent your children from watching specific programs by specifying a basis rating.
3.5 Adjusting the on-screen display 25 To change the number, select the Change PIN Code menu; then an input box appears. You have to enter a desired number twice for confirmation. You can also restrict uses of some menus. Selecting the Access Control menu displays a list of menus that you can lock. If the Time Setting item is set to Locked, you have to enter the personal identification number to access the Time Setting menu. If you enter a wrong number, you cannot use the menu.
26 Preference Settings menu and set the Time Shifting option to Enable. See § 5.5 for how to use this feature. 3.7 Setting for MediaHighway program guide Almost every service provider would provide the electronic program guide. However, you can get more abundant program information from the specific transponder that provides only program guides. For detailed description about the electronic program guide, see § 5.3. MediaHighway stands for the transponder dedicated to the electronic program guide.
27 Chapter 4 Service Search After connecting up the digital receiver, you will need to perform a service search. 4.1 Searching broadcasting services This digital receiver can be operated with both fixed and motorized antenna system. You have to configure antenna settings according to your antenna system in the following order: 1. Configure LNB settings. (Refer to § 4.1.1.) 2. Set the position of your desired satellites if you have a motorized antenna. You can control the antenna in DiSEqC 1.
28 Service Search The LNB (Low Noise Block converter) is used to take a wide band of relatively high frequencies, amplify and convert them to similar signals carried at a much lower frequency, which is called IF (Intermediate Frequency). LNB High frequencies from satellites are converted into from 950 to 2150 MHz by a LNB. Select the Installation > LNB Setting menu to configure the LNB settings. Pressing the OK button on the Satellite Name option displays the satellite list in alphabetic order.
4.1 Searching broadcasting services 29 to your antennas either directly or via the loop-through cable. If you have connected only one socket, you could not use some features such as dual recording. The digital receiver has a database about broadcasting satellites and their transponders, containing the following information: satellite position, frequency range, symbol rate, polarization and LNB frequency corresponding to the frequency range. So you might not have to specify the LNB Frequency option.
30 Service Search For example, to select the antenna connected to the A5 input in the left figure, set the DiSEqC 1.1 option to 2 of 4 and the DiSEqC 1.0 option to 1 of 4. If you have a mini DiSEqC 1.0 switch which has only two inputs, you should set the DiSEqC 1.0 option to Mini A instead of 1 of 4. 4.1.2 Configuring DiSEqC 1.2 settings Your motorized antenna will turn toward your desired satellites horizontally by DiSEqC 1.2.
4.1 Searching broadcasting services 31 1. Choose your desired satellite at the Satellite Name option. 2. Select the tuner that is connected to the motorized antenna at the Tuner Select option. 3. Set the DiSEqC Command Mode to User. 4. Select the Goto option at the Motor Control menu. Then the antenna will turn toward your selected satellite with the position data that the digital receiver has. 5.
32 Service Search To use USALS, select the Installation > USALS Setting menu. At first you have to set the Motorized DiSEqC 1.3 option to Enable. To calculate every satellite position, perform the following steps: 1. Choose your desired satellite at the Satellite Name option. 2. Select the tuner that is connected to the motorized antenna at the Tuner Select option. 3. Input your location to the My Longitude and My Latitude options with the V− , V+ and numeric buttons. 4.
4.1 Searching broadcasting services 4.1.4 33 Searching services To perform service search, select the Installation > Service Search menu. There are four service search methods: • • • • Searching every service of a satellite. Searching every service of a transponder. Searching one service of a transponder. Searching every service of a SMATV (Satellite Master Antenna Television) transponder. To search every service of a satellite, perform the following steps: 1.
34 Service Search 4. Input the symbol rate of your desired transponder to the Symbol Rate option with the numeric buttons. 5. Set the Polarization option to the polarization of your desired transponder. NOTE You could get the transponder information from a satellite magazine or web site such as http://www.satcodx.com or http://www.lyngsat.com. To search one service of a transponder, perform the following steps: 1. Choose your desired satellite at the Satellite Name option. 2.
4.2 Copying services 35 4. Input the symbol rate of your desired transponder to the Symbol Rate option with the numeric buttons. 5. Set the Polarization option to the polarization of your desired transponder. You can search pay services as well as free services. To search only free services. set the FTA/Scrambled option to FTA only. FTA means free service. To search only pay services, set it to CAS only. CAS means pay service. To search both free services and pay services, set it to FTA + CAS.
36 Service Search • • • • Service list Favorite list Timer list Preference settings You can reset all data of the digital receiver. If you want to reset all the data, select the Installation > Factory Setting menu, then you are asked for confirmation. If you select Yes, service entries, favorite entries and timer events will be all deleted, and preference options will be reset to the manufacturer’s factory settings.
37 Chapter 5 Daily Usage 5.1 Volume control Use the V− and V+ buttons to alter the volume to a comfortable level. You may need to adjust the volume on your television set too. To temporarily switch off the sound, press the button. Press it again to restore the sound to the previous level. 5.2 Watching television To change services, press the P+ or P− button. Pressing the button switches to the previously viewed service.
38 Daily Usage On the service list, you can view the service information as follows: • • • • Service number Service name Transmitting satellite Receiving tuner: T1 stands for the first tuner; T2 stands for the second tuner. • Transponder information A dollar sign ($) may be marked on some entries, which indicates pay service. To watch pay services, you need the subscription card.
5.2 Watching television 39 • Select your desired tuner at the Tuner option, then the only services provided through the selected tuner will be listed. • By setting the Show Provider option to On, you can view the provider of the services, which is usually the name of the television company responsible for broadcasting them. • To change the name of the highlighted service, select the Rename option; then the on-screen keyboard appears, with which you can enter a new name. See § 6.
40 Daily Usage Fav–NoFav from favorite services to unfavorite services. 5.2.1 Watching favorite services You can select a service to watch on the favorite list as well as on the service list. To display the favorite list, press the FAV button; it will be displayed. Whenever moving the highlight bar on or down on the favorite group list, favorite services belonging to the highlighted group are listed.
5.2 Watching television • • • • • • • • • • • 41 Service number Service name Transmitting satellite Receiving tuner Transponder information Signal level and quality Program name Program rating Program summary Broadcasting time Current time In addition, you might see the following symbols: • Subtitle symbol ( ) if subtitle tracks are provided on the current program. • Teletext symbol ( ) if teletext pages are provided on the current program. • Lock symbol ( ) if the current service is locked.
42 Daily Usage addition, you could enjoy audio tracks in four sound modes: Stereo, Mono, Left or Right. However, if a multifeed program is provided at the moment, video tracks will be displayed. In this case, you have to press the button once more to select an audio track. 5.2.4 Selecting subtitle tracks Some programs are provided with subtitle tracks in one or more languages. If the current program provides subtitle tracks, the subtitle symbol ( ) will be marked on the information box.
5.4 Watching multifeed program 43 Pressing the GUIDE button displays the electronic program guide, on which you can see the followings: • • • • Scheduled programs Program summary Broadcasting date Broadcasting time To see detailed information of a desired program, put the high light bar on your choice with the P+ or P− button and press button. To switch to other service, press the V− or V+ button. To see the program guide for radio broadcasts, press the button.
44 Daily Usage Order Starting time 1 2 3 4 5 13:00 PM 13:15 PM 13:30 PM 13:45 PM 14:00 PM For example, assume a movie is broadcasted at five steps like on the left table. Even if you have missed the movie of the first step, you can watch one of the subsequent steps. If a multifeed program is provided on the current service, the multifeed symbol ( ) will be marked on the information box. Press the button, then available video tracks will be listed. Once you select one, it will be presented.
5.6 Using picture in picture 45 3. You can move backward 10 seconds at a time by pressing the button. 4. To hide the progress bar, press the button again. 5. To end time shift, display the progress bar with the button and press the button. 5.6 Using picture in picture You can watch two services at the same time; one of them is presented in the sub-screen. We call this feature picture-inpicture. The instruction on how to use the picture-in-picture feature is as follows: 1.
46 Daily Usage 5. To display the service list for the sub-screen, press the button. 6. If both pictures are pay services all, only the main-picture will be presented. NOTE If you wish to watch two pay services using the picture-inpicture feature, you should prepare a dedicated CAM that is able to descramble two pay services simultaneously.
47 Chapter 6 Listing Services 6.1 Editing the service list You would have got the service list after service search. You can rename, move, lock or delete service entries on the service list. To edit the service list, select the Organizing Svc/Fav > Organizing Services menu; then a screen will be displayed like the left figure. There are editing options on the left column and service entries on the right column.
48 Listing Services To edit the radio service list, press button; then radio service entries will be listed on the right column. To turn back to the television service list, press it again. To change the name of a service, select the Rename and select a desired service; then the on-screen keyboard appears. For how to use the keyboard, refer to § 6.2. Unlike analog broadcasts, each service does not have a proper service number in digital broadcasts.
6.2 Editing the favorite list 49 FTA–CAS from free services to pay services CAS–FTA from pay services to free services Provider by service provider 6.2 Editing the favorite list You can make your own favorite service list. To edit your favorite list, select the Organizing Svc/Fav > Organizing Favorites menu; then an editable favorite list appears. There are a group list on the left column, a favorite list on the center column and a service list on the right column.
50 Listing Services You can move the highlight key horizon tally with the V− and V+ buttons and ver tically with the P+ and P− buttons. Press ing the OK button on a key enters its letter in the input line. To type a space, select the Space key. To type lower case letters or numerals, select the Other key. To delete a letter, put the cursor on a desired letter at the input line and then select the Del key.
6.4 Editing channel data on your computer 51 To transfer receiver data, perform the following steps: 1. Plug one end of a RS-232 cable (9 pin Dsub cable) into the RS-232 port on the digital receiver, and the other end into the matching port on the other digital receiver. 2. Turn on both of them. 3. Select the Installation > Transfer Firmware > Transfer Data to Other IRD menu. 4. Restart the digital receiver.
52 Listing Services If you have a RS-232 cable (9 pin D-sub cable), plug one end of the cable into the RS-232 port on the digital receiver, and the other end into the matching port on your computer. If you have a USB cable, plug one end of the cable into the USB port on the digital receiver, and the other end into the matching port on your computer. Turn off the digital receiver if it is on, and then Run Vega. To import the channel data from the digital receier, perform the following steps: 1.
6.4 Editing channel data on your computer 53 2. A box appears asking for your confirmation. Press the Download button on it. 3. Turn on the digital receiver. Data transfer will start as soon as it is turned on. 6.4.1 Editing satellite and transponder list To edit the satellite list, you have to press the F1 key on your keyboard in the first place. Then related menus will become enabled. To add a satellite entry, select the Function > Satellite, TP > Add Satellite menu, then a box appears.
54 Listing Services entry by pressing the OK button on the box, you should configure LNB settings for the new one. Refer LNB settings to § 4.1.1. To delete a satellite entry, choose your desired satellite entry at the Satellite drop-down list box, and then select the Function > Satellite, TP > Delete Satellite menu. When a box appears asking for your confirmation, the selected satellite entry will be deleted by pressing the Yes button on it.
6.4 Editing channel data on your computer 55 To delete a service entry, choose your desired service entry at the TV Service list, and press the Delete key on your keyboard. When a confirmation dialog box appears, the selected service entry will be deleted by pressing the Yes button on it. Checking the CAS check box designates a selected service entry as a pay service. If there is a service that you want to prevent your children from watching, select it and check the Lock check box.
56 Listing Services To delete a favorite group, choose your desired favorite group at the Favorite Group Name drop-down list box, and then select the Function > Fav Group > Delete Current Fav Group menu. When a confirmation dialog box appears, the selected favorite group will be deleted by pressing the Yes button on it.
6.4 Editing channel data on your computer 57 To add a favorite group, select the Function > Fav Group > Add New Fav Group menu. Then you will see a dialog box like the left figure. Enter your desired name into the Favorite Group Name text box to name a new group. If you make a radio favorite group, select the Radio option button.
58 Recording and Playing Chapter 7 Recording and Playing With one tuner of the digital receiver, you can record a service and at the same time watch another service if the two services are provided through a same transponder.
7.1 Recording a program 7.1 59 Recording a program Once recording has started, a symbol like the left figure will be displayed on the top right of the screen for a few seconds. When you are watching a service different from the service being recorded, you can view a number on the center of the symbol, which indicates the order that the recording is started. Circle NOTE When a recording is finished, it might not be saved if its recording duration is less than one minute. 7.1.
60 Recording and Playing program options would be available. Once the After this program option is selected, the current recording will stop the moment the current program ends. Likewise, once the After next program option is selected, the current recording will stop the moment the next program ends. Selecting the Record pause option pauses recording. When you press the button again, you will see this option is changed to Record continue. To resume recording, select it.
7.1 Recording a program 61 To input a timer recording, select the Timer Setting menu; then the timer list will be displayed. To add a new timer event, press the button, and a box like the above figure appears; take the following steps. 1. Set the Record option to On to make a recording. If this option is set to Off, the digital receiver will turn on at the specified time but not record; instead, you may record with your video cassette recorder or suchlike in this case. 2.
62 Recording and Playing Every Weekend means ‘Saturday and Sunday per week’. Weekly means ‘one day per week’. Every Weekday means ‘from Monday to Friday per week’. If your favorite program is broadcasted at weekends and you wish to record every episode of the program, set the Mode option to Every Weekend. 6. Set the Date option to a desire date, on which the recording will be started. The date format is day/month/year– day of the week.
7.1 Recording a program 7.1.3 63 Scheduling a recording using the program guide If the electronic program guide is properly provided, you can make timer events on it by taking the following steps: 1. Press the GUIDE button to display the electronic program guide. 2. Select a service you want to record with the V− and V+ buttons. 3. Select a program you want to record with the P+ and P− buttons. 4.
64 Recording and Playing 2. To move to a desired scene, hold down the button until it is reached. or 3. Press the button to start recording. 4. Press the button to stop time shift. 5. Press the button once more to stop recording. See § 5.5 for detailed description about the time shift feature. 7.1.5 Recording a pay service program You can record a pay service program without the subscription card. However, you need the subscription card to play back it because it has not been descrambled.
7.2 File archive 7.2 65 File archive When a program is recorded, it is stored as a file on the builtin hard disk of the digital receiver. You can select a recording to play back on the recording list. To see the recording list, press the button. In addition to the recording list, there are the MP3 list and the TAP list. You can enjoy music or audio books in MP3 format with the digital receiver. To view other lists, press the or button. See Chapter 8 for description about TAP.
66 Recording and Playing 3. Press the EXIT button. 4. They are sorted by the specified option. To lock a recording file To lock a recording so that other people cannot play it, perform the following steps: 1. Put the highlight bar on a desired recording. button to display the additional options. 2. Press the 3. Set the Lock option to Locked. 4. Press the EXIT button. 5. The lock symbol ( ) is displayed on it.
7.3 Playing back a recording 67 To move a recording to other folder To move a recording to other folder, put the highlight bar on a desired recording and press the button; then the folders are listed. Once you choose a folder, the recording is moved to it. 7.3 Playing back a recording When a program is recorded, its additional contents such as audio tracks or teletext are also recorded together. So you can enjoy them when a recording is played.
68 Recording and Playing 7.3.1 To play in slow motion To watch in slow motion during a playback, press the button. If you press it repeatedly, the playback speed changes in 3 steps: 1/2, 1/4 and 1/8 times. To resume normal speed, press the button. 7.3.2 To play in fast motion To watch in fast motion duration a playback, press the button. If you press it repeatedly, the playback speed changes in 3 steps: 2, 4 and 6 times. To resume normal speed, press the button.
7.3 Playing back a recording 3. To jump to a bookmark, press the 69 button. 4. To delete a bookmark, jump to it and then press the button. When there is no preset bookmark, pressing the makes to jump forward 30 seconds at a time. 7.3.4 button To play back a recording repeatedly You can play a recording repeatedly both in whole and in part. To play a recording repeatedly in whole, press the button when the progress bar is hidden; then the repetition symbol ( ) is displayed on the information box.
70 Recording and Playing 2. Select your desired recordings with the a recording is selected, it is numbered. button. When 3. Press the OK button to start playback. 4. The selected recordings are played in the sequence that they are numbered. 7.3.6 To play back a scrambled recording If you have recorded a program of a pay service with the subscription card, you can play it as freely as one of a free service.
7.5 Copying a recording 71 7. If you choose the Save option, it will be saved in a new file which is named after the original recording with a suffix of ‘CUT’ and a number. 7.5 Copying a recording You can copy a recording file in whole or in part during a playback by performing the following steps: 1. Start playback of a recording you want. 2. Move to a scene form which you want to start copy by holding down the or button. 3.
72 Recording and Playing 3. Press the OK button to start playback. 4. To stop playback, press the button. To play all MP3 files in a subfolder, put the highlight bar on a desired folder, and press the button. 7.7 Transferring recording files You can transfer files between the digital receiver and your computer via USB connection with Altair, which is a program used to transfer files. You can download it from the the Topfield web site, http://www.i-topfield.com.
7.7 Transferring recording files 73 The instruction on how to use Altair is as follows: 1. Select files to transfer. The left panel shows files and folders that are on the digital receiver, while the right panel shows files and folders that are on your computer. 2. To transfer files from the digital receiver to your computer, press the right arrow button (→). 3. To transfer files from your computer to the digital receiver, press the left arrow button (←).
74 Recording and Playing Visit http://www.elecard.com or http://www.videolan.org where you can find a MPEG player being able to play back them. If you wish to author DVDs with them, visit http: //www.haenlein-software.com where you can find a DVD authoring program being able to process them. 7.8 Formatting the hard disk To format the hard disk of the digital receiver, select the Installation > Format Hard Disk menu. Formatting the hard disk will delete all files permanently.
75 Chapter 8 Topfield Application Program If you are good at programming with C++ language, you can make a program executable in the digital receiver. We call this Topfield Application Program (TAP). In making a TAP, it is recommended to use Diab compiler of Wind River, whose web site address is http://www.windriver.com. Some variants of GCC compiler also might perhaps be available as a compiler for TAPs.
76 Topfield Application Program 2. Place the highlight bar on a file entry you want to run. 3. Press the OK button to start the program. 4. To exit the program, press the EXIT button. The figure on the left is a running screen of a TAP, Image Viewer, which displays image files of BMP, GIF and JPG format. This TAP is available from the Topfieldweb site, http:// www.i-topfield.com.
77 Chapter 9 Accessing The Digital Receiver TF 6000 PVR provides a web service and FTP service. You can make a timer recording or download a recording file using those services. Here you need a wireless router, which will connect the digital receiver to your computer or the Internet. To use the web service of the digital receiver, you should take the following steps: 1. Configuring a router for the digital receiver. 2. Configuring the digital receiver’s Wireless Local Area Network (WLAN) settings. 3.
78 Accessing The Digital Receiver 9.1 Configuring the router In this section, the setup program of WRT54G, which is a router manufactured by Linksys, will be referred to as an exemplary description to help your understanding about how to configure the router for network connection. NOTE For detailed description about how to set up the router, refer to the manual of your router. 9.1.
9.1 Configuring the router 79 feature, Your router will lead you to the digital receiver when you access your router with its IP address. Your router may be assigned to a dynamic IP address by an Internet service provider. So if the router has rebooted, you cannot access it as long as someone in your home does not inform you of the changed IP address. However, many routers support Dynamic Domain Name System (DDNS) service, which can settle this problem.
80 Accessing The Digital Receiver Whenever a new dynamic IP address is assigned to the router, it will inform the DDNS service provider of the new IP address. This makes it possible that you access the router with a domain name at any time. 9.2 Configuring the digital receiver You should configure the WLAN settings to enable the web service and FTP service. You had better refer to the manual of your router for understanding of technical terminology.
9.2 Configuring the digital receiver 81 Whenever the digital receiver is restarted, the dynamic IP address will be changed and you will have to check it at the WLAN Status menu to access the digital receiver. To avoid this cumbersome thing, you had better assign a static IP address rather than dynamic one. Set the DHCP option to Off, then the IP Address, Subnet Mask and Gateway options become enabled. You have to set these options to match the configuration of your router.
82 Accessing The Digital Receiver 1: Always on 2: Always off Ad-Hoc Mode Rate 0: Adhere Wi-Fi spec 1: Violate Wi-Fi spec TX Rate 0: 1: 2: 3: 4: Auto 1 Mbps 2 Mbps 5.5 Mbps 11 Mbps 5: 6: 7: 8: 9: 10: 11: 12: 6 Mbps 9 Mbps 12 Mbps 18 Mbps 24 Mbps 36 Mbps 48 Mbps 54 Mbps Short Slot Time 0: Disable 1: Enable Profile To make profiles for various network connections, select the Installation > LAN Setting > Profile menu. The value of the Country Region option is applied to every profile in common.
9.2 Configuring the digital receiver 83 Table 9.1: Country Region Value Channel Range Country FCC IC ETSI SPAIN FRANCE MKK MKK1 ISRAEL 1–11 1–11 1–13 10–11 10–13 14 1–14 3–9 USA Canada Europe, Korea Spain France Japan Japan Israel To apply your chosen profile, set the Activate option to On. To view or edit a profile, choose your desired profile at the Profile Name option and select the Edit Profile item. A profile consists of several options.
84 Accessing The Digital Receiver Key: 26 hexadecimal characters or 13 ASCII characters only if the Authentication Type option is set to WEP. To save a profile, select the OK item. 9.3 Accessing the web server In the web pages provided by the digital receiver, you can do the followings: • Downloading or uploading a recording, MP3 or TAP file. Refer the TAP to Chapter 8. • Making a timer recording • Viewing the information about the program being recorded currently.
9.3 Accessing the web server 85 You cannot only download but also upload recording files or MP3 files in the File Management page.
86 Accessing The Digital Receiver NOTE The maximum number of the user connection is only one. This means that you cannot access the web server while someone else is occupying it. 9.4 Accessing the FTP server You need a FTP client program to access the digital receiver’s FTP server. You can log in the FTP server with the user name and password specified in the WLAN Setting menu. For how to configure the WLAN settings, refer to § 9.2.
9.4 Accessing the FTP server 87 NOTE The maximum number of the user connection is only one. This means that you cannot access the FTP server while someone else is occupying it.
88 Firmware Update Chapter 10 Firmware Update The digital receiver has a stable and convenient firmware to use. However, a new firmware may be released to improve the digital receiver. You can get a latest firmware and an update utility from the Topfield web site, http://www.i-topfield. com. You should check the firmware information of your digital receiver before downloading a new firmware. To check the current information of the digital receiver, select the Information > IRD Status menu.
10.1 Over the air 10.1 89 Over the air You can get a new firmware over the air. To update the firmware by this method, press the Installation > Firmware Upgrade menu. Selecting the Start option starts firmware update Satellite Frequency Symbol Rate Polarity PID Astra 12603 MHz 22000 KS/s Horizontal 347 On the left table is presented the transponder information appointed by the manufacturer Topfield for firmware update. This transponder information can be changed.
90 Firmware Update 1. Download a new firmware applicable to the digital receiver from the Topfield web site. 2. Plug one end of a USB cable into the USB port on the digital receiver, and the other end into the matching port on your computer. 3. Turn on the digital receiver. 4. Run TFDN USB. The instruction on how to use TFDN USB is as follows: 1. Press the Find button to select the new firmware file. 2. Press the Download button to start the file transfer. 3.
10.4 From another digital receiver via RS-232 port 91 1. Download a new firmware applicable to the digital receiver from the Topfield web site. 2. Plug one end of a RS-232 cable (9 pin Dsub cable) into the RS-232 port on the digital receiver, and the other end into the matching port on your computer. 3. Turn on the digital receiver. 4. Run TFD-Down. The instruction on how to use TFD-Down is as follows: 1. Press Find button to select the new firmware file. 2.
92 Firmware Update 1. Plug one end of a RS-232 cable (9 pin Dsub cable) into the RS-232 port on the digital receiver, and the other end into the matching port on the other digital receiver. 2. Turn on both of them. 3. Select the Installation > Transfer Firmware > Transfer Firmware to Other IRD menu.
93 Index 16:9, 20 1st Audio Language, 18 1st Subtitle Language, 18 22 kHz, 29 2nd Audio Language, 18 2nd Subtitle Language, 18 4:3, 21 802.
94 INDEX Default, 39, 48 Default Key ID, 83 Delete, 39, 48 Delete Current Fav Group, 56 Delete Satellite, 54 Delete Transponder, 54 DHCP, 80, 81 Diab, 75 DiSEqC, 29 DiSEqC 1.0, 29, 30 DiSEqC 1.
95 Lock, 39, 48, 55, 66 Locked, 66 Loop Through, 28 Manual, 33 MediaHighway, 26 MediaHighway, 26 MediaHighway EPG, 26 Menu Language, 17 Mini A, 30 Mode, 22, 23, 62 mono, 22 Motor Control, 31 Motorized DiSEqC 1.2, 30, 53 Motorized DiSEqC 1.
96 INDEX Services Copy, 35 Shared, 83 Short Slot Time, 82 Show Provider, 39 Size, 65 SMATV, 33 SMATV, 34 Sort, 48 Sorting, 39, 65 Sound Mode, 22 Space, 50 Start, 89 Start Search, 35 Start Time, 62 std, 51, 52 stereo, 22 Stop, 90, 91 Store, 31 Subnet Mask, 81 subtitle, 42 Symbol Rate, 34, 35 System ID, 88 System Setting, 25 TAP, 75 tap, 75 teletext, 42 television service list, 48, 50 TFD-Down, 90, 91 TFDN USB, 89, 90 Time, 65 time format, 23 Time Offset, 22 Time Setting, 25 time shift, 44 Time Shifting, 26
97 wide-screen television, 20 Wind River, 75 Wireless Mode, 81 WLAN, 77 WLAN ANT, 11 WLAN Setting, 86 WLAN Status, 80, 81 Y/Pb/Pr, 10
Correct disposal of this product This marking shown on the product or its literature indicates that it should not be disposed with other household wastes at the end of its working life. To prevent possible harm to the environment or human health from uncontrolled waste disposal, please separate this from other types of wastes and recycle it responsibly to promote the sustainable reuse of material resources.