
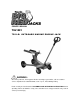
Product Manual


GENERAL SAFETY INSTRUCTIONS (continued):
Additional Notes:
Save the receipt, warranty and these instructions.
Do not modify the jack in any way. Unauthorized modification may impair the function
and/or safety and could affect the life of the equipment. There are specific applications for
which the jack was designed.
Always check for damaged or worn out parts before using the jack. Broken parts will affect
the equipment operation. Replace or repair damaged or worn parts immediately.
When jack is not in use, store it in a secure place out of the reach of children. Inspect it for
good working condition prior to storage and before re-use.
ASSEMBLY
1. Familiarize yourself with the jack.
2. Prior to assembly, carefully remove the retaining clip attached to the handle socket.
CAUTION: The socket will tend to spring upward when the clip is removed. To prevent
possible injury, place one hand on the top of handle socket to control the upward motion
of the handle socket retaining clip, and then carefully remove the retaining clip. After
removed slowly allow handle socket to raise back into resting position.
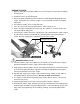
3. Take off the screw located on handle piece 1; Attach handle pieces 1 and 2 making sure
to align the holes on both sections. Reinsert the screw and tighten.
4. Unfasten the screw located in the Handle Socket to insert the assembled handle.
5. Line up the square whole located at the bottom of the handle over the square bolt inside
the Handle Socket.
6. Secure the handle in place by tightening the screw in the Handle Socket Without any
weight on the jack. Cycle the lift up and down several times to insure the hydraulic system
is operating properly. (Perform to the Air Purge Procedure before first use.)
CAUTION:
Do not lift or carry jack by handle. Handle could dislodge and jack may fall, resulting
in possible injury or property damage.