Integrated High Definition LED TV/DVD Combination User’s Guide: 24V4210U 24V4260U If you need assistance: Toshiba's Support Web site support.toshiba.com Call Toshiba Customer Support Center: Within the United States at (800) 631-3811 Outside the United States at (949) 583-3050 For more information, see “Troubleshooting” on page 147 in this guide. Owner's Record The model number and serial number are on the back and side of your TV. Record these numbers in the spaces below.
Dear Customer, Thank you for purchasing this Toshiba LED TV. This manual will help you use the many exciting features of your new LED TV/DVD combination. Before operating your LED TV/DVD combination, carefully read this manual completely.
glass and a toxic liquid. If the liquid comes in contact with your mouth or eyes, or your skin is cut by broken glass, rinse the affected area thoroughly with water and contact your doctor immediately. • ALWAYS contact a service technician to inspect the TV any time it has been damaged or dropped. Important Safety Instructions 1) 2) 3) 4) Read these instructions. Keep these instructions. Heed all warnings. Follow all instructions. 5) Do not use this apparatus near water. 6) Clean only with dry cloth.
23) DANGER: RISK OF SERIOUS PERSONAL INJURY, DEATH, OR EQUIPMENT DAMAGE! Never place the TV on an unstable cart, stand, or table. The TV may fall, causing serious personal injury, death, or serious damage to the TV.
37) Never hit, press, or place anything on the back cover. These actions will damage internal parts. 38) WARNING: RISK OF ELECTRIC SHOCK! Never spill liquids or push objects of any kind into the TV cabinet slots. 39) During a lightning storm, do not touch the connecting cables or product. 40) For added protection of your TV from lightning and power surges, always unplug the power cord and disconnect the antenna from the TV if you leave the TV unattended or unused for long periods of time.
Removing the Pedestal Stand 1) Carefully lay the front of the unit face down on a flat, cushioned surface such as a quilt or blanket. Leave the stand protruding over the edge of the surface. Note: Extreme care should always be used when removing the pedestal stand to avoid damage to the LCD panel. 2) Remove the screws shown in the below diagram. This will allow removal of the pedestal stand.
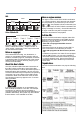
Notes on region numbers DVD DVD Title 1 Title 2 Chapter 1 Chapter 2 Chapter 1 Chapter 2Chapter 3 Video CD/Audio CD On Video CDs Video CD/Audio CD Track 1 Track 2 Track 3 Track 4 The region number of this LED TV/DVD combination is 1. If region numbers, which stand for their playable area, are printed on your DVD and you do not find ( ) or ( ), disc playback will not be allowed by the player. (In this case, the LED TV/DVD combination will display a message on-screen.).
• You cannot play discs other than those listed above. • You cannot play discs of DVD-RAM, DVD-ROM, CD-ROM, Photo CD, etc., or non-standardized discs even if they may be labeled as above. • Some DVD-R/RWs and CD-R/RWs cannot be played back depending on the recording conditions. • This LED TV/DVD combination uses the NTSC color system, and cannot play DVD video discs recorded in any other color system (PAL, SECAM, etc.). • This DVD Module does not support 8cm Disc.
Important notes about your TV/DVD combination The following symptoms are technical limitations of LCD Display technology and are not an indication of malfunction; therefore, Toshiba is not responsible for perceived issues resulting from these symptoms. 1) An afterimage (ghost) may appear on the screen if a fixed, non-moving image appears for a long period of time. The afterimage is not permanent and will disappear in a short period of time.
Notice The information contained in this manual, including but not limited to any product specifications, is subject to change without notice. TOSHIBA CORPORATION AND TOSHIBA AMERICA INFORMATION SYSTEMS, INC. (TOSHIBA) PROVIDES NO WARRANTY WITH REGARD TO THIS MANUAL OR ANY OTHER INFORMATION CONTAINED HEREIN AND HEREBY EXPRESSLY DISCLAIMS ANY IMPLIED WARRANTIES OF MERCHANTABILITY OR FITNESS FOR ANY PARTICULAR PURPOSE WITH REGARD TO ANY OF THE FOREGOING.
Contents Chapter 1: Introduction.............................................................. 18 Features ..................................................................18 Overview of installation, setup, and use..................19 TV front, top, and side panel controls and connections 20 Adjusting the screen angle......................................22 TV back panel connections .....................................22 Chapter 2: Connecting Your TV................................................
Contents Connecting a DVD player with ColorStream® (component video)............................................29 Connecting a satellite receiver.................................30 Connecting an HDMI® or DVI device to the HDMI® input .................................................................31 HDMI® CEC connection .........................................34 Connecting a digital audio system ..........................35 Connecting a computer...........................................
Contents 13 Favorites browser .............................................64 Elements of the Channel Browser .....................65 Adding and clearing channels and inputs in the History List .................................................67 Tuning channels......................................................67 Tuning to a specific channel (programmed or unprogrammed)..........................................67 Tuning to the next programmed channel ..........
Contents Adjusting the audio quality................................83 Audyssey Premium Television™ ......................84 Audyssey ABX™ ...............................................84 Using Audyssey Dynamic Volume® .................85 Selecting the optical audio output format .........85 Using the Dolby® Digital Dynamic Range Control feature.........................................................85 Using the Locks menu ............................................86 Entering the PIN code .........
Contents 15 Using HDMI® CEC................................................108 Displaying TV status information ..........................112 Understanding the auto power off feature.............113 Understanding the last mode memory feature ......113 Chapter 7: Using the TV’s Advanced Features ......................114 Using the advanced picture settings .....................114 Dynamic Contrast ...........................................114 Static Gamma .................................................
Contents Changing the scene angle (DVD) ....................130 Selecting a DVD title (DVD).............................130 DVD menu (DVD)............................................130 Sound track language/Audio channel/Subtitle.......131 Selecting a sound track language (DVD).........131 Selecting the audio channel (VCD)..................131 Viewing subtitles (DVD) ..................................131 Playback information/VCD playback control .........132 Viewing the playback info (DVD/VCD).........
Contents 17 Media Player problems .........................................152 Disc playback problems ........................................152 light indicator .......................................................153 Power indicator...............................................153 If the problem persists after trying the solutions ..153 Appendix A: Specifications...................................................... 154 Television system .................................................
Chapter 1 Introduction Features The following are just a few of the many exciting features of your new Toshiba wide screen, integrated HD, LED TV/DVD combination: 18 ❖ Integrated Digital Tuning (8VSB ATSC and QAM)— Eliminates the need for a separate digital converter set-top box (in most cases). ❖ 1920 x 1080 output resolution. ❖ Two HDMI®—Digital, High-Definition Multimedia Interfaces with 1080p input support, see “Connecting an HDMI® or DVI device to the HDMI® input” on page 31.
Introduction Overview of installation, setup, and use 19 ❖ HDMI® CEC—Allows control of external devices from the TV remote via HDMI® connection, see “Using HDMI® CEC” on page 108. ❖ Media Player—Allows you to view photo files and play music, see “Using the Media Player” on page 99. ❖ ENERGY STAR® qualified. Overview of installation, setup, and use Follow these steps to configure your TV and begin using its many exciting features.
Introduction TV front, top, and side panel controls and connections 6 See “Learning about the remote control” on page 42 for an overview of the buttons on the remote control. 7 After connecting all cables and devices, plug in the power cords for your TV and other devices. Then press the Power button on the TV control panel or remote control to turn on the TV.
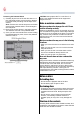
Introduction TV front, top, and side panel controls and connections 21 2 Remote sensor (embedded)—Point the remote control toward this remote sensor. 3 Disc slot—Load the disc, with label facing forward, into the disc slot to view or listen. 4 EJECT button—Press to eject the disc. 5 VOLUME (+ -) buttons—Adjusts the volume level. When an on-screen menu appears, these buttons function as ( / ) menu navigation buttons.
Introduction Adjusting the screen angle Adjusting the screen angle You can adjust the angle of the TV screen 3° forward or 15° backward from a vertical angle. Hold the base of the TV while adjusting the screen. (This feature is available on select models.) (Sample Illustration) Adjusting the screen angle TV back panel connections For explanations of cable types and connections, see “Overview of cable types” on page 24.
Introduction TV back panel connections 2 3 4 5 6 7 8 23 ANALOG AUDIO OUT—Analog audio outputs for connecting an audio amplifier. PC/HDMI 1 (Audio) IN—PC audio input terminal is shared with an HDMI 1 analog audio input terminal, and its use can be configured in the Audio Setup menu, see “Setting the PC Audio” on page 98. PC IN—Connects a personal computer.
Chapter 2 Connecting Your TV Overview of cable types Before purchasing cables, know the connector types your devices require. You can purchase cables from most stores that sell audio/video devices. Coaxial cable (F-type) (Sample Illustration) Coaxial cable Coaxial (F-type) cable connects your antenna, cable TV service, and/or cable converter box to the ANT/CABLE input on your TV.
Connecting Your TV Overview of cable types 25 Standard A/V cables (red/white/yellow) (Sample Illustration) Standard AV cables Standard A/V cables (composite video) usually come in sets of three, and connects with video devices with analog audio and composite video output. These cables (and the related inputs on your TV) are typically color-coded according to use: yellow for video, red for stereo right audio, and white for stereo left (or mono) audio.
Connecting Your TV Overview of cable types Optical audio cable (Sample Illustration) Optical audio cable Optical audio cable connects receivers with Dolby® Digital or PCM (pulse-code modulation) optical audio input to the TV’s Digital Audio Out terminal, see “Connecting a digital audio system” on page 35.
Connecting Your TV Connecting a VCR, antenna, or cable TV 27 Connecting a VCR, antenna, or cable TV White Red Ye l l o w Ye l l o w Red White (Sample Illustration) Connecting to a VCR, antenna, or Cable TV Items needed: ❖ Coaxial cables ❖ Standard AV cables NOTE When you use a Cable box, you may not be able to use the remote control to program or access certain features on the TV. To view the antenna or cable signal: Select ANT/CABLE video input source on the TV.
Connecting Your TV Connecting a camcorder Connecting a camcorder Ye l l o w Red White Ye l l o w Red White (Sample Illustration) Connecting a camcorder You will need standard A/V cables. To view the camcorder video, select the VIDEO input source on the TV.* *To select the video input source, press the INPUT button on the remote control, see “Selecting the video input source” on page 59.
Connecting Your TV Connecting a DVD player with ColorStream® (component 29 Connecting a DVD player with ColorStream® (component video) Red Blue Green White Red Green Red Blue Red White (Sample Illustration) Connecting a DVD player with ColorStream® Items needed: ❖ Standard audio cables ❖ Component video cables ❖ You can connect the component video cables (plus audio cables) from the DVD player to the COLOR STREAM HD terminal in the TV.
Connecting Your TV Connecting a satellite receiver Connecting a satellite receiver Green Blue Red White Red Green Red Blue Red White (Sample Illustration) Connecting a satellite receiver Items needed: ❖ Standard audio cables ❖ Component video cables ❖ You can connect the component video cables (plus audio cables) from the DVD player to the COLOR STREAM HD terminal in the TV. The COLOR STREAM HD terminal can be used to display Progressive (480p, 720p) and Interlaced (480i, 1080i).
Connecting Your TV Connecting an HDMI® or DVI device to the HDMI® input NOTE 31 The unauthorized recording, use, distribution, or revision of television programs, videotapes, DVDs, and other materials is prohibited under the Copyright Laws of the United States and other countries, and may subject you to civil and criminal liability.
Connecting Your TV Connecting an HDMI® or DVI device to the HDMI® input ❖ HDMI® cables transfer both video and audio. Separate analog audio cables are not required (see illustration). (Sample Illustration) Connecting an HDMI® device To view the HDMI® device video: Select HDMI 1 or HDMI 2 video input source on the TV.* *To select the video input source, press the INPUT button on the remote control, see “Selecting the video input source” on page 59.
Connecting Your TV Connecting an HDMI® or DVI device to the HDMI® input ❖ 33 3.5mm Stereo to RCA Y-Cable An HDMI® to DVI adapter cable transfers video only. Separate analog audio cables are required (see illustration). (Sample Illustration) DVI Device connections NOTE To ensure that the HDMI® or DVI device is reset properly: ❖ When turning on your electronic components, turn on the TV first, and then the HDMI® or DVI device.
Connecting Your TV HDMI® CEC connection HDMI® CEC connection You can control the basic functions of connected audio/video devices using the TV’s remote control if you connect a HDMI® CEC compatible audio receiver or playback device. For an explanation of setup and operations, see “HDMI® CEC playback device (DVD player, etc.) control” on page 108. To connect an HDMI® device, you will need one HDMI® cable (type A connector) per HDMI® device.
Connecting Your TV Connecting a digital audio system 35 ❖ This feature is limited to models incorporating Toshiba’s HDMI® CEC. However, Toshiba is not liable for those operations. For compatibility information, refer to the individual instruction manuals for your other devices that have CEC technology. NOTE This feature may not work properly depending on the devices that are connected.
Connecting Your TV Connecting a digital audio system 3 Press the ( / arrow) buttons to select Audio Setup, and then press the INPUT button. (Sample Image) Audio Setup screen 4 Press the ( / Format. 5 Press the ( / arrow) buttons to select either Dolby Digital or PCM, depending on your device. arrow) buttons to select Digital Output (Sample Image) Audio Setup screen - Done 6 NOTE To save the new settings, highlight Done, and then press the OK button.
Connecting Your TV Connecting a computer 37 Connecting a computer With either the PC IN or HDMI® connection, you can view your computer’s display on the TV and hear the sound from the TV’s speakers. Connecting a computer to the TV’s PC IN terminal When connecting a computer to the PC IN terminal on the TV, use an analog RGB (15-pin) computer cable and a PC audio cable. For more information, see “Overview of cable types” on page 24.
Connecting Your TV Connecting a computer Other formats or non-standard signals will not be displayed correctly. To display the optimum picture, use the computer setting feature, see “Using the PC settings feature” on page 97. NOTE ❖ The PC audio input terminals on the TV are shared with the HDMI 1 analog audio input terminals. For configuration information, see “Setting the PC Audio” on page 98. ❖ Some computer models cannot be connected to this TV.
Connecting Your TV Connecting a computer 39 Connection to the TV’s HDMI® terminal When connecting a computer with a HDMI® terminal on the TV, use an adapter cable and analog audio cables. When connecting a computer with an HDMI® port, use an HDMI® cable (type A connector). Separate analog audio cables may not be necessary, depending on computer hardware and setup.
Chapter 3 Using the Remote Control Using the remote control The remote control can operate your LED TV/DVD combination and control the basic functions of connected audio/video devices if you connect a HDMI® CEC compatible audio receiver or playback device, see “HDMI® CEC playback device (DVD player, etc.) control” on page 108. Installing batteries To install batteries: 1 Open the battery lid at the bottom of remote control.
Using the Remote Control Installing batteries 2 41 Insert the batteries, corresponding to the (+) and (–) markings on the battery compartment. (Sample Illustration) Installing the batteries 3 Replace the battery cover. Do not expose batteries to excessive heat such as sunshine, fire, etc. NOTE ❖ Be sure to use AAA size batteries. ❖ Dispose of batteries in a designated disposal area. ❖ Always consider the environment when disposing of batteries. Always follow applicable laws and regulations.
Using the Remote Control Learning about the remote control Learning about the remote control The buttons used for operating the LED TV/DVD combination are described here. For the HDMI® CEC remote control functions, see “HDMI® CEC playback device (DVD player, etc.) control” on page 108.
Using the Remote Control Learning about the remote control NOTE 43 The error message “NOT AVAILABLE” may appear if you press a key for a function that is not available. 1 The POWER button turns the TV On and Off. When the TV is on, the power LED indicator on the TV front glows green. 2 The EJECT button ejects the disc from the disc slot. 3 The TV/DVD button switches between TV and DVD mode. 4 The FREEZE button freezes the picture.
Using the Remote Control Learning about the remote control 17 The CH RTN button returns to the last viewed channel or source, see “Switching between two channels using Channel Return” on page 68; Also, the CH RTN button returns to the previous directory from a Media Player sub-folder or sub-menu, see “Viewing photo files” on page 101.
Using the Remote Control Learning about the remote control 45 30 The STOP button stops playback of the loaded disc, see “Playing an audio file” on page 136. 31 The SKIP forward button skips forward to locate later DVD chapters, see “Playing an audio file” on page 136. 32 The SKIP reverse button skips back to locate the beginning of current DVD chapter or locate a previous chapter, see “Playing an audio file” on page 136.
Chapter 4 Menu Layout and Navigation Main menu layout The Installation menu contains the Terrestrial and System Status menus. To open the Installation menu, press the MENU button on the remote control or MENU on the TV control panel, open the Setup menu, select Installation, and then press the OK button.
Menu Layout and Navigation Menu setup/installation/layout Icon Preferences Locks Setup Item CC Selector Base CC Mode Digital CC Settings Input Labeling AV Input Menu Language Channel Browser Setup HDMI® CEC Player Control Energy Saving Settings Enable Rating Blocking Edit Rating Limits Input Lock Panel Lock GameTimer® New PIN Code Installation HDMI® CEC Setup Sleep Timer PC Settings Media Player 47 Option Launches the temporary CC Selector Off/CC1/CC2/CC3/CC4/T1/T2/T3/T4 Opens the Digital CC Settings
Menu Layout and Navigation Navigating the menu system Icon Terrestrial Item Input Configuration Channel Program Channel Options Time Zone System Status Signal Meter System Information Option Opens the Input Configuration menu Start Scan > Scans for new channels on ANT/CABLE Opens the Skip/Lock Channel menu Eastern/Newfoundland/Atlantic/Hawaii/ Alaska/Pacific/Mountain/Central Opens the Signal Meter menu Opens the System Information screen Navigating the menu system You can use the buttons on the r
Menu Layout and Navigation Navigating the menu system 49 4 All menus close automatically if you do not make a selection within a few seconds, except the signal meter menu, which closes automatically after a few minutes. 5 To close a menu instantly, press the EXIT button. NOTE The menu background may sometimes appear black, depending on the signal the TV is receiving. This is not a sign of malfunction.
Chapter 5 Setting up your TV Initial Setup When you first turn on or reset the TV, the Initial Setup window will appear. 1 In the Menu Language field, press the ( / arrow) buttons. 2 Press the ( / arrow) buttons to select Time Zone Setup and set your desired time zone, using the ( / arrow) buttons, and then press the OK button. The Location settings window appears. 3 For normal home use, press the ( / arrow) buttons to select Home, and then press the OK button. The ANT/CABLE In setup window appears.
Setting up your TV Initial Setup 51 Menu language You can choose from three different menu language settings (English, Français, and Español). Your selection is the language all menus are displayed in. To select the menu language: 1 Press the MENU button to open the Preferences menu, and highlight Menu Language. 2 Select Settings, SETUP, and then Menu Language. 3 Press the ( / language.
Setting up your TV Storing channels in memory (optional) 4 Highlight ANT/CABLE In and press the ( / arrow) buttons to select the input source (Cable or Antenna). (Sample Image) Selecting the ANT/CABLE input source 5 To save your new settings, highlight Done, and then press the OK button. To revert to your original settings, highlight Cancel, and then press the OK button.
Setting up your TV Storing channels in memory (optional) 3 53 Highlight Installation, and then press the OK button. (Sample Image) Auto tuning program channels A new set of Installation menus appear. 4 Open the Terrestrial menu, highlight Channel Program to open the Start Scan window, and then press the OK button to begin channel programming.
Setting up your TV Setting channel skip Setting channel skip To prevent a channel from being viewed, you can set it to be skipped. 1 From the Setup menu, highlight Installation, and then press the OK button. 2 Press the ( / arrow) buttons to select Channel Options, and then press the OK button. The list of channels appears. (Sample Illustration) List of channels 3 Press the ( / arrow) buttons to select a channel position to be skipped, and then press the OK button.
Setting up your TV Setting the HDMI® audio mode 2 55 Press the ( / arrow) buttons to select a channel position to be locked, and then press the OK button. Enter your four-digit PIN code. A check appears in the box. To remove the check, press the OK button again. NOTE 3 If the PIN code has not been set yet, a warning message appears. To save the setting, press the EXIT button.
Setting up your TV Setting the HDMI® audio mode 3 Press the ( / arrow) buttons to select HDMI 1 Audio, and then press the ( / arrow) buttons to select the HDMI 1 audio mode (Auto, Digital, or Analog). (Auto is the recommended mode.) See “Connecting an HDMI® or DVI device to the HDMI® input” on page 31. (Sample Image) HDMI® Audio mode screen Mode: Description: Auto When viewing the HDMI 1 input, if digital audio from the HDMI® input is available, it will be output.
Setting up your TV Viewing the Digital Signal Meter 57 Viewing the Digital Signal Meter You can view the digital signal meter in the ANT/ CABLE digital TV input source only. To view the digital signal meter: 1 Press the MENU button to open the Setup menu. 2 Highlight Installation, and then press the OK button. A new set of Installation menu icons appear. 3 Open the Terrestrial menu, highlight Signal Meter, and then press the OK button.
Setting up your TV Viewing the system status To set the Daylight Saving Time status, press the ( / arrow) buttons to select Yes or No, highlight Done, and then press the OK button. Viewing the system status 1 Press the MENU button to open the Setup menu. 2 Highlight Installation, and then press the OK button. A new set of Installation menu icons appear. 3 Open the System Status menu, highlight System Information, and then press the OK button.
Chapter 6 Using the TV’s features Selecting the video input source To select the video input source to view: 59 1 Press the INPUT button on the remote control or TV control panel. 2 Choose from the following options: ❖ Press 0-5. ❖ Repeatedly press the ( / arrow) buttons on the remote control, and then press the OK button to change the input setting. ❖ Repeatedly press the INPUT button on the remote control or TV control panel to change the input setting.
Using the TV’s features Selecting the video input source ❖ The current signal source displays in the top right corner of the Input Selection screen. Input Selection 0 1 2 3 4 5 ANT/CABLE ANT/CABLE Video/ColorStream HD HDMI 1 HDMI 2 PC DVD 0 - 5 / INPUT to Select Navigate (Sample Image) Input Selection screen NOTE ❖ You can label the video input sources according to the specific devices you have connected to the TV, see “Labeling the video input sources” on page 61.
Using the TV’s features Labeling the video input sources 61 Press the INPUT button repeatedly to highlight the desired input source, and then press the EXIT button. NOTE ❖ When selecting HDMI® CEC input sources from the pop-up window using the INPUT button, some HDMI® CEC devices may automatically turn on. ❖ When selecting input sources using the ( / arrow) buttons, you will need to press the OK button to actually select a particular device from the pop-up window.
Using the TV’s features Labeling the video input sources To label the video input sources: 1 Press the MENU button to open the Preferences menu. 2 Highlight Input Labeling, and then press the OK button. (Sample Image) Input Labeling screen 3 Press the ( / arrow) buttons to highlight the video source you wish to label. 4 Press the ( / arrow) buttons to select the desired label for that input source. If a particular input is not used, Hide can be selected as the label.
Using the TV’s features Tuning channels using the Channel Browser 63 Input labeling example: The screen below left shows the default Input Selection screen (with none of the inputs labeled as a specific device). The screen below (right) is an example of how you can label the inputs if you connected a VCR to ColorStream® HD, a video recorder to HDMI 1, and a DVD player to HDMI 2.
Using the TV’s features Tuning channels using the Channel Browser Favorites browser The Favorites Browser allows you to quickly configure a favorite channels/inputs list that is integrated into the Channel Browser. To add a favorite channel/input: 1 Tune to the channel or input. 2 Press and hold the FAV button for a few seconds. NOTE The channel or input is added to the beginning of the Favorites list on the left side of the Channel Browser.
Using the TV’s features Tuning channels using the Channel Browser 65 5 Press the ( arrow) button to highlight Inputs List, and then press the ( / arrow) buttons to select On/Off. 6 Press the ( arrow) button to highlight Favorites List, and then press the ( / arrow) buttons to select On/Off. 7 Press the ( arrow) button to highlight HDMI® CEC List, and then press the ( / arrow) buttons to select On/Off.
Using the TV’s features Tuning channels using the Channel Browser 4 Channel or input that is currently highlighted in the browser 5 Channels stored in the History List To toggle among the available lists: After opening the Channel Browser, press the ( / arrow) buttons to toggle through the History, ANT/CABLE, Inputs, Favorites, or HDMI® CEC options. NOTE ❖ The Channel Browser opens in History List by default.
Using the TV’s features Tuning channels 67 Adding and clearing channels and inputs in the History List Adding channels and inputs to the History List: As a channel or input is tuned, the Channel Browser adds it to the History List and displays it on the right side of the Channel Browser. Previously tuned channels/inputs are shifted to the left, eventually moving off the left side. Press the BACK CB button to surf backward through the previously tuned channels/inputs.
Using the TV’s features Tuning channels Tuning to the next programmed channel Tuning analog channels: Press the Channel Number (0–9) buttons on the remote control. For example, to select channel 125, press 1, 2, 5, and then press the OK button. Tuning digital channels: Press the Channel Number (0–9) buttons on the remote control, followed by the Dash/100 button, and then the sub-channel number. For example, to select digital channel 125-1, press 1, 2, 5, –, 1, and then press the OK button.
Using the TV’s features Selecting the picture size 69 2 Press and hold the CH RTN button for a few seconds until the message “Memorized” appears on the screen. The channel has been programmed to the CH RTN button. 3 You can then change channels repeatedly, and when you press the CH RTN button, the memorized channel will be tuned. The TV will return to the memorized channel one time only.
Using the TV’s features Selecting the picture size To select the picture size using the menus: 1 Select Picture Size in the Theater Settings menu. 2 Press the ( / setting. 3 Highlight Done, and then press the OK button. arrow) buttons to select the desired picture size NOTE Some of the picture sizes may not be available depending on the receiving signal format (those will be “grayed out” in the Picture Size screen).
Using the TV’s features Selecting the picture size 71 TheaterWide 1 This setting is for viewing in 4:3 format programs. (Sample Illustration) Picture size - TheaterWide 1 The center of the picture remains close to its original proportion, but the left and right edges are stretched horizontally to fill the screen. TheaterWide 2 This setting is for viewing letter box programs. (Sample Illustration) Picture size - TheaterWide 2, letter box The picture’s top and bottom edges may be hidden*.
Using the TV’s features Selecting the picture size Native These settings are for viewing in 480i (HDMI®), 480p (HDMI®), 720p, 1080i, and 1080p signal programs). (Sample Illustration) Picture size - Native ❖ If receiving a 1080i, 1080p, 720p, 480i (HDMI®), or 480p (HDMI®) signal program, the video is scaled to display the entire picture within the borders of the screen (i.e. no over-scanning).
Using the TV’s features Scrolling the TheaterWide® picture (TheaterWide 2 and 3 only) 73 Normal This setting is for viewing VGA, SVGA, XGA, WXGA, and SXGA sources. (Sample Illustration) Picture size - Normal This size is a non-stretched display. Some input signal formats will display with sidebars and/or bars at the top and bottom. Dot by Dot This setting is for viewing VGA, SVGA, XGA, WXGA, and SXGA sources. (Sample Illustration) Picture size - Dot by Dot “Dot by Dot” is a non-scaling display.
Using the TV’s features Using the Auto Aspect feature 2 Highlight Theater Settings, and then press the OK button. (Sample Image) Theater settings screen 3 In the Picture Size field, select either TheaterWide 2 or TheaterWide 3 NOTE You cannot scroll in any other mode. 4 Press the ( 5 Press the ( / arrow) buttons to scroll the picture up and down as needed. 6 To save the new settings, highlight Done, and then press the OK button.
Using the TV’s features Selecting the cinema mode Aspect Ratio of Signal Source 75 Automatic Aspect Size (automatically selected when Auto Aspect is On) Not defined (no ID-1 The current picture size you set under, see “Selecting the data or HDMI® aspect picture size” on page 69. data) NOTE The auto aspect ratio feature is not applicable to the PC input. To turn on the auto aspect ratio feature: 1 Press the MENU button and open the Picture menu.
Using the TV’s features Adjusting the picture NOTE Using the FREEZE function for any purpose other than your private viewing may be prohibited under the Copyright Laws of the United States and other countries, and may subject you to civil and criminal liability. NOTE If the TV is left in FREEZE mode for more than 15 minutes, the FREEZE mode will automatically release and the TV returns to normal video.
Using the TV’s features Adjusting the picture 2 77 Highlight Mode, and then press the OK button. (Sample Image) Mode screen 3 Press the ( / arrow) buttons, and then press the OK button. (Sample Image) Mode selections screen Adjusting the picture quality You can adjust the picture quality (Contrast, Backlight, DynaLight™, Brightness, Color, Tint, and Sharpness.) to your personal preferences.
Using the TV’s features Using closed captions **DynaLight®: This function automatically strengthens the black coloring of dark areas in the video according to the level of darkness. To adjust the picture quality: 1 Press the MENU button and open the Picture menu. 2 Highlight Picture Settings, and then press the OK button.
Using the TV’s features Using closed captions 79 To view captions, highlight CC1, CC2, CC3, or CC4. (CC1 displays translation of the primary language in your area.) (Sample Illustration) Viewing captions NOTE If the program or video you selected is not closed captioned, no captions will display on-screen. To view text, highlight T1, T2, T3, or T4. (Sample Illustration) Captions - text NOTE If text is not available in your area, a black rectangle may appear on screen.
Using the TV’s features Using closed captions Digital CC settings You can customize the closed caption display characteristics by changing the background color, opacity, text size, type, edge, and color. NOTE ❖ These settings are available for digital channels only. ❖ You cannot set Caption Text and Background as the same color. To customize closed captions: 1 Press the MENU button to open the Preferences menu. 2 Highlight Digital CC Settings, and then press the OK button.
Using the TV’s features Adjusting the audio 81 caption setting will automatically change back to the current Base CC Mode setting. You can also use the CC Selector to select digital closed caption services, if available. When such services are not available, the CC Selector presents a default list of services. If the selected service is not available, the next best service will be used. To select closed captions: 1 Press the MENU button to open the Preferences menu.
Using the TV’s features Adjusting the audio Using the digital audio selector You can use the Digital Audio Selector to conveniently switch between audio tracks on a digital channel (for those channels that have multiple audio tracks). This temporarily overrides the audio track chosen by the language option under Audio Setup, see “Selecting stereo/SAP broadcasts” on page 82. 1 Press the MENU button to open the Sound menu. 2 Highlight Digital Audio Selector, and then press the OK button.
Using the TV’s features Adjusting the audio NOTE 83 ❖ You can typically leave the TV in Stereo mode because it outputs the type of sound being broadcast (stereo or monaural). ❖ If the sound is noisy, select Mono to reduce the noise. To listen to an alternate language on an ATSC digital station (if available), highlight the Language field in step 3 above, and then press the ( / arrow) buttons to select the language you prefer.
Using the TV’s features Adjusting the audio To adjust the audio quality: 1 Press the MENU button to open the Sound menu. 2 Highlight Audio Setup, and then press the OK button. 3 Press the ( / arrow) buttons to highlight the item you wish to adjust (Bass, Treble, or Balance). 4 Press the ( / arrow) buttons to adjust the level. ❖ makes the bass or treble weaker or increases the balance in the left channel (depending on the item selected).
Using the TV’s features Adjusting the audio 3 Press the ( / ABX™ field. arrow) buttons to highlight the Audyssey 4 Press the ( / arrow) buttons to select On. 85 Using Audyssey Dynamic Volume® This feature provides a consistent sound volume between television programs, commercials, and between the loud and soft passages of movies. 1 Press the MENU button. Select Settings, SOUND, Audyssey Premium Television, Dynamic Volume. 2 Press the ( / NOTE arrow) buttons to select ON or Off.
Using the TV’s features Using the Locks menu 2 Highlight Audio Setup, and then press the OK button. 3 In the Dolby® Digital Dynamic Range Control field, select either Compressed. When Standard is selected, the audio outputs with minimal compression. 4 To save the new settings, highlight Done, and then press the OK button. 5 To reset the settings to the factory defaults, highlight Reset, and then press the OK button.
Using the TV’s features Using the Locks menu 2 Press the ( screen. 87 arrow) button to display the PIN code entry The Lock System screen appears if a PIN code has not been stored. (Sample Image) Lock menu - store PIN screen 3 4 NOTE Press the Channel Number buttons to enter a new four-digit code, enter the code a second time to confirm, and then press the OK button. The Locks/Active screen appears if the PIN code is already stored.
Using the TV’s features Using parental controls (for USA region) 4 Press the ( arrow) button to highlight New PIN Code, and then press the OK button. 5 Press the Number buttons to enter a new four-digit code. Reenter the PIN code to confirm it. 6 Press the OK button. The new PIN code is now active. NOTE The PIN code cannot be set to “0000.
Using the TV’s features Using parental controls (for USA region) 89 (Sample Image) Locks menu screen for other regions 6 Press the ( arrow) button to highlight Edit Rating Limits, and then press the OK button. 7 Press the ( / / / button. arrow) buttons, and then press the OK A box with an “X” is a rating that will be blocked. As you highlight a rating, a definition for the rating appears at the bottom of the screen. 8 NOTE To save the new settings, highlight Done, and then press the OK button.
Using the TV’s features Using parental controls (for USA region) 5 Press the ( 6 Press the ( arrow) button to highlight Edit Rating Limits, and then press the OK button. arrow) button to select On. The Edit Rating Limits screen appears. 7 Highlight Alt RS, and then press the OK button. The Edit Alternate Ratings screen appears. NOTE ❖ The Alt RS button will only be available if an additional rating system is currently available.
Using the TV’s features Using parental controls (for USA region) 91 Rating system Independent rating system for broadcasters: Ratings: TV-MA TV-14 TV-PG TV-G TV-Y7, TV-Y7FV Description and Content themes: Mature Audience Only (This program is specifically designed to be viewed by adults and therefore may be unsuitable for children under 17.
Using the TV’s features Using parental controls (for USA region) Indication other than rating system: Display: Description: NONE The program is rated None. (No rating appears) No rating information is provided. NOTE If you place an “X” in the box next to “None” Rated, programs rated “None” or “Not Rated” will be blocked; Programs that do not provide any rating information will not be blocked.
Using the TV’s features Using parental controls (for USA region) 8 93 Press the ( / / / arrow) buttons, and then press the OK button to select the level of blocking you prefer. A box with an “X” is a rating that will be blocked. 9 To save the new settings, highlight Done, and then press the OK button. 10 In the Edit Rating Limits screen, highlight Done, and then press the OK button.
Using the TV’s features Using the input lock feature To temporarily unlock the program: 1 Press the MUTE button. 2 Enter your four-digit PIN code, and then press the OK button. If the correct code is entered, the program lock mode is released and the normal picture appears. All locking will be enabled again when you change the channel. Using the input lock feature You can use the Input Lock feature to lock the video inputs (Video, ColorStream® HD, HDMI 1, HDMI 2, and PC) and channels 3 and 4.
Using the TV’s features Locking channels 3 Press the ( / arrow) buttons to select Channel Options, and then press the OK button. The list of channels appear. (Sample Illustration) Channel options 4 Press the ( arrow) button, and then press the ( / buttons to select a channel in the lock column. 5 Press the OK button. arrow) PIN code entry will be required to set a locked channel. NOTE If the PIN code has not yet been set, a warning message appears. 6 A check appears in the box.
Using the TV’s features Locking channels To cancel the GameTimer®, select Off in step 3 above. To deactivate the Input Lock once the GameTimer® has activated it: ❖ NOTE Set the Input Lock to Off, see “Using the GameTimer®” on page 95. ❖ A message appears when 10 minutes, 3 minutes, and 1 minute are remaining. ❖ If the TV loses power with time remaining, the TV will enter Input Lock mode when power is restored (as if the GameTimer had been activated).
Using the TV’s features Using the PC settings feature 97 To unlock the control panel, select Off in Step 5 above or press and hold the VOLUME (–) button on the TV control panel for a few seconds until the volume icon appears. Using the PC settings feature You can view an image from a PC on the TV screen. When a PC is connected to the TV's PC IN terminal, you can use the PC Settings feature to make adjustments to the image.
Using the TV’s features Using the PC settings feature NOTE The screen is disrupted momentarily while adjusting the PC settings. This is not a sign of malfunction. Mode: Description: Horizontal Position Moves the picture left/right. The adjustment range is within ±10 from center.* Vertical Position Moves the picture up/down. The adjustment range is within ±10 from center.* Clock Phase Helps to reduce noise and sharpen the picture. The adjustment range is within ±16 from center.
Using the TV’s features Using the Media Player 99 Using the Media Player Using Media Player with a USB device You can enjoy photos or music contents stored on a USB storage device. Photo Viewer specifications: ❖ Data type: JPEG EXIF ver 2.
Using the TV’s features Using the Media Player NOTE ❖ Gently insert the USB device into the port and do not remove while viewing Media Player. ❖ USB device: USB Mass Storage Class device (MSC) ❖ Connectivity is not guaranteed for all devices. ❖ Connect the USB device to the TV directly. ❖ Do not use a USB Hub. ❖ You must obtain any required permission from copyright owners to use copyright content. Toshiba cannot and does not grant such permission.
Using the TV’s features Using the Media Player 2 Press the ( / OK button. 101 arrow) buttons to select Yes, and then press the The Media Player menu will appear. When you select No, nothing happens. (Sample Image) Media Player - open screen NOTE ❖ The prompt will disappear after about 10 sec. ❖ If Auto Start is set to off, you can start the Media Player manually. Manual Start: 1 Press the MENU button to open the Setup menu.
Using the TV’s features Using the Media Player This view allows you to search for photos in a grid format. These pictures are displayed using thumbnail data in each image file. Date : 2009-07-29 05:10:15 640x480 OK Enter CH (Sample Image) Media Player - photos screen 1 Press the ( / / / arrow) buttons to move the highlight in one window. If all of the photos will not fit in one screen, when pressing the ( arrow) button at the top left thumbnail, the screen will move to the previous page.
Using the TV’s features Using the Media Player 103 Slide show This view allows you to watch a slide show of the photos. In this mode, only files located in the selected directory will be played. 1 To start slide show, press the OK button to select Single View mode. 2 Press the ( / photo. arrow) buttons to view the previous or next To set Interval Time and Repeat settings: 1 Press the MENU button to open the Quick Menu. 2 Press the ( / or Repeat.
Using the TV’s features Using the Media Player NOTE ❖ If playback finishes before the STOP button is pressed, the next file automatically starts to play from the beginning. ❖ Depending on the file size, it may take some time for playback to begin. To pause playback: ❖ Press the PAUSE button to pause playback. ❖ To resume normal playback, press the PLAY or PAUSE button. ❖ To locate a specific file, press the SKIP Reverse or SKIP Forward button repeatedly.
Using the TV’s features Using the Media Player 105 Contents Description Description Photo Photo list (Multi View) See page 137 Sorting To sort the folders and files: 1 Press the MENU button to open the Quick Menu from Multi View mode. 2 Press the ( / arrow) buttons to select Sort. 3 Press the ( / arrow) buttons to select Title, New, or Old to set the sorting rule.
Using the TV’s features Setting the sleep timer Contents Description Description Music Music list (Multi View) See page 136 Sorting To sort the folders and files: 1 Press the MENU button to open the Quick Menu. 2 Press the ( / arrow) buttons to select Sort. 3 Press the ( / arrow) buttons to select Title, New, or Old to set the sorting rule.
Using the TV’s features Automatic Power Down 3 NOTE 107 Press the Number buttons to enter the length of time (maximum of 12 hours) and then press the OK button. Or press the ( / arrow) buttons to increase or decrease in 10-minute increments, (maximum of 12 hours). If a power failure occurs, the sleep timer setting may be cleared. To display the time remaining until the TV turns off, press the SLEEP button. NOTE A message displays on-screen when one minute is remaining on the sleep timer.
Using the TV’s features No Signal Power Down No Signal Power Down The TV will automatically turn itself off after 15 minutes when no signal is detected. ❖ You can change the setting to Off for the following functions: ❖ Low signal strength of an analog channel (no signal detection) ❖ Only Audio L/R is connected to external input to listen to music through the TV speakers. 1 From the Preferences menu, highlight Energy Saving Settings, and then press the OK button.
Using the TV’s features Using HDMI® CEC Button: SKIP Reverse FF REV / / / OK CANCEL NOTE 109 Description: Skip backward Fast forward Rewind/reverse Navigates menu options Enters menu options Return to the previous menu These functions depend on the devices connected. HDMI® CEC Player Control menu functions: 1 Press the MENU button, and then open the Preferences menu. 2 Highlight HDMI® CEC Player Control, and then press the OK button.
Using the TV’s features Using HDMI® CEC NOTE These functions depend on the devices that are connected. The HDMI® CEC Player Control item will be grayed out in the following conditions: ❖ A non-HDMI® input is currently selected. ❖ The Enable HDMI® CEC item is set to Off. ❖ The connected CEC device is not a playback or recording device. HDMI® CEC input source selection If a HDMI® CEC device with HDMI® switching capability (e.g.
Using the TV’s features Using HDMI® CEC 111 Other HDMI® CEC functions When the Enable HDMI® CEC and each item in the HDMI® CEC Setup menu are set to On, the following functions will be enabled. Item: TV Auto Input Switch TV Auto Power Device Auto Standby Speaker Preference Description: If a connected HDMI® device starts playing video or audio, the TV will automatically switch to the appropriate HDMI® input. If a HDMI® CEC device is turned on, the TV turns on automatically.
Using the TV’s features Displaying TV status information 5 To save the new settings, highlight Done and press the OK button. To revert to the factory defaults, highlight Reset and press the OK button. Displaying TV status information To display TV status information: ❖ Press the INFO button on the remote control. The following information will be displayed (if applicable): ❖ Current input (ANT/CABLE, Video, etc.
Using the TV’s features Understanding the auto power off feature NOTE 113 The location of the banner can be moved to the top or bottom of the screen by pressing or while the INFO display is on-screen. Understanding the auto power off feature The TV will automatically turn itself off after approximately 15 minutes if it is tuned to a vacant channel or a station that completes its broadcast for the day. NOTE ❖ If you want to set this feature to Off, see “No Signal Power Down” on page 108.
Chapter 7 Using the TV’s Advanced Features Using the advanced picture settings Dynamic Contrast Dynamic Contrast detects changes in picture quality that affect the appearance of your contrast settings and then automatically adjusts the video. To select Dynamic Contrast preference: 1 From the Picture menu, highlight Picture Settings and press the OK button. (Sample Image) Dynamic Contrast screen 114 2 Highlight Advanced Picture Settings, and then press the OK button.
Using the TV’s Advanced Features Using the advanced picture settings 4 Press the ( / Off. 115 arrow) buttons to select High, Middle, Low or Static Gamma The static gamma feature lets you adjust the levels of black in the picture. To adjust the static gamma settings: 1 Press the MENU button to open the Picture menu. 2 Highlight Picture Settings, and then press the OK button. 3 Highlight Advanced Picture Settings, and then press the OK button.
Using the TV’s Advanced Features Using the advanced picture settings 2 Highlight Picture Settings, and then press the OK button. 3 Highlight Advanced Picture Settings, and then press the OK button. 4 Highlight Color Temperature, and then press the OK button. 5 In the Color Temperature field, press the ( / arrow) buttons to select the mode you prefer (Cool, Medium, or Warm).
Using the TV’s Advanced Features Using the advanced picture settings NOTE 117 ❖ If the current input is ANT/CABLE or VIDEO, the menu will display the text “CableClear”. The available selections are Off, Low, Middle, and High. ❖ If the current input is ColorStream® HD, HDMI 1 or HDMI 2, the menu will display the text “DNR”. The available selections are Off, Low, Middle, and High. Low, Middle, and High will reduce the noise in varying degrees, from lowest to highest, respectively.
Using the TV’s Advanced Features Using the advanced picture settings NOTE To use the Game Mode feature, the current video input must be Video, ColorStream® HD, HDMI 1 or HDMI 2. The Game Mode cannot be turned on when any other video input, other than the above mentioned is selected. To turn on Game Mode: 1 Press the MENU button to open the Picture menu. 2 Press the ( / 3 Press the OK button to toggle Game Mode On/Off. arrow) buttons to select Game Mode.
Chapter 8 Basic Disc Playback Disc playback This section shows you the basics on how to play a disc. Basic playback (DVD/VCD/CD) 1 Press the POWER button on the TV control panel or on the remote control. The Power LED on the front of the LED TV/DVD combination changes to green. It may take approximately 10 seconds for a picture to appear on-screen. When using an amplifier, switch on the amplifier.
Basic Disc Playback Disc playback 2 Press the TV/DVD button on the remote control to switch to DVD mode. The DVD start-up screen appears. (Sample Image) DVD start-up screen 3 NOTE Hold the disc by its edges and load it in the disc slot with the label side facing forward. The prompt “Close” changes to “Loading” and then playback begins. DO NOT touch the surface of the disc. This may leave a smudge that can cause playback errors. If the disc has its own menu, it will be displayed on-screen.
Basic Disc Playback Disc playback 121 Higher quality picture: High resolution pictures on some discs may occasionally cause noise on the picture display. If this is the case, reduce the Sharpness setting under the Picture Settings menu. NOTE ❖ Keep your fingers well clear of the disc slot when a disc is loading or unloading. Failure to do so may cause serious personal injury. ❖ Do not move the TV during playback. Doing so may damage the disc.
Basic Disc Playback Playback navigation ❖ When you load a disc with the playback side facing backward, the message, “Loading” appears on the screen. It will be replaced by the message, “Incorrect Disc.” Eject the disc and load it again making sure the playback side is now facing forward. ❖ The playback resume function may not work on some discs. ❖ Some DVDs may have fixed playback operations designed by the DVD manufacturer. Your LED TV/DVD combination follows this fixed playback design.
Basic Disc Playback Playback navigation 123 Playing frame by frame (DVD/VCD) Press the PAUSE button during playback. Each time you press the PAUSE button, the picture advances one frame. To resume normal playback, press the PLAY button. NOTE The sound is muted during frame by frame playback. Playing in slow motion (DVD/VCD) Press the SLOW button during playback. Each time you press the SLOW button, the slow motion speed changes. To resume normal playback, press the PLAY button.
Chapter 9 Advanced Disc Playback Zoom function/Scene navigation You can change the viewing scale of a picture by using the Zoom function. Once the image has been rescaled, use the ( / / / arrow) buttons to pan the image. Scene navigation options differ depending on the kind of disc. DVDs use the title, chapter or record time to locate the start point for playback. Audio CDs and Video CDs use the record time or track number. Using Zoom (DVD/VCD) 1 Press the ZOOM button during playback.
Advanced Disc Playback Zoom function/Scene navigation NOTE 125 ❖ You can use the Pause, Slow and Search playback functions in Zoom mode. ❖ Zoom function may not apply to some discs. Locating a specific scene 1 Press the JUMP button during playback, still or stop mode. (Sample Image) Disc Jump - Title 2 Press the ( / arrow) buttons to select a navigation option.
Advanced Disc Playback Scene bookmark VCD mode: (Sample Image) Disc Jump - VCD mode CD mode: (Sample Image) Disc Jump - CD mode NOTE ❖ When you use title navigation, playback starts from the first chapter of the selected title. ❖ For PBC-enabled VCDs, turn off the PBC function first before using the Jump function. ❖ Scene navigation may not apply to some discs. Scene bookmark Scene bookmarks refer to specific points in the playback range that have been marked for later access.
Advanced Disc Playback Scene bookmark 127 Bookmarking a scene (DVD/VCD) 1 During playback, press the MARKER button at the scene you would like to place the bookmark. (Sample Image) Disc scene bookmarking 2 Press the ( / arrow) buttons to select a blank marker, and then press the PLAY button. Repeat these steps to save twelve more bookmarks. (Sample Image) Disc scene bookmarking 3 NOTE Press the MARKER button to exit and close the bookmark window.
Advanced Disc Playback Scene bookmark Viewing a scene bookmark (DVD/VCD) 1 Press the MARKER button to open the bookmark window. 2 Press the ( / arrow) buttons to select the saved marker. (Sample Image) Disc scene bookmarking 3 Press the PLAY button to start playback on the scene saved in the selected bookmark. To delete a scene bookmark, perform steps 1 and 2 above, and then press the EXIT button. Repeat playback/A-B repeat You can choose to repeat DVD playback by title or chapter.
Advanced Disc Playback Scene bookmark 129 The LED TV/DVD combination automatically starts repeat playback after finishing the current title or chapter. (Sample Image) Disc enabling repeat playback VCD: ❖ Press the PLAY MODE button repeatedly to select a repeat mode. The modes are listed by Track, All, or Off. (Sample Image) Disc enabling repeat playback NOTE If you set the repeat mode during stop mode, press the PLAY button to start Repeat playback.
Advanced Disc Playback Scene angle/Title selection/DVD menu To resume normal playback, press the REPEAT A-B button until "A-B repeat" disappears on the screen. NOTE ❖ In some cases, subtitles for the repeated scene may not display. ❖ The A-B repeat mode may not apply to some DVD scenes. ❖ The A-B repeat mode is not applicable to interactive DVDs and JPEG CDs. Scene angle/Title selection/DVD menu Changing the scene angle (DVD) 1 Press the ANGLE button during playback.
Advanced Disc Playback Sound track language/Audio channel/Subtitle 131 2 Press the ( / / / arrow) buttons to select a DVD menu item, and then press the OK or PLAY button to access it. Use the same buttons to enable an option for the selected item. Repeat this step to configure other menu options. 3 Press the DVD MENU button again to resume playback on the scene that was playing when you pressed the DVD MENU button.
Advanced Disc Playback Playback information/VCD playback control To disable subtitles: Press the SUBTITLE button until Off appears. NOTE ❖ Not all DVDs have encoded subtitles. ❖ The subtitle selection may revert to the default language when you stop playback and try to play the DVD again. ❖ In some cases, the selected subtitle may not display immediately. Playback information/VCD playback control Viewing the playback info (DVD/VCD) Press the DISPLAY button during playback.
Advanced Disc Playback MP3, WMA, JPEG, and Audio CD operation 133 (Sample Image) Enabling the PBC function When enabled, PBC allows interactive Video CD playback using the remote control. MP3, WMA, JPEG, and Audio CD operation This LED TV/DVD combination can play MP3, WMA, and JPEG files recorded on a DVD/CD-R or DVD/CD-RW disc. To create the MP3/WMA/JPEG disc, you need a Windows PC with a DVD/CD-RW drive and file encoding software. You must use a Windows® computer to create the MP3/WMA/JPEG disc.
Advanced Disc Playback MP3, WMA, JPEG, and Audio CD operation ❖ Refrain from making too many sub-folders. ❖ It may take more than one minute for this LED TV/DVD combination to read MP3, WMA, and JPEG files depending on the disc structure. ❖ Audio files recorded using the Joliet Recording Specification can be played back in this LED TV/DVD combination. The file name is displayed (up to 20 characters). Longer file names will be condensed.
Advanced Disc Playback MP3, WMA, JPEG, and Audio CD operation ❖ 135 WMA: ❖ File format: WMA version 7 or 8 ❖ Sampling frequency: 32 kHz/48 kbps, 44.1 kHz/48 to 92 kbps, 48 kHz/128 to 192 kbps A file recorded in mono (48 kHz/48 kbps) is not supported by this LED TV/DVD combination.
Advanced Disc Playback MP3, WMA, JPEG, and Audio CD operation Viewing image files in thumbnail mode: You can change the browsers view mode from list mode to thumbnail mode. This is convenient when browsing for JPEG files. 1 Press the DVD MENU button during JPEG playback. 2 Press the ( / / / 3 Press the OK button to play the image file. arrow) buttons to select an image file. To return the browser to list mode, press the STOP button.
Advanced Disc Playback MP3, WMA, JPEG, and Audio CD operation 3 137 Press the PLAY button or the OK button to start playback. To stop playback, press the STOP button. NOTE ❖ If the current directory has more than eight files, press the ( / arrow) buttons to scroll the file list. ❖ To see folder contents, select a folder and then press the OK button. ❖ To return to the root directory, press the RETURN button or select “Go Up” icon and then press the OK button.
Advanced Disc Playback MP3, WMA, JPEG, and Audio CD operation Viewing a slide show If there are multiple JPEG files in the selected directory, you can view them in a slide show. The instructions on how to enable the slide show feature and set the interval period between pictures are listed below. 1 Open the file folder containing the JPEG files you want to include in the slide show. 2 Press the ( / arrow) buttons to select the file you want to be the starting image for the slide show.
Advanced Disc Playback MP3, WMA, JPEG, and Audio CD playback modes NOTE 139 ❖ The Rotate mode is available in regular JPEG viewing and slide show modes. ❖ The A-B repeat mode is not available when viewing JPEG images. ❖ During a slide show, the interval time between images may increase if the file size is too big. ❖ When an image exceeds 5760 x 3840 pixels, the image display can appear cropped.
Advanced Disc Playback MP3, WMA, JPEG, and Audio CD playback modes Programming the playback sequence 1 In the file browser, press the MARKER button to open the file list (Sample Image) Programming the playback sequence NOTE 2 You can not select the same file twice or more. A JPEG file cannot be added to a playlist. Press the ( / arrow) buttons to select a file, and then press the OK button to add it for inclusion in the programmed playlist.
Advanced Disc Playback Customizing disc playback 3 141 Press the MARKER button, The programmed files appear in the Playlist. (Sample Image) Programming the playback sequence 4 In the programmed file list, press the ( / arrow) buttons to select a file, and then press the PLAY button to start playback. To remove a file from the programmed list: 1 In the Playlist, press the ( / arrow) buttons to select the file you wish to remove, and then press the CANCEL button.
Advanced Disc Playback Customizing disc playback 2 Press the ( / arrow) buttons to select a setup tab, and then press the ( arrow) button. The first setup option is highlight. (Sample Image) Configuring disc playback settings 3 Press the ( / arrow) buttons to select the setup option you wish to customize. 4 Press the ( arrow) or the OK button to display a list of available option settings.
Advanced Disc Playback Customizing disc playback 143 Disc playback setup Option OSD Language Audio Disc Menu Subtitle Default Downmix Parental Language Preference Password Spdif Output NOTE Description Selects the language for the setup screen display. Selects the audio language for disc playback. Selects the language for the DVD menu display. Selects the subtitle language. Resets to default. Selects the downmix to options like Stereo. Sets the restriction level for allowable disk content.
Advanced Disc Playback Customizing disc playback The selected language will be heard or seen. (Sample Image) Playback settings (Sample Image) Playback settings Parental A DVD is usually encoded with a rating level to indicate the recommended audience age. You have the option to select the content rating level allowed for playback in your LED TV/DVD combination. Press the ( / arrow) buttons to select the allowable rating level, and then press the OK button.
Advanced Disc Playback Customizing disc playback NOTE 145 ❖ The Parental rating levels correspond to the US movie ratings. Level 1 – Kids Safe Level 2 – G Level 3 – PG Level 4 – PG–13 Level 5 – PG–R Level 6 – R Level 7 – NC–17 Level 8 – Adult ❖ Some discs may not have their rating level encoded on the disc though it’s indicated on the disc jacket. Playback restriction will not apply to these discs so make sure to restrict access to it manually.
Advanced Disc Playback Customizing disc playback 3 Use the Channel Number buttons (0–9) to input the current password. If the password has not been set yet, key in “0000.” This is the factory default password. 4 Use the Channel Number buttons (0–9) to input the new password. You will be prompted to confirm the new password. 5 Use the Channel Number buttons (0–9) to input the new password again. 6 Note this new password for future reference.
Chapter 10 Troubleshooting General troubleshooting Before calling a service technician, review this chapter or visit the Toshiba technical support Web site at support.toshiba.com for possible causes/solutions for the problem you are experiencing. Before you begin to troubleshoot any problem, first unplug the TV from the AC wall outlet, wait approximately one minute, and then plug the TV back into the AC wall outlet. If the problem still exists attempt to troubleshoot the problem. Black box on-screen.
Troubleshooting Picture problems Other problems. If your TV’s problem is not addressed in this Troubleshooting chapter or the recommended solution has not worked, use the Reset Factory Defaults procedure, see “Reset Factory Defaults” on page 58. TV will not turn on. Ensure the power cord is plugged in properly, and then press the POWER button. Replace the batteries in the remote control, see “Installing batteries” on page 40. Try the control panel buttons on the TV.
Troubleshooting Sound problems 149 Video Input Selection problems. If the Input Selection window does not appear when you press INPUT on the remote control or TV, press INPUT a second time. This will cause a change to the next video input source and display the Input Selection window. Poor display color or no color. The station may be having broadcast difficulties. Try another channel. Adjust the Tint and/or Color, see.“Adjusting the picture quality” on page 77 Poor composite picture.
Troubleshooting Remote control problems If you hear no sound, try setting the MTS feature to Stereo mode, see “Using the MTS button” on page 83. If you are not receiving a second audio program from a known SAP source, make sure the MTS feature is set to SAP mode, see “Selecting stereo/SAP broadcasts” on page 82. If you hear audio that seems incorrect for the program you are watching (such as music or a foreign language), the SAP mode may be on.
Troubleshooting Closed caption problems 151 Closed caption problems If the program or video you have selected is not closed captioned, no captions appear on the screen. If text is not available, a black rectangle may appear. If this happens, turn off the closed caption feature, see “Using closed captions” on page 78.
Troubleshooting Media Player problems Legacy HDMI® sources. Some legacy HDMI® sources may not work properly with the latest HDMI® TV products, due to new standard adoption. Media Player problems Incorrect functionality may occur when using a USB HUB connection. Photo files that were processed and edited using the computer’s application software may not be viewable. The TV may select one format automatically and play it when contents that support two or more formats are played.
Troubleshooting light indicator 153 The audio sound track and/or subtitle language cannot be changed. The disc has no multi-language option encoded on it, see “Sound track language/Audio channel/Subtitle” on page 131. No subtitle. The disc has no subtitle encoded on it. Subtitles are disabled. Press the SUB TITLE button, see “Viewing subtitles (DVD)” on page 131. Scene angle cannot be changed. The disc has no multi-angle scenes, see “Sound track language/Audio channel/Subtitle” on page 131.
Appendix A Specifications NOTE ❖ These models comply with the specifications listed below. ❖ Designs and specifications are subject to change without notice. ❖ These models may not be compatible with features and/or specifications that may be added in the future.
Specifications Power source Power source 120 V AC, 60 Hz Power maximum current 24V4210U 0.65 A 24V4260U 0.65 A Power consumption 24V4210U 24V4260U 0.65 A (maximum current) 0.2W (Standby mode) 0.65 A (maximum current) 0.2W (Standby mode) Audio power 24V4210U 5W + 5W 24V4260U 5W + 5W Speaker type 24V4210U Two 3 5/8 x 1 x 7/8 inches (91 x 25 x 23mm) 24V4260U Two 3 5/8 x 1 x 7/8 inches (91 x 25 x 23mm) Video/audio terminals Video/audio input Video Audio 1 V (p-p), 75 ohm, negative sync.
Specifications Video/audio terminals ColorStream® (component video) HD input Video Audio Y: 1V(p-p), 75 ohm, negative sync. Y: 1V(p-p), 75 ohm, negative sync. PB: 0.
Specifications Dimensions HDMI® input HDMI® compliant HDCP compliant HDMI® Audio 2-channel Linear-PCM; 32/44.1/48 kHz sampling frequency; 16/ 20/24 bits per sample Digital audio output Optical type PC input 15-Pin D-sub Analog RGB DVD/CD player Signal system NTSC Supported disc size 12 cm Pickup mechanism 1-lens, 2-beams Dimensions 24V4210U 24V4260U Width Height Depth Width Height Depth 22.94” (583.1mm) 16.17” (410.9mm) 9.18” (233.2mm) 22.94” (583.1mm) 16.17” (410.9mm) 9.18” (233.
Specifications Supplied accessories Supplied accessories ❖ Remote control with two size “AAA” batteries ❖ Resource Guide ❖ Quick Start Guide ❖ Pedestal stand ❖ Warranty Acceptable signal formats for PC IN, HDMI® PC IN signal formats NOTE Depending on the connected PC, the following status may occur; incorrect display, false format detection, picture position failure, blur, or judder. But this is not a malfunction of your TV. Format Resolution V. Frequency H.
Specifications Acceptable signal formats for PC IN, HDMI® 159 Format Resolution V. Frequency H. Frequency Pixel Clock Frequency 480i 720 x 480i 59.940 Hz 15.734 kHz 27.000 MHz 480p 720 x 480p 59.940 Hz 31.469 kHz 27.000 MHz 720p 1280 x 720p 60.000 Hz 45.000 kHz 74.250 MHz 1080i 1920 x 1080i 60.000 Hz 33.750 kHz 74.250 MHz 1080p 1920 x 1080p 24.000 Hz 27.000 kHz 74.250 MHz 60.000 Hz 67.500 kHz 148.
Appendix B License Agreement License Information on the software used in the TOSHIBA Digital TV The software pre-installed in the TOSHIBA Digital Televisions consists of multiple, independent software components. Each software component is copyrighted by TOSHIBA or a third party. The TOSHIBA Digital Televisions uses software components that are distributed as freeware under a third-party end-user license agreement or copyright notice (hereinafter referred to as a "EULA").
License Agreement 161 or fitness for specific uses. All risks associated with the quality or performance of these software components are assumed by the user. TOSHIBA shall not be liable whatsoever for any cost of repair or correction or other incidental expense incurred in connection with a defect found in any of these software components.
License Agreement (3) Permission for use of this software is granted only if the user accepts full responsibility for any undesirable consequences; the authors accept NO LIABILITY for damages of any kind. These conditions apply to any software derived from or based on the IJG code, not just to the unmodified library. If you use our work, you ought to acknowledge us.
License Agreement 163 This license was inspired by the BSD, Artistic, and IJG (Independent JPEG Group) licenses, which all encourage inclusion and use of free software in commercial and freeware products alike. As a consequence, its main points are that: ❖ We don't promise that this software works. However, we will be interested in any kind of bug reports. (`as is' distribution) ❖ You can use this software for whatever you want, in parts or full form, without having to pay us.
Index A advanced picture settings CableClear® digital Noise Reduction 116 Color temperature 115 Dynamic Contrast 114 Game Mode feature 117 MPEG Noise Reduction 117 Static Gamma 115 using 114 audio adjusting quality 83 Audyssey ABX™ 84 Dolby® Digital Dynamic Range Control 85 MTS button 83 muting sound 81 optical audio output format 85 stereo/SAP broadcasts 82 Auto Aspect using 74 auto power down set 107 auto power off feature 113 Auto Start function Media Player 100 B blocking programs Canada rating 92 C
Index tuning channels 63 Channel Return switching between two channels 68 channels auto tuning 52 locking channels 94 skipping 54 specific channel 67 storing in memory 52 cinema mode selecting 75 closed captions CC selector 80 Digital CC settings 80 using 78 computer setting the audio 98 using with the TV 97 connecting a computer 37 audio system 35 cable TV 27 camcorder 28 computer to TV’s PC IN 37 DVD player with ColorStream® 29 DVI device to HDMI® input 31 HDMI® device to HDMI® input 31 HDMI®-CEC 34 sate
Index chapter or track 123 fast reverse, fast forward 122 frame by frame 123 slow motion 123 E Elements 65 F factory defaults reset 58 favorites browser 64 features 18 Freeze feature 75 M Media Player open 100 photo files 101 playing music files 103 using 99 menu layout 47 navigation 48 setup 47 N no signal power down set 108 G O GameTimer® using 95 operation MP3/WMA/JPEG/Audio CD 133 overview installation 19 setup 19 use 19 H HDMI® audio mode setting 55 HDMI®-CEC additional functions 111 usi
Index Dot by Dot 73 Full 70 Native 72 Normal 73 selecting 69 TheaterWide 1 71 TheaterWide 2 71 TheaterWide 3 71 pin code changing 87 entering PIN code 86 forgotten 87 playback modes MP3/WMA/JPEG/Audio CD 139 program ratings displaying 92 unlocking programs 93 Q quick setup ANT/CABLE IN 51 menu language 51 R rating system 91 downloading additional 89 S screen angle adjusting 22 scrolling TheaterWide® picture 73 specifications acceptable signal formats 158 audio power 155 channel coverage 154 ColorStream®
Index TV panel controls front 20 left side 20 side 20 TV remote functionality 42 install batteries 40 TV remote control using 40 TV status information show 112 V video input source selecting 59 video input sources labeling 61