TOSHIBA 27/32/37WL56 Series Owner's manual
Contents Remember… ? For television operation qu eries, please ring the helpline… SETTING UP Safety precautions – Some do’s and don’ts for you to be aware of 3 Installation and important information 4 The remote control – an at-a-glance guide 5 Connecting external equipment – a guide to connecting equipment to the back of the television 6 Connecting a computer – connecting a computer to the back of the television 7 Side connections and controls – switching on the television, standby, using the top contr
Safety Precautions This equipment has been designed and manufactured to meet international safety standards but, like any electrical equipment, care must be taken to obtain the best results and for safety to be assured. Please read the points below for your own safety. They are of a general nature, intended to help with all electronic consumer products and some points may not apply to the goods you have just purchased.
Installation and important information Where to install Locate the television away from direct sunlight and strong lights, soft, indirect lighting is recommended for comfortable viewing. Use curtains or blinds to prevent direct sunlight falling on the screen. Place on a sturdy platform, the mounting surface should be flat and steady.
The remote control UP Simple at-a-glance reference of your remote control.
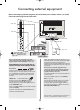
Connecting external equipment Before connecting any external equipment, turn off all main power switches. If there is no switch remove the mains plug from the wall socket. SCART 1 (EXT1) SCART 2 (EXT2) CABLE HOLDER FIXING STRAP decoder* MEDIA REC. TV HDMI™ INPUT ital ☛ a decoder could beanDig y to Air or e Fre , lite tel Sa le decoder.
Connecting a computer Before connecting any external equipment, turn off all main power switches. If there is no switch remove the mains plug from the wall socket. the back of your television Computer Audio cable for PC to television connection (not supplied) Mini D-sub 15p connector RGB PC cable (not supplied) Conversion adaptor if required (not supplied) Connect the PC cable from the computer to the PC terminal on the back of the television.
Side connections and controls A wide variety of external equipment can be connected via the sockets located on the side of the television. Whilst all the necessary adjustments and controls for the television are made using the remote control, the buttons on the top of the television may be used for some functions. Standby GREEN – On-timer set ☛ The television l screen can swive on its foot stand the 15 degrees to left and right.
Tuning the television using Quick Setup, Programme sorting Before switching on the television put your decoder and media recorder to Standby if they are connected. To set up the television use the buttons on the remote control as detailed on page 5. 1 Connect the television to the mains power. The Quick Setup screen will appear. 7 Quick Setup With the list of stations now showing use Q or P to highlight the station you want to move and press R .
Manual tune The television can be tuned-in manually using Manual tuning. For example: if the television cannot be connected to a media recorder/decoder with a SCART lead or to tune-in a station on another System (see page 9). Use S and R to move across the screen and select any of these Manual Tune options. Programme Colour system System Programme skip Channel Search Station Manual fine tuning Programme: The number to be pressed on the remote control. System: Specific to certain areas. See page 9.
Manual tune continued Programme skip 8 When your media recorder signal is found, press R to move along to Station. With P, Q, S and R put in the required characters, e.g. VCR. Programme skip To prevent certain programmes from being viewed, the programme position can be skipped. The remote control must be removed as the channels will still be available using P and Q. The television can then be watched as normal using the controls on the top, but the television will not show the skipped programme position.
Auto tune, general controls, time display, stereo/bilingual transmissions Using Auto tuning 1 Selecting programme positions To select a programme position use the numbered buttons on the remote control. To set up the television using Auto tuning, press MENU and use S or R to select the SET UP menu. For programme positions below 10 use 0 and the required number e.g. 01 for programme position 1.
Sound controls, WOW™ sound effects, dual, stable sound® WOW Sound controls Volume Press j — ( S) or j + ( R) to adjust the volume. On FOCUS Off TruBass Off MENU Sound Mute Press SRS 3D k once to turn the sound off and again to cancel. Bass Boost – to enhance the depth of sound n Press then S or R to adjust the effect. The difference will only be noticeable on sound with a strong bass. Press again to turn Bass Boost off.
Widescreen viewing Depending on the type of broadcast being transmitted, programmes can be viewed in a number of formats. button repeatedly to select between Super live, Cinema, Subtitle, 14:9, Wide and 4:3. Press the Please note: Whenever the MENU button is pressed the picture size setting will change while the menus are ON the screen. This is to ensure that the menus do not overlap the edges of the viewable area.
Picture controls Picture position PICTURE The picture position may be adjusted to suit personal preference and can be particularly useful for external inputs. 1 Picture settings OK Cinema mode Off In the SET UP menu press Q until Picture position is highlighted. MENU SET UP 2/2 Picture position OK Quick Setup OK Back EXIT Watch TV 2 In the Picture settings menu press Q to select Back light. 3 Press S or R to adjust.
Picture controls continued Black stretch Colour temperature Black Stretch increases the strength of dark areas of the picture which improves the definition. Colour Temperature increases the ‘warmth’ or ‘coolness’ of a picture by increasing the red or blue tint. 1 In the Picture settings menu press Q until Black Stretch is highlighted. 1 In the Picture settings menu press Q until Colour Temperature is highlighted.
Picture controls continued, panel lock, the timer Grey screen The Timer When Grey screen is selected the screen will turn grey and the sound will be muted when no signal is received. The television can be set to turn itself On or Off after a certain time. 1 In the FUNCTION menu press Q to highlight Grey screen. 2 Press S or R to select On or Off. 1 TIMER Side panel adjustment The Side Panel feature lightens or darkens the band each side of the screen when in 4:3 or 14:9 format.
PC settings – picture position, clock phase, sampling clock, reset Picture position Sampling clock The picture position may be adjusted to suit personal preference. Adjusting the Sampling clock alters the number of pulses per scan, this will clear vertical lines on the screen. 1 to select PC, then select PC Setting Press from the SET UP menu. B 1 In the SET UP menu press Q until PC Setting is highlighted. 2 Press OK to select, then Q to highlight Sampling clock.
Input selection and AV connections Defining the INPUT and OUTPUT sockets so that the television recognises connected equipment. See page 6 for a clear view of the back connection recommendations. Most media recorders and decoders send a signal through the SCART lead to switch the television to the correct Input socket. Alternatively press the external source selection button until the picture from connected equipment is shown.
Text services – setting up, general information, Auto and LIST modes This television has a multi-page text memory, which takes a few moments to load. It offers two Modes of viewing text – Auto will display Fastext, if available. LIST will store your four favourite pages. Selecting modes To access the sub-pages press ( ) then use P and Q to view them. A bar with numbers will appear on the side of the screen.
Text services continued – control buttons Below is a guide to the functions of the remote control text buttons. T select a page whilst viewing a 8/9 Tonormal page: To display an index/initial page: Auto. / , a normal Enter the page number then press picture will be displayed. The television will indicate when the page is present by displaying the page number at the / top of the screen. Press to view the page. 89 T Press to access index pages. The one displayed is dependant on the broadcaster.
Remember… Questions and Answers ? For television operation queries , please ring the helpline… Below are the answers to some of the most common queries. For more information go to www.toshiba.co.uk Q Q Why is there no sound or picture? A A Check the mains switch is on and check all connections. Check the television is not in standby mode.
Questions and Answers Q Q Why are there horizontal stripes and/or blurred images on the screen? A A The Clock phase may need adjustment. Select PC Setting from the SET UP menu, highlight Clock phase and adjust until the picture clears. Q Why are the colours wrong when an NTSC source is played? Connect the source via a SCART lead and play. Select Manual setting from the SET UP menu. Manual setting Why are there problems with text? Colour system: Auto.
Specifications and accessories Broadcast systems/channels PAL-I UHF UK21-UK69 PAL-B/G UHF E21-E69 VHF E2-E12, S1-S41 SECAM-L UHF F21-F69 VHF F1-F10, B-Q SECAM-D/K UHF R21-R69 VHF R1-R12 Video Input 21-pin SCART RGB, A/V EXT2 Input/Output 21-pin SCART A/V, S-video Selectable output EXT3 Input (Side) 4 pin Phono jack Phono jacks S-video (32/37WL only) Video Audio L + R Input HDMI connector Input Phono jacks Digital television and audio signal Audio L + R Input Input Mini D-sub 15-pin Anal