INTERNET FACSIMILE OPERATOR’S MANUAL
NOTICE TO USERS Please read through this manual before using the machine. After reading it, be certain to keep it so that you may refer to it whenever necessary. U. S. A. WARNING FCC Notice: Part 15 This terminal has been tested and found to comply with the limits for a Class A digital device, pursuant to Part 15 of the FCC Rules. These limits are designed to provide reasonable protection against harmful interference when the equipment is operated in a commercial environment.
NOTICE TO USERS Canada NOTICE: The Industry Canada label identifies certified equipment. This certification means that the equipment meets telecommunications network protective, operational and safety requirements as prescribed in the appropriate Terminal Equipment Technical Requirements document(s). The Department does not guarantee the equipment will operate to the user's satisfaction. AVIS: L’étiquette d’lndustrie Canada identifie le marériel homologué.
INTRODUCTION CONTENTS Rear View ............................................................................................... 9 Operation Panel...................................................................................... 9 BASIC FUNCTIONS .................................................... 10 RECEIVE E-MAIL ................................................................. 10 Automatic Receiving Mode .................................................................. 10 Manual Receiving Mode ..
LIST OF REPORTS .................................................. 95 E-MAIL NOTIFICATION REPORTS PRINT FORMAT ......... 95 DSN Report .......................................................................................... 95 MDN Report .......................................................................................... 96 Alert Report .......................................................................................... 97 LIST AND REPORT PRINT FORMAT AND PRINTING PROCEDURE ..................
INTRODUCTION - FEATURES The Internet Fax Kit enables your machine to transmit the document through the Internet or Intranet. This enables the machine to transmit the document as an E-mail between other Internet Fax machines and computers. NOTE: • The machine must be connected to the E-mail server in the local area network to use the Internet Fax functions. Ensure that your E-mail server is connected with the machine in the local area network.
Before Connecting the Machine to Internet Before connecting to the network, read this section to understand the Internet Fax functions. POP and SMTP The available functions depend on whether this machine is setup to use the POP or SMTP for retrieving E-mail from a mail server. POP (Post Office Protocol) and SMTP (Simple Mail Transfer Protocol): “SMTP” is a server protocol for sending E-mail messages between servers.
Internet Fax Transmission Overview The following is an overview of the various transmissions that can be performed using the Internet Fax function. Internet Fax to/from Client Computers The machine can send a document to client computers through the Internet or Intranet. The client computers can send the E-mail to the machine as well. Internet Fax to Internet Fax The machine can send a document to another Internet Fax machine through the Internet or Intranet.
Internet Fax Transmission Overview - continued Onramp Gateway Transmission Offramp Gateway Transmission Using the Internet Fax function, E-mail addresses can be assigned to the ITU-T Mailbox in this machine. Therefore, ITU-T F-code compliant facsimiles can send documents to the ITU-T Mailbox in this machine and this machine can forward the received document to E-mail recipients assigned to the Mailbox using the relay function.
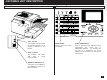
- FACSIMILE UNIT DESCRIPTION Rear View Operation Panel Green Indicator The indicator that lights while the network interface card is properly connected to the network. Amber Indicator The indicator while data communicated. that is CHECK E-MAIL Used to receive an E-mail immediately. E-MAIL ADDRESS Key Used to program E-mail addresses when programming One Touch Key or Abbreviated Numbers. By pressing this key prior to a transmission, an E-mail address can be entered for an Internet Fax transmission.
BASIC FUNCTIONS - RECEIVE E-MAIL The methods to receive an E-mail vary according to the type of protocols used for receiving an E-mail. When “POP” is selected for the Receive Mode, the following receiving methods are available: • • Auto Receive The machine accesses the E-mail server at specified intervals to check whether any E-mail has been delivered. If an E-mail has been delivered, the machine will automatically retrieve and print out the E-mail.
Output Print Format for Receiving E-mail When an Internet Fax message (or E-mail message) is received, the following output may be printed in addition to the originals (scanned data). • Text Body • Header The Text Body and the Header of the received message is printed according to the settings of the E-mail properties on your machine. Text Body Output This output is printed when the Print Text Body is set to ON or the E-mail has only the text body section and no attached image files.
Output Print Format for Receiving E-mail - continued Header Output This output is printed when the Print Header is set to ON.
- SEND E-MAIL The machine can send an E-mail using the following methods. • Direct Input Input the E-mail address directly to send a document. • Search E-mail Address Search an E-mail address from the local phonebook and histories to send a document. • One Touch Dialing Send a document to the E-mail address that is assigned to a One Touch key. • Abbreviated Dialing Send a document to the E-mail address that is assigned to an Abbreviated Dial Number.
Sending E-mail by Direct Input - continued 3 Select the Resolution This setting will allow you to specify the resolution for the documents you are sending, if you know the resolution capability of the recipient machine. 3a Resolution Setting Press If you know the resolution capability of the recipient machine, press: until the required resolution mode is indicated by the appropriate LED.
Sending E-mail by Direct Input - continued 4 Select the Compression This setting will allow you to specify the compression for the documents you are sending, if you know the compression capability of the recipient machine. If you know the compression capability of the recipient machine, press: If you do not know the compression capability of the recipient machine, press: 5 Scan the document 4a Compression Setting Select the desired Compression.
Sending E-mail by Searching E-mail Addresses 1 Display the SPEED DIAL Menu Press: PRESS SPEED DIAL, ONE TOUCH KEY OR ENTER TO ENTER E-MAIL ADDRESS Then press: SPEED DIAL 1.ABB. NUMBERS 2.SPEED DIAL 2 Select SPEED DIAL Press: 1.LOCAL ADDRESS 2.RECEPTION HISTORY 3.SENT HISTORY 3 Searching for an E-mail address This operation searches for an E-mail address and sends the documents to the E-mail address. You can search for an E-mail address in the following categories.
Sending E-mail by Searching E-mail Addresses - continued 3 Searching for an E-mail address - continued 3a Select the search 3b Search from Local Adressess category - continued When “3.SENT HISTORY” is selected, the following screen appears. Skip to Step 3d. SENT HISTORY NOW SEARCHING After 2 seconds: SENT HISTORY [STOP]:TO PREVIOUS 001@toshiba.com [ ] 00001/00050 When “3.
Sending E-mail by Searching E-mail Addresses - continued 3 Searching for an E-mail address - continued 3d Search from Local Adressess - continued 3b-2 Enter the Search Name Enter the character(s) associated with the ID name of Abbreviated Dial Numbers or One Touch Dial Keys using the Keyboard and the Dial Keypad. SEARCH NAME NAME (20 MAX): Toshiba 3b-3 Select the ID Name NOTE: The machine searches all ID names that include the search name entered and applicable to the case.
Sending E-mail by Searching E-mail Addresses - continued 3 Searching for an E-mail address - continued 3b Search from Local Adressess - continued 4 Scan the document 3c Select from Reception History 3b-5 Select the E-mail address Locate the screen of the desired E-mail address using the following scroll keys. (for the previous screen) 3b-6 Select the E-mail address Locate the screen of the desired E-mail address using the following scroll keys.
Sending E-mail by One Touch Dialing If you have assigned an E-mail address to a One Touch key, you can send a document to the E-mail address by pressing the corresponding One Touch key. 1 One Touch Dialing for E-mail Press: Your machine will automatically start scanning the document into memory (if enabled). SCANNING INTO MEMORY FILE NUMBER= 007 RESIDUAL MEMORY 98% SCANNING PAGE : 003 PRESS SPEED DIAL, ONE TOUCH KEY OR ENTER TO ENTER E-MAIL ADDRESS Then select the desired One Touch key from 01 to 73.
Sending E-mail by Abbreviated Dialing If you have assigned an E-mail address to an Abbreviated Dial Number, you can send a document to the E-mail address by entering the corresponding Abbreviated Dial Number. 1 Display the SPEED DIAL Menu Press: PRESS SPEED DIAL, ONE TOUCH KEY OR ENTER TO ENTER E-MAIL ADDRESS 2 Select ABB. NUMBERS Press: 3 Enter the ABB. 4 Press the START Number Key Tray Enter the Abbreviated Dial Number (1 to 999) assigned to the desired destination. ABB.
Sending E-mail by Abbreviated Dialing - continued 5 Scan the document Your machine will automatically start scanning the document into memory (if enabled). SCANNING INTO MEMORY FILE NUMBER= 007 RESIDUAL MEMORY 98% SCANNING PAGE : 003 After scanning, the machine starts transmission. If the document is not loaded in the Document Tray, the following screen is displayed. LOAD DOCUMENT Load the document in the Document Tray. Then your machine will automatically starts scanning the document.
Multi-Key Quick Broadcast Transmission This Multi-key Quick Broadcast Transmission allows you to send a document to a combination of the following numbers without pre-programming a group. • • • • Abbreviated Dial Numbers One Touch Dial Keys Search E-mail Address Direct Input NOTE: By using this method, you can send a document to both E-mail addresses and fax numbers in a single operation. To send a document to fax number using this feature, refer to the DP120F/DP125F Operator’s Manual.
Multi-Key Quick Broadcast Transmission - continued 5 Press the START 4 Select the CANCEL or MODIFY Facsimile Number You can cancel or modify the Manual Group Dial Number registered in this facsimile.
- AUTOMATIC TELEPHONE DIALING REGISTRATION E-mail addresses can be assigned to Abbreviated Dial Numbers and One Touch Keys. The numbers are used for Abbreviated Dial E-mail transmission, One Touch E-mail transmission, and Group E-mail transmission. Once the addresses are assigned, the following features allow you to send documents to frequently sent addresses by pressing a few keys.
Abbreviated Dialer Registration - continued 3 Enter an ABB. Dial Number Enter an Abbreviated Dial Number from 1 to 999. 4 When a Preset ABB. Dial Number is Active If the ABB. Dial Number you entered has not been previously registered, the following screen will be displayed. Skip to Step 5. ABB. NBR= 001 ID NAME =(MAX20) After 2 seconds: Make sure that the 3-digit number (001 to 999) appears correctly, then press: ABB. NUMBER ENTRY ALREADY ASSIGNED ABB.
Abbreviated Dialer Registration - continued 7 Select the input E-mail address method To input an E-mail address directly, press: To input an E-mail address by modifying the searched E-mail address, press: When is pressed, the ENTER E-MAIL ADDRESS screen appears. Skip to Step 10. ENTER E-MAIL ADDRESS 8 Searching for an E-mail address This operation is to search an E-mail address and modify it to a new E-mail address. You can search an E-mail address in the following categories.
Abbreviated Dialer Registration - continued 8 Searching for an E-mail address - continued 8b Search from Local Adresses You can search an E-mail address from the Local Addresses using the following method. 8b-1 Select the search method Search Name: You can search an E-mail address by the ID name. To select Search Name, press: Search E-mail Addr: You can search an E-mail address by the specific address.
Abbreviated Dialer Registration - continued 8 Searching for an E-mail address - continued 8d Search from Local Addresses - continued 8b-2 Enter the Search Name 8b-3 Select the Search 8b-4 Enter the Search E-mail Address Name Enter the character(s) associated with the ID name of Abbreviated Dial Numbers or One Touch Dial Keys using the Keyboard and the Dial Keypad. SEARCH NAME NAME (20 MAX): 00 NOTE: The machine searches all ID names that include the search name entered and applicable to the case.
Abbreviated Dialer Registration - continued 8 Searching for an E-mail address - continued 8b Search from Local Addresses - continued 9 Enter the E-mail address 8c Select from Reception History 8b-5 Select the E-mail address Locate the screen of the desired E-mail address using the following scroll keys. (for the previous screen) 8b-6 Select the E-mail address Locate the screen of the desired E-mail address using the following scroll keys.
Abbreviated Dialer Registration - continued 10 Select Receiver Capability This setting will allow you to specify one or more following Receiver Capabilities for the Abbreviated Dial Number you are registering, if you know the capabilities of the recipient machine. Resolution: Selected to specify the resolution of images to be sent. This resolution is set to “200x200” as a default setting.
Abbreviated Dialer Registration - continued 10 11 Select Receiver Capability - continued 10c Compression Setting 10d Complete the Receiver Capability Setup To designate a specific compression of the documents sent to this E-mail address, select COMPRESSION by pressing: Select the desired Compression. Press: If you have completed the desired Receiver Capability setting for this Abbreviated Dial Number, select DONE by pressing: (for MH) COMPRESSION 1.MH 2.MR 3.MMR (for MR) ↓ 4.
Abbreviated Dialer Registration - continued 11 Select E-mail Options - continued 11b Delayed Communication Setting 11c Confirmation Report Setting To designate a specific time to start the transmission of the job using this Abbreviated Dial Number, press: DELAYED COMM.
Abbreviated Dialer Registration - continued 12 13 Complete the ABB. registration If you have completed the registration for this Abbreviated Dial Number, select COMPLETE by pressing: NOTE: If you want to edit or cancel the registration of this Abbreviated Dial Number, press . E-MAIL ADDRESS ALREADY ASSIGNED ABB.
Modify/Delete the Abbreviated Dial Number 1 Display the TEL LIST ENTRY Menu View the “50-73” Flip Panel to select the desired Function Key. 2 Display the ABB. NUMBERS Menu To select “ABB. NUMBERS”, press: 3 Enter the ABB. Dial Number Enter the Abbreviated Dial Number that you want to modify or delete from 1 to 999. Press: TEL LIST ENTRY 1.ABB. NUMBERS 2.GROUP NUMBERS 3.ONE TOUCH KEYS ENTER ABB. NUMBER OR PRESS [BACK]:TO PREVIOUS [STOP]:TO COMPLETE Upon entering the first number: ABB.
Modify/Delete the Abbreviated Dial Number - continued 4 Change the ABB. Information - continued 4b Modify the ABB. Dial Information 4c Retain the Current ABB. Dial Information To change the E-mail address or the ID Name currently assigned to this Abbreviated Dial Number, press: Rename the Location ID name of the remote party to be assigned to the current Abbreviated Dial Number. When the name is displayed correctly on the LCD display, press: (to MODIFY) E-MAIL ADDRESS ALREADY ASSIGNED 001@toshiba.
One Touch Dialer Registration This machine provides up to 73 One Touch Dial keys. Keys 1 to 49 are accessible with the Flip Panel in the “01-49” view. Keys 50 to 73 are accessible with the Flip Panel in the “5073” view. 1 Display the TEL LIST ENTRY Menu View the “50-73” Flip Panel to select the desired Function Key. 2 Display the ONE TOUCH KEYS Menu To select “ONE KEYS”, press: TOUCH 3 Select a One Touch Location Press the desired One Touch key. Example: One Touch key 03 Press: TEL LIST ENTRY 1.
One Touch Dialer Registration - continued 5 Enter the Location ID Name Enter the Location ID name of the remote party to be assigned to the current One Touch key. 6 Select the type To select to register an E-mail address for the One Touch key, Press: When the name is displayed correctly on the LCD display, press: ONE TOUCH = 1.TEL NUMBER 2.
One Touch Dialer Registration - continued 8 Searching for an E-mail address This operation is to search for an E-mail address and modify it to a new E-mail address. You can search for an E-mail address in the following categories. Local Addresses: You can search for an E-mail address that is assigned to Abbreviated Dial Numbers or One Touch Dial Keys. Reception History: You can search for an E-mail address which the machine has received the E-mails from.
One Touch Dialer Registration - continued 8 Searching for an E-mail address - continued 8b Search from Local Adressess You can search for an E-mail address from the Local Addresses using the following method. 8b-1 Select the search method Search Name: You can search for an E-mail address by the ID name. To select Search Name, press: Search E-mail Addr: You can search for an E-mail address by the E-mail address.
One Touch Dialer Registration - continued 8 Searching for an E-mail address - continued 8d Search from Local Adressess - continued 8b-2 Enter the Search Name 8b-3 Select the Search 8b-4 Enter the Search E-mail Address Name Enter the character(s) associated with the ID name of Abbreviated Dial Numbers or One Touch Dial Keys using the Keyboard and the Dial Keypad. SEARCH NAME NAME (20 MAX): 00 NOTE: The machine searches all ID names that include the search name entered and applicable to the case.
One Touch Dialer Registration - continued 8 Searching for an E-mail address - continued 8b Search from Local Adressess - continued 9 Enter the E-mail address 8c Select from Reception History 8b-5 Select the E-mail address Locate the screen of the desired E-mail address using the following scroll keys. (for the previous screen) 8b-6 Select the E-mail address Locate the screen of the desired E-mail address using the following scroll keys.
One Touch Dialer Registration - continued 10 Select Receiver Capability This setting will allow you to specify one or more following Receiver Capabilities for the One Touch key you are registering, if you know the capabilities of the recipient machine. Resolution: Selected to specify the resolution of images to be sent. This resolution is set to “200x200” as a default setting.
One Touch Dialer Registration - continued 10 11 Select Receiver Capability - continued 10c Compression Setting 10d Complete the Receiver Capability Setup To designate a specific compression of the documents sent to this E-mail address, select COMPRESSION by pressing: Select the desired Compression. Press: If you have completed the desired Receiver Capability setting for this One Touch key, select DONE by pressing: (for MR) ↓ 4.JBIG These items are outside the LCD frame.
One Touch Dialer Registration - continued 11 Select E-mail Options - continued 11b Delayed Communication Setting 11c Confirmation Report Setting To designate a specific time to start the transmission of the job using this One Touch key, press: DELAYED COMM.
One Touch Dialer Registration - continued 12 Complete the One Touch Key registration If you have completed the registration for this One Touch key, select COMPLETE by pressing: NOTE: If you want to edit or cancel the registration of this One Touch key, press . E-MAIL ADDRESS ALREADY ASSIGNED ONE TOUCH = L.A. OFFICE 03 001@toshiba.com After 2 seconds: REGISTERED After 2 seconds: PRESS ONE TOUCH KEY OR PRESS [BACK]:TO PREVIOUS [STOP]:TO COMPLETE Returns to Step 2.
Modify/Delete the One Touch Key 1 Display the TEL LIST ENTRY Menu View the “50-73” Flip Panel to select the desired Function Key. 2 Display the ONE TOUCH KEY Menu To select “ONE KEYS”, press: TOUCH Press: 3 Select a One Touch 4 Change the One Touch Key Information Location Press the One Touch key that you want to modify or delete. Example: One Touch key 03 You can cancel or retain the One Touch key once registered in the facsimile. • TEL LIST ENTRY 1.ABB. NUMBERS 2.GROUP NUMBERS 3.
Modify/Delete the One Touch Key - continued 4 Change the One Touch Key Information - continued 4b Modify the One Touch Key Information 4c Retain the Current ABB. Dial Information To change the E-mail address or ID Name currently assigned to this One Touch key, press: Rename the Location ID name of the remote party to be assigned to the current One Touch key.
Group Number Registration E-mail addresses can be assigned to the Group Numbers. You can send a document to multiple remote stations in a single operation. This is referred to as Group Dialing or Multi-address Transmission. It is useful to preset addresses, to which Multi-address Transmissions are often performed, in a group. To make a Multi-address Transmission easier, you can assign such a group to a One Touch key. The preset groups can also be used as groups for Multi-polling Receptions.
Group Number Registration - continued the Existing 4a Cancel Group the Existing 4b Modify Group the Existing 4c Retain Group To cancel the existing Group, press: To change the existing Group, press: To retain the existing Group, press: Enter the Group Name (comprised of up to 20 characters) associated with the Group Number using the Keyboard and the Keypad. (to CANCEL) (to MODIFY) (to RETAIN) (When no name is entered in this step, no name will be given to the Group Number.
Group Number Registration - continued 6 Enter a Remote Station - continued Enter the E-mail addresses of the remote stations to be preset in the group. If a remote station is assigned to a One Touch key, press the One Touch key. If a remote station is assigned to an Abbreviated Dial Number, enter the number then press .
Group Number Registration - continued 9 Assign a One Touch Key To assign this group to a One Touch key, press the desired One Touch key. To skip assigning this group to a One Touch key, press: Example: One Touch key 35. GROUP NUMBER= 0001 ONE TOUCH KEY= 35 COLORADO GRP REGISTERED ENTER GROUP NUMBER OR PRESS [BACK]:TO PREVIOUS [STOP]:TO COMPLETE After 2 seconds: Press to display the previ- ous screen in Menu Screen mode. to display the pre- vious screen in Menu Screen mode.
SETUP - SETUP FLOW The following table describes the Initial Setup Flow according to your conditions or needs. To use the functions, the network configuration for this machine must be set up correctly. For the values of the network configuration, contact to your network administrator. TCP/IP Configuration Setup The items and the parameter values for the TCP/IP Configuration Setup differs whether the IP address of this machine is obtained from a DHCP server or assigned manually.
- TCP/IP CONFIGURATION This section describes the procedures to configure the TCP/ IP for the Network Interface Card to connect to the Internet. BootP/DHCP Setting 1 Display the TCP/IP Menu Press: 2 Display the BOOTP/DHCP Menu 3 Select the BootP/ DHCP Mode Enable or Disable the BootP/ DHCP function. Press: + + (for ON-Enable) + BOOTP/DHCP 1.ON 2.OFF + (for OFF-Disable) OPERATION COMPLETED + Displayed for 2 seconds 01.DONE 02.BOOTP/DHCP 03.IP ADDRESS 04.SUBNET MASK 05.DEFAULT GATEWAY 06.
IP Address Setting 1 Display the TCP/IP Menu Press: 2 Display the IP ADDRESS Menu 3 Enter the IP address Enter the IP address. Press: OPERATION COMPLETED + + Displayed for 2 seconds + The display returns to Step 1. + Continue to set another item, or IP ADDRESS IP ADDRESS 000.000.000.000 + 01.DONE 02.BOOTP/DHCP 03.IP ADDRESS 04.SUBNET MASK 05.DEFAULT GATEWAY 06.HOST NAME 172.016.110.110 NOTE: • “000.000.000.000” cannot be assigned for the IP address.
Subnetmask Setting 1 Display the TCP/IP Menu Press: 2 Display the SUBNET MASK Menu Press: 3 Enter the Subnetmask Enter the Subnetmask. OPERATION COMPLETED + + Displayed for 2 seconds + + The display returns to Step 1. Continue to set another item, or SUBNET MASK SUBNET MASK 000.000.000.000 + 01.DONE 02.BOOTP/DHCP 03.IP ADDRESS 04.SUBNET MASK 05.DEFAULT GATEWAY 06.HOST NAME 56 255.255.000.000 NOTE: “000.000.000.000” and “255.255.255.255” cannot be assigned for the Subnetmask.
Default Gateway Setting 1 Display the TCP/IP Menu Press: 2 Display the DEFAULT GATEWAY Menu Press: 3 Enter the Default Gateway address Enter the Default Gateway address. OPERATION COMPLETED + + Displayed for 2 seconds + + The display returns to Step 1. Continue to set another item, or DEFAULT GATEWAY press DEFAULT GATEWAY 000.000.000.000 + 255.000.000.000 When the correct Default Gateway address is displayed, press: 01.BOOTP/DHCP 02.IP ADDRESS 03.SUBNET MASK 04.
Host Name Setting 1 Display the TCP/IP Menu Press: 2 Display the HOST NAME Menu Press: 3 Enter the Host Name Enter the Host Name using the Keyboard and Numeric Keypad. + + (MAX 254:) XXXXXX + + HOST NAME HOST NAME When the correct Subnetmask is displayed, press: (MAX 254:) + OPERATION COMPLETED 01.BOOTP/DHCP 02.IP ADDRESS 03.SUBNET MASK 04.DEFAULT GATEWAY ↓ 05.HOST NAME This item is outside the LCD frame. To view them, use the [ ] scroll key.
- E-MAIL ACCOUNT SETUP This section describes the procedures to set E-mail account information on the machine so that you can send and receive E-mails with this machine. NOTE: Before you set up the E-mail account information, your E-mail account must be created on the E-mail server. Please confirm the following information before configuring the E-mail settings in your machine. • • Ask your administrator for your E-mail account information.
E-mail Address Setting This sets the E-mail address of the machine. 1 Display the E-MAIL Menu 2 Display the E-MAIL ADDRESS Menu Press: Press: 3 Enter the E-mail address 3a When the Receive Mode is set to POP 3b When the Receive Mode is set to SMTP + + Enter the E-mail address using the Keyboard and Numeric Keypad. + E-MAIL ADDRESS + E-MAIL ADDRESS (MAX 256:) + When the Receive Mode is set to POP, go to Step 3a. 01.E-MAIL ADDRESS 02.ERR EMAIL FW ADDR 03.RECEIVE MODE 04.POP SERVER ADDR ↓ 05.
Error E-mail Forward Address Setting This sets the E-mail address to forward the received E-mail when an error occurs and the machine cannot print the Email. NOTE: The machine recognizes an error if the E-mail contains files of other than text format or TIFF-FX format. The machine can forward this E-mail to another E-mail address when this happens. It is recommended to set the address to forward the E-mail to a personal computer because personal computers are normally be able to view the files.
Receive Mode Setting This sets the type of protocols used for receiving E-mail. 1 Display the E-MAIL Menu NOTE: To perform the Offramp Gateway transmission, the Receive Mode must set to “SMTP”. See “OFFRAMP GATEWAY SETUP” on page 85 for further details. 2 Display the RE- CEIVE MODE Menu Press: Press: 3 Select the Receive Mode Select the Receive Mode. To select press: + the POP server, + + + To select the SMTP server, press: RECEIVE MODE 1.POP 2.
POP Server Address Setting This sets the IP address of the POP server. This must be set when “POP” is selected in “Receive Mode.” 1 Display the E-MAIL Menu Press: 2 Display the POP SERVER ADDR Menu Press: 3 Enter the POP server address Enter the POP server address. + + + + POP SERVER ADDRESS POP SERVER ADDRESS 000.000.000.000 + 172.016.110.120 When the correct POP server address is displayed, press: 01.E-MAIL ADDRESS 02.ERR EMAIL FW ADDR 03.RECEIVE MODE 04.POP SERVER ADDR ↓ 05.POP TIME 06.
POP Time Setting This sets the time interval to check whether or not new Email has been received at the POP server. This setting is valid when “POP” is selected in “Receive Mode.” “10MINS” is selected as the default setting. 1 Display the E-MAIL Menu Press: 2 Display the POP 3 Select the POP Time TIME Menu Press: Select the desired POP Time. Press: + + + + (for 6HRS) (for 1MIN) + + + (for 12HRS) (for 2MINS) + + 01.E-MAIL ADDRESS 02.ERR EMAIL FW ADDR 03.RECEIVE MODE 04.POP SERVER ADDR ↓ 05.
POP Login Name Setting This sets the user name to log in the POP server. This must be set when “POP” is selected in “Receive Mode.” NOTE: The user name to log in the POP server is provided by the administrator of the Email server. Ask your administrator for the user name if you do not know it. 1 Display the E-MAIL Menu 2 Display the POP LOGIN NAME Menu Press: Press: 3 Enter the POP Login Name Enter the POP Login Name using the Keyboard and Numeric Keypad.
POP Password Setting This sets the password to log in the POP server. This must be set when “POP” is selected in “Receive Mode.” NOTE: The password to log in the POP server is provided by the administrator of the Email server. Ask your administrator for the password if you do not know it. 1 Display the E-MAIL Menu 2 Display the POP PASSWORD Menu Press: Press: 3 Enter the POP Password Enter the POP Password using the Keyboard and Numeric Keypad.
SMTP Server Address Setting This sets the IP address of the SMTP server which is used for an Outgoing E-mail server. NOTE: When “SMTP” is selected in “Receive Mode”, the machine also retrieves E-mails from the SMTP server assigned here using SMTP transmission. In this case, this machine works as one of the mail servers. 1 Display the E-MAIL Menu Press: 2 Display the SMTP SERVER ADDR Menu Press: 3 Enter the POP server address Enter the SMTP server address.
- E-MAIL PROPERTIES SETUP This section describes the procedures to set the E-mail properties on how the machine activates the Internet Fax function. properties that can be set up. See the following sections for more information about each item. Properties Name Print Text Body Body Page Limit Send Disposition Print Header Print E-mail Error Print DSN Print Disposition Request DSN Confirm. Timer Set Confirm.
Print Text Body Setting This sets whether or not the body section of the received Email is printed NOTE: When the Internet Fax function is used only between other DP120F/DP125Fs, it is recommended to select OFF. 1 Display the E-MAIL Menu 2 Display the PRINT TEXT BODY Menu Press: Press: 3 Enable/Disable the Print Text Body Enable or Disable the Print Text Body function. + + (for ON-Enable) + 01.PRINT TEXT BODY 02.BODY PAGE LIMIT 03.SEND DISPOSITION 04.PRINT HEADER ↓ 05.PRINT E-MAIL ERR 06.
Body Page Limit Setting This sets the maximum number of the pages to be printed in the range from 1 to 99 when receiving an E-mail. If the number of the pages to be printed exceeds the limit, the machine interrupts the printing. NOTE: The received body text data may be garbled during transferred through the Internet. This is a known problem with E-mail transmissions over the Internet. It is recommended to select ON to avoid printing of a large amount of the garbled data.
Send Disposition Setting This sets the reply to the MDN request when receiving the documents from other DP120F/ DP125F using the Internet Fax function. MDN, Message Disposition Notification, is used to notify the sender of the disposition of a message after it has been successfully delivered to a recipient. NOTE: This function is only available when the remote unit and the your Incoming Email server support the MDN.
Print Header Setting This sets whether or not the header section of the received E-mail is printed. 1 Display the E-MAIL Menu 2 Display the PRINT HEADER Menu Press: Press: 3 Enable/Disable the Print Header Enable or Disable the Print Header function. + + (for ON-Enable) + 01.PRINT TEXT BODY 02.BODY PAGE LIMIT 03.SEND DISPOSITION 04.PRINT HEADER ↓ 05.PRINT E-MAIL ERR 06.PRINT DSN 07.PRINT DISPOSITION 08.REQUEST DSN 09.EMAIL TO FAX GTWY 10.GATEWAY PRINT 11.GATEWAY SECURITY 12.CONFIRM. TIMER 13.
Print E-mail Error Setting This sets you would like to print only the items that can be printed normally when an error occurs. The items that the machine recognize to be erroneous are not printed. NOTE: • When this is set to ON, the range of the printed section varies according to the settings of Print Text Body and Print Header. • When this is set to OFF, the machine interrupts printing if any error is found.
Print DSN Setting This sets whether or not the DSN is printed when it is announced from the E-mail server or the recipient. DSN, Delivery Status Notification, is used to notify the sender of the status of the message that has been sent. The status, such as failed delivery, delayed delivery, successful delivery, or the gatewaying of a message into an environment that may not support DSNs, is notified when an E-mail with the DSN request is sent.
Print Disposition Setting This sets whether or not the MDN is printed when it is announced from the recipient. The machine sends the MDN request to the recipient in every transmission, so that the machine receives the MDN when the recipient supports the MDN request. 1 Display the E-MAIL Menu 2 Display the PRINT DISPOSITION Menu Press: Press: 3 Enable/Disable the Print Disposition Enable or Disable the Print Disposition function.
Request DSN Setting This sets whether or not the DSN is requested when sending a document from the machine using the Internet FAX function. DSN, Delivery Status Notification, is used to notify the sender of the status of the message that has been sent. The status, such as failed delivery, delayed delivery, successful delivery, or the gatewaying of a message into an environment that may not support DSNs, is notified when an E-mail with the DSN request is sent.
Confirmation Timer Setting This sets whether or not the alert report is printed when the machine does not receive a MDN reply from recepients, in the time interval set in “Set Confirm. Time.” When the I-Fax message that you sent from the machine is not received successfully by recepients, you cannot get any response for the MDN. In this case, you can print the alert report tells you the machine does not receive the MDN from the recepients by setting this item ON.
Set Confirmation Time Setting This sets the time interval to wait for the MDN reply before printing the alert report. This setting is available when “Confirm. Timer” is set to ON. 1 Display the E-MAIL Menu Press: 2 Display the Set Confirm. Time Menu Press: 3 Select the Confirmation Time Select the desired Confirmation Time. Press: + + (for 15MINS) + 01.PRINT TEXT BODY 02.BODY PAGE LIMIT 03.SEND DISPOSITION 04.PRINT HEADER ↓ 05.PRINT E-MAIL ERR 06.PRINT DSN 07.PRINT DISPOSITION 08.REQUEST DSN 09.
MSG Size Limit Setting This sets the maximum size for sending documents using the Internet FAX function. If the size of documents exceeds the maximum size, the machine sends the documents separately. NOTE: The document that contains only one page of an image cannot be separated even if the document size exceeds the limit. In this case, the machine interrupts the job.
- ONRAMP GATEWAY SETUP Onramp Gateway uses the relay function which is one of the ITU-T Mailbox features. The ITU-T Fcode compliant facsimiles can send the document to the Relay Mailbox in the machine and then the DP120F/DP125F transfers the document to the E-mail addresses of other Internet Fax machines and client computers programmed in the Relay Box. ITU-T compatible G3 FAX 3. The facsimile is converted to an E-mail and forwarded to a mail server through the LAN.
Setting Up a Relay Box with E-mail Address - continued 3 Select MAILBOX SETUP Select “2.MAILBOX SETUP” by pressing: 4 Select the RELAY 5 Enter the Box Number Select “3.RELAY” by pressing: 6 Select the Password Option Select whether or not to use the password option for this relay box. 7 Enter the Password Enter the password (max. 20 digits). To set the password option for this relay box, press: MAILBOX TYPE 1.CONFIDENTIAL 2.BULLETIN BOARD 3.
Setting Up a Relay Box with E-mail Address - continued 8 Enter the End Station Repeat this step until all of the required end stations are entered. Then go to Step 9. NOTE: Also the facsimile numbers can be assigned to a Relay Box where E-mail addresses have been assigned. To assign the facsimile numbers to a Relay Box, see the section about “RELAY TRANSMISSION” in the DP120F/125F OPERATOR’S MANUAL.
Setting Up a Relay Box with E-mail Address - continued 8 Enter the End Station - continued 9 Complete the End Station Entry When all the desired End Station Entries (One Touch Keys or Abbreviated Dial Numbers) are completed under the same Relay Box, press: 8b Enter the Abbreviated Dial Number of End Station If an Abbreviated Dial Number is assigned to the end station, press: 10 Enter the Number to send the Transmission Result Enter the facsimile number you want to send the relay transmission report (
Setting Up a Relay Box with E-mail Address- continued 10 Enter the Number to send the Transmission Result - continued 10 Complete the Relay 10b Enter the Number using If you complete the Relay Box Setup, press: Box Setup 10b Enter the Number using the Abbreviated Dial Number the One Touch Key Press the desired One Touch Key. Press the desired Abbreviated Dial Number. Then press: The display returns Standby Mode. Example: One Touch Key 01.
- OFFRAMP GATEWAY SETUP Offramp Gateway, Offramp Gateway Overview What is a “Offramp Gateway”? This machine can be used as a Hub Station to forward E-mails from your client computer or Internet Fax machine to the any facsimile through the public switched telephone network. 2. The mail server (toshiba.com) retrieves the E-mail. NOTE: The mail server is configured to retrieve the E-mail whose forwarding address contains “host1.toshiba.com”. 1. The E-mail is sent to “xxxx@host1.toshiba.
How to send a document using Offramp Gateway Using the Offramp Gateway transmission, you can send E-mail documents to a facsimile connected in the public switched telephone network. Also, this machine supports addressing the ITU-T Mailbox in the remote facsimile.
E-mail to FAX Gateway Setting This sets the machine to allow forwarding the document that is received by the Offramp Gateway transmission. If this is set to ON, it is recommended to set up “Gateway Print” and “Gateway Security”. 1 Display the E-mail Menu Press: 2 Display the EMAIL TO FAX GTWY Menu Press: 3 Enable/Disable the EMAIL TO FAX GTWY Enable or Disable the E-mail to FAX Gateway function. + + (for ON-Enable) + 01.PRINT TEXT BODY 02.BODY PAGE LIMIT 03.SEND DISPOSITION 04.PRINT HEADER ↓ 05.
Gateway Print Setting This sets whether to print the E-mail that is sent to the Offramp Gateway transmission. The machine prints the document before forwarding it to the facsimile, so that you can confirm what is being sent using the Offramp Gateway. This setting is available when the “E-mail to FAX GTWY” is set to ON. 1 Display the E-mail Menu Press: WAY PRINT Menu Press: 3 Enable/Disable the Gateway Print Enable or Disable the Gateway Print function. + + (for ON-Enable) + 01.PRINT TEXT BODY 02.
Gateway Security Setting This sets whether to check the fax number where the document is sent before allowing the Offramp Gateway. If the fax number of the facsimile is not registered as One Touch dials or Abbreviated dials, the machine does not allow the Offramp Gateway for this document. This setting is available when the “E-mail to FAX GTWY” is set to ON.
- ADDITIONAL FUNCTIONS SETUP The following additional functions are available when the Internet Fax kit is installed to the machine. • FTP Server Login Name • FTP Server Login Password • LAN FAX • IPX/SPX Protocol • Frame Type FTP Server Login Name Setting This allows you to set the user name to log into the FTP server on the machine. The user name is required to transmit data between a personal computer and the machine using the TOSHIBA Viewer.
FTP Server Login Password Setting This allows you to set the password to log into the FTP server on the machine. This password is required to transmit data between a personal computer and the machine using the TOSHIBA Viewer. NOTE: The “pass” is assigned as the default login password. 1 Display the FTP Menu Press: 2 Display the FTP SRV LOGIN PWD Menu Press: 3 Enter the Login Password Enter the Login Password using the Keyboard and Numeric Keypad.
LAN FAX Setting This allows you to set the IP address of the ImageVision2000 or SmartLink server. Only the server assigned here can access this machine. 1 Display the LAN FAX Menu Press: 2 Display the LAN FAX SERVER ADDR Menu 3 Enter the LAN FAX server address Enter the server address of the ImageVision2000 or SmartLink2000. Press: + + + + LAN FAX SERVER ADDR 000.000.000.000 LAN FAX + 172.016.110.124 01.
IPX/SPX Protocol Setting This allows you to enable or disable the Network Interface Card to connect using the IPX/ SPX protocol. When the machine connects to the NetWare server, the IPX/ SPX protocol must be set to ON. 1 Display the NETWORK (NOVELL) Menu Press: 2 Display the FRAME TYPE Menu 3 Select the IPX/SPX Protocol Mode Enable or Disable to use the IPX/SPX Protocol. Press: + + NOTE: This is set to ON as a factory default. (for ON-Enable) + + IPX/SPX PROTOCOL 01.ON 02.
Frame Type Setting This allows you to change the frame type of the Network Interface Card. When the machine connects to the NetWare server, the machine uses this frame type. NOTE: The “AUTO” is set as the default frame type. 1 Display the NETWORK (NOVELL) Menu Press: 2 Display the FRAME TYPE Menu 3 Select the frame type Select the desired frame type. Press: Press: + + + + + + ↓ 01.DONE 02.IPX/SPX PROTOCOL 03.FRAME TYPE + to select + When “1.
LISTS AND REPORTS - E-MAIL NOTIFICATION REPORTS PRINT FORMAT DSN Report Successful Report of DSN From To Cc Date Subject : System Administrator : ifax : : Fri, 2 Mar 2001 11:53:43 +0900 : Delivered: Internet Fax MAIL Your message This message indicates that the E-mail was successfully sent to the recipients.
MDN Report This is a notification message that the recipient has successfully received the E-mail message. From To Cc Date Subject Message ID : : : : Fri, 2 Mar 2001 11:53:43 +0900 : Disposition notification (MDN): Success : <200103025113610.43@Ifxa.toshibatec.com> This report relates to a message you sent with the following header fields: Message-id: <200103025113610.43@Ifxa.toshibatec.com> To: user01@toshiba.
Alert Report This is a alert report that the recipient has not responsed for the MDN. MAR-02-01 11:22 F- 039 ALERT REPORT PAGE : 001 DATE & TIME : MAR-02-01 11:37 E-MAIL : ifax@toshiba.com JOB NUMBER : 039 DATE : MAR-02-01 11:22 TO : user01@toshiba.
- LIST AND REPORT PRINT FORMAT AND PRINTING PROCEDURE Transmission/Reception Journal (Communication Journal) Facsimile/Telephone Number of this facsimile unit, Line 1 “TO” is replaced with “FROM” in a RECEPTION JOURNAL Machine Counter Information List/Report Name Facsimile/Telephone Number of this facsimile unit, Line 2 Time of output of this list or report E-mail Address of this facsimile unit Transmission/Reception Journal shows the result of each communication for up to the past 150 transmissions/r
Memory Transmission Report This is the result report printed after a Memory Transmission. (A job transmitted after the document is first scanned into memory.) MEMORY TRANSMISSION REPORT PAGE : TIME : TEL NUMBER1 : TEL NUMBER2 : E-MAIL : NAME : FILE NUMBER : 070 DATE : MAY-17 14:18 TO : user01@toshiba.com DOCUMENT PAGES : 001 START TIME : MAY-17 14:20 END TIME : MAY-17 14:23 SENT PAGES : 000 STATUS : NG 001 MAY-17-00 14:25 12345678901234567890 12345678901234567890 ifax@toshiba.
Reservation List This is a listing of the communication jobs now reserved in memory. RESERVATION LIST PAGE : TIME : TEL NUMBER1 : TEL NUMBER2 : E-MAIL : NAME : TX/RX FILE NBR FUNCTION PGS 015 E-MAIL TO FAX GTWY 001 POLLING/FAX MAILBOX FILE NBR FUNCTION PGS RECOVERY TX FILE NBR FUNCTION PC JOB FILE NBR FUNCTION MAIL 001 MAY-17-00 14:25 12345678901234567890 12345678901234567890 ifax@toshiba.
Multi-Address Transmission Report This is the result report printed after a Multi-address Transmission. MULTI TRANSMISSION REPORT PAGE : 001 TIME : MAY-17-00 14:25 TEL NUMBER1 : 12345678901234567890 TEL NUMBER2 : 12345678901234567890 E-MAIL : ifax@toshiba.
Preset Dialing Number Lists Alphabetical Sort List Issues a listing of names programmed to Abbreviated Dial Numbers, One Touch Keys, and Group Numbers. PHONEBOOK IN ALPHABETICAL ORDER PAGE : 001 TIME : MAY-17-00 14:25 TEL NUMBER1 : 12345678901234567890 TEL NUMBER2 : 12345678901234567890 E-MAIL : ifax@toshiba.
Preset Dialing Number Lists - continued Abbreviated Dial Number List Issues a list of remote station dialing numbers assigned as Abbreviated Dial Numbers. ABBREVIATED TEL NUMBER LIST Printing Procedure PAGE : TIME : TEL NUMBER1 : TEL NUMBER2 : E-MAIL : NAME : 001 MAY-17-00 14:25 12345678901234567890 12345678901234567890 ifax@toshiba.com ABCDEFGHIJKLMNOPQRSTUVWXYZ12345678901234 ABB.
Preset Dialing Number Lists - continued Group Number List Issues a list of One Touch Key or Abbreviated Dial Numbers registered in Multi-address Groups or Multi-polling Groups. GROUP NUMBER INFORMATION PAGE : TIME : TEL NUMBER1 : TEL NUMBER2 : E-MAIL : NAME : GROUP NUMBER NAME OT/ABB. NUMBER 0001 OT ABCDEFGHIJKLMNOPQRST ABB. 1111 1999 ABBCCCDDDDEEEEE ZZZZZ ABB. OT ABB.
Preset Dialing Number Lists - continued One Touch Number List Issues a list of dial numbers of the remote stations assigned to One Touch Dial Keys. ONE TOUCH NUMBER INFORMATION PAGE : TIME : TEL NUMBER1 : TEL NUMBER2 : E-MAIL : NAME : OT NBR 001 MAY-17-00 14:25 12345678901234567890 12345678901234567890 ifax@toshiba.com ABCDEFGHIJKLMNOPQRSTUVWXYZ12345678901234 NAME/FUNCTION ABB. FAX NUMBER & E-MAIL TIME 01 ABCDEFGHIJKLMNOPQRST 09 ABB.
Function List Fucntion List (First Copy) FUNCTION LIST PAGE : TIME : TEL NUMBER1 : TEL NUMBER2 : E-MAIL : NAME : DIAL TYPE(LINE1) DIAL TYPE(LINE2) CALL NUMBER KEYBOARD TYPE MEMORY SIZE : : : : : MF MF MACHINE SETTING RINGER VOLUME ALARM VOLUME KEY TOUCH VOLUME MONITOR VOLUME SUPER POWER SAVER PRINTER POWER SAVER START TIME END TIME FAX SEPARATOR PAGE COPY SEPARATOR PAGE PC SEPARATOR PAGE SEPARATOR PAGE TRAY ACCOUNT CODE PRINT DENSITY DOCUMENT LENGTH LINE MONITOR RECEIVE INTERVAL ECM DOCUMENT MODE CONTRA
Function List - continued Fucntion List (Second Copy) Issues a list to confirm the functions currently set in this facsimile unit.
Menu List Menu List (First Copy) MENU LIST PAGE : TIME : TEL NUMBER1 : TEL NUMBER2 : E-MAIL : NAME : 1.COMM. OPTIONS 1.PAGE NUMBER 2.LINE MONITOR 3.TURNAROUND POLL 4.ECM 5.SECURITY TX 2.LISTS 1.FUNCTION 2.DEPARTMENT 3.ITU MAILBOX 3.INITIAL SETUP 1.LANGUAGE 2.DATE & TIME 3.TERMINAL ID 4.DIAL TYPE 5.NETWORK 01.TCP/IP 01.DONE 02.BOOTP/DHCP 03.IP ADDRESS 04.SUBNET MASK 05.DEFAULT GATEWAY 06.HOST NAME 02.E-MAIL 01.E-MAIL ADDRESS 02.ERR EMAIL FW ADDR 03.RECEIVE MODE 04.POP SERVER ADDR 05.POP TIME 06.
Menu List - continued Menu List (Second Copy) Issues a list of menu items through which functions or options can be set. MENU LIST PAGE : TIME : TEL NUMBER1 : TEL NUMBER2 : E-MAIL : NAME : 4.REPORTS & LIST 01.JOURNAL 02.COMM. REPORT 01.TX REPORT 02.MEMORY-TX REPORT 03.MULTI-ADD REPORT 04.MULTIPOLL REPORT 05.RELAY ORG.REP 06.RELAY STN.REP 07.SET RELAY END REP 03.RECEPTION LIST 01.LOCAL MAILBOX 02.REMOTE MAILBOX 03.RELAY 5.REMOTE SERVICE 01.REMOTE ACCESS 02.DOWNLOAD 03.RDC PASSWORD 04.SUPPLY ORDER 6.
Power Failure List This facsimile has a battery to back up the document memory contents. However, when the power is turned off for a lengthy period (due to a power failure, etc.), the communication data stored in memory will be cleared. A list of the File Numbers of those cleared communications will be printed. POWER FAILURE LIST PAGE : 001 TIME : MAY-17-00 14:25 TEL NUMBER1 : 12345678901234567890 TEL NUMBER2 : 12345678901234567890 E-MAIL : ifax@toshiba.
TROUBLESHOOTING Error Messages If an abnormal condition arises in the machine or an incorrect operation is performed, an alarm buzzer is generated for about 4 seconds and a message to indicate the nature of the error appears in the LCD Display. In that case, take corrective action according to the following table. Error Message IMAGE INPUT ERROR Cause / Solution The connectors of the Internet Fax unit are not connected correctly or the machine or Internet Fax unit has been damaged.
Error Messages - continued Error Message SMTP SRV NOT CONNECT Cause / Solution The machine cannot connect to the SMTP server. Confirm the setting of “SMTP Server Address” that the IP address of the SMTP server correctly assigned (see page 67). If this Error Message is repeatedly displayed, ask your administrator of the E-mail server. HOST NAME ERROR Error Message INVALID ZERO DATA “0” is entered at “Body Page Limit” or “000” is set to any 8-digit section of “IP address”. Input a correct value.
Error Messages - continued Error Message INVALID FTP PASSWORD Cause / Solution The invalid character is entered for FTP Server Login Password. Error Message POP3 SRV NOT CONNECT There is not enough memory to store the One Touch key, Speed Dial, or dialing history. LOW BATTERY Delete the unnecessary address data. INVALID DATA NOT POP3 RECV. MODE BATTERY ERROR This error message is displayed by pressing the [Check E-mail] key while the Receive Mode is set as SMTP.
Error Messages - continued Error Message MIB ACCESSING Cause / Solution This message is displayed by pressing any button on the Operation Panel while the machine is analyzing the MIB. Wait until analyzing the MIB is finished. FTP ACCESSING This message is displayed by pressing any button on the Operation Panel while the machine is transmitting the data in the FTP. Wait until the FTP transmission is finished. COMMAND ERROR The command error occurs while performing the Network Test. Call for service.
Error Codes Printed on Reports When an Error Code is printed as a status indication on Transmission Reports, etc. related to Internet Fax transmission, refer to the following description for the applicable Error Code to determine the cause. Receive Code Error Code Cause How to Correct 70 Memory Overflow and “Error Email Forward Address” is assigned Contact your sender to resend the document by reducing the sent pages. Or confirm the E-mail data forwarded to the “Error E-mail Forward Address”.
Error Codes Printed on Reports - continued Transmit Code Error Code Cause How to Correct 7A Memory Overflow Reduce the scan resolution or the compression of scan method and resend. Or increase the limitation size set at the “MSG SIZE LIMIT” if it is not set to maximum. 7B Communication Error with SMTP server Confirm the following: - SMTP Server Address is correctly set. - LAN cable is correctly connected. - IP Address of this machine is correctly assigned.
TECHNICAL WORD REFERENCE This section describes technical words used in this manual and basic terms for the network technology. D Default Gateway Default Gateway commonly refers to a gateway address of the router. router is a device that connects between a LAN and other LANs. The DHCP, dynamic host configuration protocol DHCP is a protocol for the purpose of assigning dynamic IP addresses to devices on a network.
L LAN, local area network LAN is a computer network that consists of computers in a small area. Each individual computer can share and access data and devices in a LAN. M MDN, message disposition notification MDN is a system to notify the electric mail sender of the disposition of a message after electric mail has been successfully delivered to a recipient. MIB, management information base MIB is a database of objects that can be monitored by a network management system.
DP120F/DP125F Internet Facsimile E1-XXXXXX
© Copyright TOSHIBA TEC CORPORATION 2000 ALL RIGHTS RESERVED DP120F/DP125F Internet Facsimile