User Guide Set Up & Start Up Basic Copier Operations Key Operator Functions Toshiba America Business Solutions, Inc.
SET UP & START UP Turning the System On Turning the System Off Overview of Copier Components Overview of Operator Panel Touch Panel Page 1
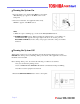
Turning the System On 1. Open the switch cover, and then turn ON the power switch. “Wait Warming Up” appears on the Basic screen on the touch panel. 2. About 25 seconds later, the equipment will be ready. “READY” appears on the Basic screen. TIPS: y While the copier is warming up, you can use the Auto Job Start function. y POWER FAILURE message: When restarting the equipment due to power failure, etc., “POWER FAILURE” appears at the upper right of the screen.
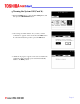
Turning the System Off (Cont’d.) 2. Press the USER button to enter the user setting menu, and then press the SHUTDOWN button. 3. “Processing job will be deleted. Are you sure you want to shutdown?” appears on the screen. Press the YES button. To cancel the shutdown operation, press the NO button. 4. “Shutdown in progress” appears on the screen, and then the equipment is shut down. The power switch automatically returns to the OFF position.
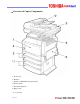
Overview of Copier Components 1. Front cover 2. Drawers 3. Operator’s Manual Pocket (back side) 4. Power switch 5. Automatic duplexer 6.
. Original scale 8. Inner tray 9. Control panel 10. Touch panel 11. Touch panel contrast adjustment volume 12.
Overview of Operator Panel OUCH PANL 1. HELP button When pressing this button, appropriate operation procedures are displayed. 2. USER FUNCTIONS button Press this button to set the paper size of the drawer, the drawer for special use, or to set/register the settings including such as the change of the default setting of the copy, scan and Fax functions. 3. TEMPLATE button Use this button to store and recall the various settings that are frequently used for copy, scan and Fax functions 4.
8. FAX button Press this button to use the Fax/Internet Fax function. (Optional FAX board, printer/scanner kit, or both printer kit and scanner upgrade kit is required.) 9. PRINT DATA/MEMORY RX/FAX communication If these lamps light, they show the status of receiving data, receiving original(s) standing by to be printed and currently used telephone line (1 or 2). 10. INTERRUPT button Use this button to interrupt the copying job in process and to perform another copying job.
Touch Panel When the power is turned on, and “READY” is displayed, the BASIC screen of the copy function is shown on the touch panel. On the screen, currently set functions, selected functions and the copier status are shown via messages and illustrations. NOTE: The contents of touch panel screens in this manual show the equipment with all options.
Touch Panel (Cont’d.) TOUCH-BUTTONS The various function items are touch-button selectable. Press any button lightly with your finger. Index buttons — These buttons are used for switching the menu. The type and the number of the index buttons varies depending on each function of Copy, Scan and Fax. Function setting area — This is an area for selecting and setting each function. SETTINGS (setting functions confirmation) button — This button allows you to confirm the functions that have been set.
Touch Panel (Cont’d.) CLEARING THE FUNCTIONS SELECTED If you press any button that is half-tone shaded, the function selected is cleared. Also, if the copier is left inactive for a while, the automatic function clear works and the setting is cleared.
BASIC COPIER OPERATIONS Making a Copy From the Glass Making a Copy From the RADF Magazine Sort & Saddle Stitch Mode (Booklet Mode) Hole Punch Mode Page 11
Making a Copy From the Glass Sheet Originals: 1. Raise the original cover or the reversing automatic document feeder (optional), and place the original face down on the glass. y Raise it 60 degrees or more for detecting the original. y A: Original 2. Align the original against the left rear corner of the glass. 3. Lower the original cover or the reversing automatic document feeder (optional) slowly.
Making a Copy From the RADF In the Continuous-Feed Mode: 1. After aligning the edges of originals, place the originals face up and align the slides to their width. y Align the originals in order from the top because they will be fed from the top. y One original sheet is also acceptable. y Maximum number of sheets (all sizes) that can be set in the reversing automatic document feeder: 100 sheets (13.3–20 lb.) or less than 0.6” in height. y Use the original stopper as required.
Magazine Sort & Saddle Stitch (Booklet Mode) When the Magazine Sort mode is selected, 1-sided originals can be copied and bound like magazines or booklets. When the saddle-stitch finisher (optional, MJ-1025) is installed, you can select the saddle stitch mode that will automatically fold and staple the center of the document. LD, LT-R, A3, A4-R and B4 are available. (Special paper such as OHP films or labels is excluded. The paper weight should be in the range of 17-28 lb. Bond.
Setting Magazine Sort & Saddle Stitch Mode 1. Place paper in the drawer(s). 2. Set the paper size. 3. Place the original(s). y When placing originals in the reversing automatic document feeder (optional), set them by referring to the order of previous pages in the illustrations. y When placing them on the glass, place the first page of the originals first if the MAGAZINE SORT or the MAGAZINE SORT & SADDLE STITCH is selected.
Hole Punch Mode (Optional) When the optional hole punch unit is attached to the finisher (Optional: MJ-1025), you can hole punch your copies. The paper weight should be in the range of 17 lb. to 110 lb. Special paper such as OHP files or labels is excluded. 1. Place paper in the drawer(s). y When using this mode in bypass copying, be sure to specify the paper size. 2. Place the original(s). 3. Press the Finisher button on the BASIC menu as shown in the illustration on the right (highlighted). 4.
KEY OPERATOR FUNCTIONS Replacing the Toner Cartridge Changing the Paper Size of the Drawer and Adding Paper How to Clear a Misfeed Counter Reading Service Calls and Supply Orders Replacing the Toner Cartridge When the toner in the cartridge runs out, the REPLACE TONER CARTRIDGE symbol blinks and “Install new toner cartridge” appears. 1. Open the front cover. 2. Press the green lever down.
Replacing the Toner Cartridge (Cont’d.) 3. Pull out the toner cartridge. 4. Shake the new toner cartridge well to loosen the toner inside. 5. Pull out the seal in the direction of the arrow. 6. Insert the toner cartridge until it clicks.
Replacing the Toner Cartridge (Cont’d.) 7. Lower the bypass tray. 8. Open the automatic duplexer. 9. Open the transfer cover to take out the transfer charger cleaner from the front pocket. 10. Wipe the transfer charger wire properly with the transfer charger cleaner. y Insert the transfer charger cleaner into the edge of the transfer separation unit. Then take it out again after cleaning. y Press the cleaner against the wall of the next charger and check if the cleaner pad contacts the wire.
Replacing the Toner Cartridge (Cont’d.) 11. Return the transfer charger cleaner to the front pocket, and then close the transfer cover. 12. Return the automatic duplexer and the bypass tray to their original position. 13. Close the front cover.
Changing the Paper Size of the Drawer and Adding Paper The paper size of the drawers can be changed. The drawers can also be set for cover sheet, insertion, thick paper 1, Fax and special sheets. 1. Pull out the drawer carefully until it comes to a stop. 2. Push the lower part of the width guide in the direction of the arrow to remove it, then reinstall the width guide at the desired paper size (indicated on the bottom inner surface of the drawer). 3.
Changing the Paper Size of the Drawer and Adding Paper 5. Push the arrow part (left side) to lock the size selection lever. 6. Place paper in the drawer(s). y Place paper face up. y Fan the paper well before placing it in the drawer. y Do not add paper above the line indicated on the guide. y Do not use creased, folded, wrinkled or damp sheets of paper. NOTE: Make sure that a gap of approx. 0.02” (less than 0.04” in total) is left between the paper and the side guide.
Changing the Paper Size of the Drawer and Adding Paper 9. Press the USER FUNCTIONS button on the control panel. 10. Press the USER button, then press the GENERAL button on the touch panel. 11. Press the DRAWER button. 12. Press the drawer button corresponding to the one in which the paper size has been changed, and then press the button indicating the new paper size.
How to Clear a Misfeed Paper Misfeed in the Drawer Feeding Area 1. Open the bypass tray. 2. Open the automatic duplexer. 3. Open the transfer cover. 4. Rotate the green knob as indicated by the arrow toward the inside and remove any misfed paper. 5. Return the transfer cover, the automatic duplexer and the bypass tray to their original positions.
How to Clear a Misfeed (Cont’d.) 6. Open the cover. 7. Remove any misfed paper. 8. Close the cover. Paper Misfeed on the Bypass Feed Unit 1. Pull out misfed paper on the bypass tray.
How to Clear a Misfeed (Cont’d.) Paper Misfeed in the Automatic Duplexer 1. Make sure that the bypass tray is opened, and then open the automatic duplexer. CAUTION: y Be careful not to let your fingers be caught between the equipment and the automatic duplexer. y Do not touch the metal portion of a guide board as it could burn you. 2. Lift the paper guide as indicated by the arrow and remove any misfed paper. 3. Lower the paper guide and return the automatic duplexer to the original position.
How to Clear a Misfeed (Cont’d.) Paper Misfeed in the Fuser Unit 1. Make sure that the bypass tray and the automatic duplexer are opened, and then open the transfer cover. 2. Open the exit cover. y Press it down completely. 3. Remove any misfed paper. 4. Close the exit cover, the transfer cover and the automatic duplexer. Return the bypass tray to the original position.
Counter Reading Displaying Print Counter This feature allows you to display the total number of the print counter. The print counter contains following counters: y Copy Counter — indicates the number of sheets that has been printed by copy operations. y Fax Counter — indicates the number of sheets that has been printed by fax receptions. y Printer Counter — indicates the number of sheets that has been printed by print operations and E-mail receptions (Internet Fax receptions).
Counter Reading (Cont’d.) Displaying Scan Counter This feature allows you to display the total number of the scan counter. The scan counter contains following counters: y Copy Counter — indicates the number of originals that has been scanned by copy operations. y Fax Counter — indicates the number of originals that has been scanned by fax and Internet Fax transmissions. y Network Counter — indicates the number of originals that has been scanned by scan operations. 1.
Counter Reading (Cont’d.) Displaying Print Counter for Department Code This feature allows you to display the number of the print counter for each department code. NOTE: The department counter is available only when this equipment has been managed with the department code. The print counter contains following counters: y Copy Counter — indicates the number of sheets that has been printed by copy operations. y Fax Counter — indicates the number of sheets that has been printed by polling operations.
Counter Reading (Cont’d.) Displaying Print Counter for Department Code (Cont’d.) 4. Press the PRINT COUNTER button. 5. The Print Counter for the specified department code is displayed.
Counter Reading (Cont’d.) Displaying Scan Counter for Department Code This feature allows you to display the number of the scan counter for each department code. NOTE: The department counter is available only when this equipment has been managed with the department code. The scan counter contains following counters: y Copy Counter — indicates the number of originals that has been scanned by copy operations.
Counter Reading (Cont’d.) Displaying Scan Counter for Department Code (Cont’d.) 4. Press the SCAN COUNTER button. 5. The Scan Counter for the specified department code is displayed. Service Calls and Supply Orders* All service calls and supply orders will be placed using the phone number below: ________________________________________________ Please reference the Toshiba serial # on the GOLD Label on the front of the copier/fax system.
Notes Page 34