
Telephone User Manual


IPedge
Preferences
IPedge UG 06/11 TOSHIBA 121
• Change Low Priority Text Color
• Change Font
• Reset
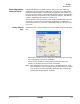
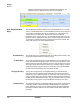
Insert your Logo
into the Skin
You can choose a graphic different from the default logo that may be used for
display in the title line of the Call Manager display, and application menu logo.
The Skin Editor provides a series of default graphics and allows for using .png,
.jpg, .gif, or. bmp-formatted graphics as well. The graphic size should not be larger
than 22 x 224 pixels to fit within the available space.
• Click the Title Bar option to change Title Bar logo. Browse to select your
graphic file in the dialog box.
• Click on Application Menu option to change application menu logo. Browse to
select your graphic file in the dialog box.Set the Call Window Colors and Font
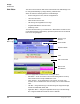
Changing Call
Windows
Appearance
Right click on any call window area, to show menu options:
• Change background color
• Change text color
• Change font
• Reset
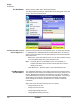
Changing the
Button/ACD
Button
Appearance
You can change default button colors and font; and change colors of ACD status
buttons.
Default button – By clicking the Default button, you can revert to the default
setting of any button when it is initialized or reset. Right click on the default
button to show menu options:
• Change background color
• Change text color
• Change font
• Reset: Clicking the reset button resets the colors and font to the default
values for buttons that have not be customized with different colors.
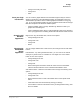
ACD status buttons – Select the ACD status button and right click to bring menu
options:
• Change background color
• Change text color
• Reset: Click this button to reset to the default colors for the specific ACD
status.
• Click Hide Colors when done.Finish by Saving your Design
• Use the Save or Save As commands to save your design before exiting. See
above for details.