Introduction HDD/DVD VIDEO RECORDER OWNER’S MANUAL Playback RD-X2U Basic operations TOSHIBA HDD/DVD VIDEO RECORDER RD-X2U DIGITAL VIDEO Recording 3 ABLE BOX ONTROL Dubbing OPERATIONS Read “INSTALLATION GUIDE” first. Editing Function setup Others © 2002 Toshiba Corporation *RD-X2.
Introduction Table of Contents Memo Introduction Introduction Playback About this product .............................................. 5 10 10 12 14 16 Before operating this recorder ........................ Initializing a DVD-RAM disc (Logical Format) ......... DVD-RAM Physical Format ................................... Entering characters ............................................... 18 22 23 24 Viewing still pictures (Playing a disc that contains still pictures) ..............
Introduction Recording Editing Before Editing .................................................. 104 Recording a TV program ................................... 67 Playlist Editing (Collecting desired scenes) ........................... 111 Tips on Recording ............................................. Relay Recording ................................................... A–B Recording ..................................................... Reservation Disc (Program Record Lock) ..............
Others Troubleshooting .............................................. 132 Glossary ........................................................... 135 Alert message and corrective action ............ 137 Q&A .................................................................. 139 FAQ ................................................................... 141 Language Code List ........................................ 142 Specifications ..................................................
Introduction About this product “ ” may appear on the TV screen during operation. “ ” means that the operation is not permitted by the recorder or the disc. Using different disc types for different purposes Use DVD-RAM discs for your personal library DVD-RAM discs comply with the global standard DVDVR (Video Recording) format, and are optimized for recording of TV programs.
Introduction Compatible discs You can enjoy recording and playback using the HDD of this recorder. When you want to play software or perform dubbing, load a disc into the recorder. There are many types and formats in discs. Confirm the compatibility of selected disc to insure proper performance. Note Depending on the data recording method or the disc status, playback or recording on this recorder may not be possible, even if the disc is labeled as below.
Introduction On DVD-RAM discs Use only DVD-RAM discs that comply with DVDRAM standard Version 2.0 Recommended discs The following discs has been tested with this recorder: 9.4 GB double-sided type4 cartridge: Panasonic LMAD240U 4.7 GB single-sided type4 cartridge: Panasonic LMAB120U Dubbing On DVD-R discs A 4.7 GB DVD-R disc can only be recorded from the page 128) HDD when the DVD-R compatible mode ( is set to on; you cannot record directly on the disc.
Introduction Compatible discs (Continued) On handling discs Do not touch the playback side of the disc. Marks on DVD video discs The following are examples of marks and the meanings. Mark Meanings Number of audio streams recorded in the disc. (2 streams such as English and Japanese in this example.) 2 Playback side Do not stick paper or tape to discs. Number of subtitle languages recorded in the disc. (2 subtitle languages are recorded in this example.
Introduction Structure of disc contents Basic operations Normally, DVD video discs are divided into titles, and the titles are subdivided into chapters. VIDEO CDs/audio CDs are divided into tracks. DVD video disc Title 1 Title 2 Chapter 1 Chapter 2 Chapter 1 Chapter 2 Chapter 3 Playback VIDEO CD / audio CD Track 1 Track 2 Track 3 Track 4 Track 5 Divided contents of a DVD video disc. Roughly corresponds to a story title in short stories. Chapter: Divided contents of a title.
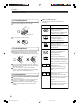
Introduction Index to Parts and Controls See pages with arrows for details. Front panel 2 1 3 4 5 6 7 HDD 8 TIMESLIP 9 10 11 12 DVD ON/STANDBY INPUT SELECT REC MODE REC MENU INPUT 2 S-VIDEO VIDEO L – CONTENT MENU CHANNEL + QUICK MENU R ENTER * The above illustration displays the front panel with the cover open. See the following page on how to open or close the cover. 1 ON/STANDBY button pages 18, 19 Turns the power on/restores the unit in the standby mode.
Introduction TIMESLIP Basic operations HDD DVD ON/STANDBY S-VIDEO VIDEO L – 13 page 18 % Disc tray Place a disc to play or record. 18 19 20 21 22 , Directions buttons page 30, 118 Moves the cursor to select an item. page 30, 118 - ENTER button Enters a command. page 30 . CONTENT MENU button Displays the CONTENT MENU. Dubbing page 68 & REC MODE button Changes the picture and sound quality settings.
Introduction Index to Parts and Controls (Continued) Rear Panel 1 2 3 1 AC IN socket page 15 in “INSTALLATION GUIDE” Connects to the supplied power cord. 4 5 6 7 page 3 DIGITAL AUDIO OUT/COAXIAL jack 21, 22, 23 in “INSTALLATION GUIDE” Use this to connect the recorder to an audio receiver equipped with a coaxial digital audio input jack. page 74 4 INPUT 1 jacks Use this to connect the recorder to output jacks of external devices such as another player or camcorder.
Introduction Basic operations Playback Recording 7 OUTPUT 2 jacks page 19 in “INSTALLATION GUIDE” Outputs video and audio signals to a connected TV or amplifier. Y, PB, PR: connects to a TV equipped with component video jacks. Dubbing 8 VHF/UHF RF OUT (TO TV) output socket page 14 in “INSTALLATION GUIDE” Connects the supplied coaxial cable to a TV. Editing 9 VHF/UHF RF IN (FROM ANT.) input socket page 14 in “INSTALLATION GUIDE” Connects to an antenna or cable signal. Function setup Others 13 *RD-X2.
Introduction Index to Parts and Controls (Continued) Remote control OPEN/CLOSE button MENU button*1 page 18, 19 Power button TOP MENU button page 29 page 53 ANGLE button OPEN/CLOSE TOP MENU DVD MENU RETURN ANGLE SUBTITLE AUDIO HDD TIMESLIP V-REMOTE SE CONTENT MENU C AR H LIBRARY button page 46 INSTANT REPLAY button EDIT MENU button SK page 46 page 88 CONTENT MENU button PI C page 34 page 28, 30, 88 IP REC MENU button DVD button EDIT MENU LIBRARY RE page 61 REC MENU TU
Introduction REC MODE button VCR Plus+ button SETUP button EXTEND REC MODE page 36, 39 page 49, 68 page 118 TV CODE T.SEARCH 1 2 3 4 5 6 +10 7 8 9 0 SETUP DELETE CLEAR page 44 TV CODE button in “INSTALLATION GUIDE.” T.SEARCH button CLEAR button Playback Number buttons page 68 page 72 VCR Plus+ EXTEND button Basic operations Under the lid page 49 page 49 Recording To open, raise a lid toward you.
Introduction Index to Parts and Controls (Continued) Display 1 18 17 16 15 2 3 4 5 14 13 12 11 6 10 7 9 8 LPressing the DIMMER button on the remote control changes the brightness of the display (normal/dimmed/ off). 1 Picture quality mode indicator (HDD) (page 128) The current picture quality mode lights up.
Introduction Basic operations Playback Recording " DVD indicator Illuminates when a DVD-RAM, DVD video or DVDR disc is selected, or when the disc tray is empty. Dubbing # DVD media indicator Indicates playback or recording condition when a DVD-RAM, DVD-R, VIDEO CD or audio CD is chosen as media. $ HDD-DVD Moving/Copy direction Indicates moving/copy direction of HDD or DVD. Editing % VCD/CD indicator Illuminates when playing a VIDEO CD or an audio CD.
Introduction Before operating this recorder Is your recorder ready? Loading a disc Refer to the supplied “INSTALLATION GUIDE” manual and finish the necessary preparations. Check disc compatibility beforehand (page 6) and use a proper playable disc. Turning the power on (This owner’s manual instructions are based on the assumption that all proper connections have been completed and the TV is turned on.
Editing Press the ON/STANDBY button on the front panel of the recorder or the power button on the remote control. Dubbing Turning the power off Note • If there are any performance malfunctions of the HDD or the DVD-RAM drive, immediately discontinue use of this recorder, and disconnect the power cord from a wall outlet, then contact your dealer. Continuous use of the recorder in such a condition will aggravate the condition and result in increased cost and cord repair time.
Introduction Before operating this recorder (Continued) Using the GUI (Graphical User Interface) If a message appears The recorder provides you with a variety of GUI (Graphical User Interface) to assist your operation of most functions such as customizing of setting, playback or recording. Refer to the operation guide on the bottom on each GUI. This will indicate proper button selection for desired action. The recorder will display messages related to operational status.
Because of problems and errors that can occur during the creation of DVD software and/or the manufacture of DVD discs, Toshiba America Consumer Products cannot guarantee that this recorder will play every feature of every DVD bearing the DVD logo. As one of the creators of DVD technology, Toshiba DVD recorders are manufactured to the highest standards of quality and, as a result, such incompatibilities are very rare.
Introduction Before operating this recorder (Continued) Initializing a DVD-RAM disc (Logical Format) Be sure to read this section prior to using a DVD-RAM disc on this recorder for the first time. For DVD-R, initializing is not necessary. A disc should be initialized in the following cases: (The recorder may display a message to request you to do so.) e.g. When you use a DVD-RAM disc on this recorder for the first time. If data fragments produced by repeated recording or erasing have accumulated.
Introduction 4) Press the / buttons to select “Start,” then press the ENTER button. 1) During pause, press the SETUP button. Basic operations 2) Press the / buttons to select “Initial Settings” then press the ENTER button. AB C DVD-RAM Format Entire disc contents excluding library data will be erased if disc is formatted.
Introduction Before operating this recorder (Continued) Entering characters e.g. CONTENT Title Information MENU 002 – Cursor An entered character will appear here. Indicates the number of maximum characters of the first line on the CONTENT MENU. Indicates the number of maximum characters on the CONTENT MENU. Chapter 003 The character being selected appears. Language 1 q a z English Spanish French Germany Italian etc...
Introduction Entering characters The cursor may be followed by unwanted characters. You can erase them if necessary by either of the following measures: Basic operations Erasing characters • Erasing all the characters on the writing board Select “Clear All” by pressing the / / / buttons, then press the ENTER button. Alternatively, open the lid of the remote control and press the CLEAR button.
*RD-X2.
Basic Operations Record a TV program and play it back. Playing a DVD video disc Playing recorded contents (CONTENT MENU) Tips on playback Programing a recording (REC MENU) Tips on recording Quick menu operation Hint on reading this manual The following icons show the playable discs for each function described on this instruction manual.
Basic operations DVD-VIDEO VCD CD Playing a DVD video disc You can also play VIDEO CDs, audio CDs or DVD-R discs in the same manner. To play recorded contents on the HDD or a DVD-RAM disc, follow the instructions on page 30. Preparation • Turn on a TV or audio system and select the corresponding input source that the recorder is connected to. • Load a disc you want to play. ( page 18.) SUBTITLE ANGLE HDD AUDIO TIMESLIP V-REMOTE CHANNEL DVD INSTANT REPLAY INSTANT SKIP REC MENU 1 Press DVD.
DVD-VIDEO VCD CD If you press the PLAY button after stopping playback, playback resumes from the location you have stopped. DVD-VIDEO Some DVD video discs may include a top menu, on which you can view the structure of contents or select a scene. Most of the top menus automatically appear in certain scenes, and also are displayed on demand. Actual operation of the top menu depends on the disc. This section explains a general example of how to operate a top menu.
Basic operations HDD DVD-RAM Playing recorded contents (CONTENT MENU) Titles and chapters recorded on an HDD or a DVD-RAM disc are displayed in thumbnail view, so that you can easily locate a desired one. 1 OPEN/CLOSE TOP MENU DVD MENU RETURN ANGLE SUBTITLE AUDIO During stop or playback, press CONTENT MENU. The following CONTENT MENU (Title List) appears.
Introduction Playing all titles (original) in a disc (All ORG Title Play) The recorder memorizes the location you last stopped playback to resume there. You can play all original titles in the HDD or in a DVDRAM disc in the order of the thumbnails on the CONTENT MENU, as if they are recorded in one video tape. To use this function, set “HDD/RAM Title Play” ( page 129) to “Title Resume.” The recorder will memorize the location you last stopped at in each title, so you can resume playback there.
Basic operations Playing recorded contents (CONTENT MENU) (Continued) Checking the background information on a selected title (chapter) 1) At step 2 on page 30, select a title (chapter) then press the QUICK MENU button. The Quick Menu appears. 2) Press the / buttons to select “Title Information,” then press the ENTER button. Detailed information of a selected title (chapter) appears. Notes • While the title list is displayed, you can select “Edit Title Name” or “Genre.
Tips on playback Status display Each time you operate the recorder, the following marks appear on the TV screen to indicate the status of the recorder. Status display e.g. Switch the picture to view TV broadcasts Press the STOP button to stop playback. If you pause playback or display a menu and leave it still for about 15 minutes, the recorder switches the output picture source to a TV broadcast or connected equipment. A still picture may be displayed after all titles are played.
Basic operations HDD DVD-RAM Programing a recording (REC MENU) Use the REC MENU to program a recording. It will take less time to prepare, as it provides all necessary information for recording, including estimated disc space remaining. It will also be convenient when you program the same contents on TV broadcasting for collection. page 64). For more information, see “Before Recording” ( 1 OPEN/CLOSE TOP MENU DVD MENU RETURN ANGLE SUBTITLE AUDIO CHANNEL During stop, press REC MENU.
If you set summer time on the clock of the recorder, see the notes on page 31 in the “INSTALLATION GUIDE” ** See page 136 for details Setting items Select a channel you want to record. Date Every Sunday to Saturday, Monday to Thursday, Monday to Friday, Monday to Saturday, everyday. Select a date of a TV program you want to record. Enter a starting time of recording. (Set the timer to begin recording no sooner than 5 minutes past the current time. An initial setting is 10 minutes later.
Basic operations Programing a recording (REC NAVI) (Continued) Adding a programming selection Changing an entry 1) Press the REC MENU button. The REC MENU appears. 1) Press the REC MENU button. The REC MENU appears. 2) Press the button to select a blank line, then press the ENTER button. 2) Press the / buttons to select an entry you want to change, then press the ENTER button. 3) Press the / buttons to select the item, then press the ADJUST button to set the item.
1) Press the REC MENU button. The REC MENU appears. 3) Press the / buttons to select “Elapsed Programing,” then press the ENTER button. The list of the past entry records appears. Pressing the ADJUST button can display or remove the check mark. e.g. REC MENU 6) When complete, press the ENTER button. 7) Press the REC MENU button to exit. Note • The recorder stores the latest 36 entries. A new entry erases the oldest one. 1) Press the REC MENU button. The REC MENU appears. 2) Press the QUICK MENU button.
Tips on recording To stop recording To reduce noise on recordings (Rec DNR) Press the STOP button. Before recording, select “Rec DNR” from the setup display. page 129. To pause recording (to omit an unnecessary portion) During recording, press the PAUSE button. To resume recording, press it again. Note • Pausing recording automatically creates a new chapter at that point.
This function works only during HDD recording. You cannot play a title recorded on a DVD-RAM disc sinultoneously with DVD-RAM recording. 1) While recording on the HDD, press the CONTENT MENU button. Pressing the STOP button stops playback, and the content that is being recorded appears on the display. If you press the PLAY button, playback resumes from the location you last stopped. Editing Function setup Note • While you are using this function, the following operations/ functions are not available.
Basic operations Tips on recording (continued) To delete recorded content To protect recorded content Important note Any deleted title/chapter (original) cannot be restored. Before deleting, be sure to check contents on the disc. You can protect recorded content from unexpected deletion. Protection is provided for each title (original). ENTER / / / 1) Perform steps 1 and 2 in “Playing recorded contents (CONTENT MENU)” (page 30) to select a title.
Basic operations HDD DVD-RAM DVD-VIDEO VCD CD Quick Menu operation e.g. HDD Quick Menu Source :Title Original Basic operations Preview Title Information Auto Power Off Exit Object : DVD-RAM All Clear Budget Start Playback Opening a Quick Menu TOP MENU MENU RETURN ANGLE SUBTITLE AUDIO TIMESLIP V-REMOTE DVD 1 Press QUICK MENU. The Quick Menu appears.
Basic operations Quick menu operation (Continued) Functions in a Quick Menu Besides these examples, various other ones are introduced on respective pages for convenience. To play repeatedly (Repeat playback) You can repeat a desired section. Disc: HDD DVD-RAM DVD-VIDEO Status: Stop / Play Item: VCD CD Special Playback Mode A sub menu appears. Follow steps 2 ( select an item. page 41) to A-B Repeat : You can designate a portion in a title or track to repeat continuously.
Disc: DVD-VIDEO VCD Status: Stop / Play Item: 2) Press the / buttons to select the next box, then perform step 1). To select another chapter in the same title, you do not need to select the title number. Repeat these steps if necessary. You can program up to 30 selections into memory. 3) Press the ENTER button. CD Memory : (in normal playback mode) To display an entry box for one program selection.
Basic operations Quick menu operation (Continued) To display the current bit rate To preview the first and end of every selection (titles/chapters) Disc: HDD DVD-RAM DVD-VIDEO Status: Stop / Play Disc: HDD DVD-RAM Status: While the EDIT MENU is displayed. Bit rate Item: Item: Note • To turn off the bit rate display, select this item again. To use virtual surround sound effect You can obtain expansive virtual surround sound effects from just two speakers.