RL958 Digital Series Register your TV online at www.toshiba.co.
English Contents Bass, Treble ..............................................................................25 Voice Enhancement ..............................................................25 Dynamic Bass Boost ..............................................................25 Stable Sound® .........................................................................25 Dynamic Range Control ......................................................25 Audio Level Offset ............................................
TEXT SERVICES Text services ......................................................................................77 Selecting modes ....................................................................77 Text information ....................................................................77 Navigating pages using Auto ............................................77 Navigating pages using LIST .............................................77 Control buttons .....................................................
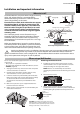
English INSTALLING YOUR TV Safety Precautions WARNING: To prevent injury, this apparatus must be securely attached to the floor/wall in accordance with the installation instructions. See page 5. This equipment has been designed and manufactured to meet international safety standards but, like any electrical equipment, care must be taken to obtain the best results and for safety to be assured. Please read the points below for your own safety.
INSTALLING YOUR TV English Installation and important information Where to install Locate the television away from direct sunlight and strong lights. Soft, indirect lighting is recommended for comfortable viewing. Use curtains or blinds to prevent direct sunlight falling on the screen. Place the TV on a stable, level surface that can support the weight of the TV.
English INSTALLING YOUR TV Please take note The digital reception function of this television is only effective in the countries listed in the “Country” section of the “System Setup” menu. Depending on country/area, some of this television's functions may not be available. Reception of future additional or modified services can not be guaranteed with this television.
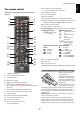
INSTALLING YOUR TV 14 To display on-screen information To access the index page in Text mode Simple at-a-glance reference of your remote control. 15 To mute the TV sound 2 3 6 7 16 To access Quick Menu 17 On-screen Menus 1 4 5 8 18 To display the digital on-screen Programme Guide 19 When using menus, the arrows move the cursor on the screen up, down, left or right.
English CONNECTING YOUR TV Connecting external equipment Before connecting any external equipment, turn off all main power switches. If there is no switch, remove the mains plug from the wall socket. ILLUSTRATION SHOWS 40RL958. HDMI 3 INPUT HEADPHONE jack Power cord HDMI 1/2 INPUTS DIGITAL AUDIO OUTPUT (OPTICAL) USB 1 port Media Player/USB HDD connection port RGB/PC INPUT SCART (EXT 1) LAN port COMPONENT VIDEO/AUDIO INPUT VIDEO/AUDIO INPUT (Y/L/R) (EXT 2) Aerial Cable Media Recorder Aerial cables:.
CONNECTING YOUR TV HDMI’s ARC (Audio Return Channel) feature The HDMI input on your television receives digital audio and uncompressed digital video from an HDMI source device. This feature enables the audio signal of the TV to be sent to the AV amplifier via the HDMI cable. It will not be necessary to connect a cable from the audio output of the TV to the audio input of the AV amplifier to reproduce the audio received from the tuner of the TV through the AV amplifier.
English CONNECTING YOUR TV Connecting an HDMI CEC Control compatible device You can control the basic functions of connected audio/video devices using the television’s remote control if you connect an HDMI CEC compatible AV amplifier or playback device. For an explanation of setup and operations, see pages 75–76. the back of your television AV amplifier Playback device Playback device For the setup shown above, you will need three HDMI cables.
CONNECTING YOUR TV With either an HDMI or an RGB/PC connection, you can watch your computer’s display on the television. To connect a PC to the RGB/PC terminal When connecting a PC to the RGB/PC terminal on the television, use an analogue RGB (15-pin) computer cable. the back of your television To connect a PC to the HDMI terminal Computer When connecting a PC to the HDMI terminal on the television, use an HDMI cable (type A connector).
English CONNECTING YOUR TV Connecting a home network The LAN port allows your Toshiba TV to connect to your home network. You can use this revolutionary home entertainment networking system to access photo, video and audio files that are stored on a DLNA CERTIFIED™ server and play/display them on your TV. NOTE: • If you connect to a shared network outside your home, it is advisable to use a router. Always use DLNA CERTIFIED™ products in private network environments.
CONNECTING YOUR TV English Controls and input connections A wide variety of external equipment can be connected to the input sockets on the side of the television. While all the necessary adjustments and controls for the television are made using the remote control, the buttons on the television may be used for some functions. ILLUSTRATION SHOWS 40RL958. USB 1 port Media Player/Wireless LAN adaptor ready for a home network COMMON INTERFACE The Common Interface is for a Conditional Access Module (CAM).
English CONNECTING YOUR TV MENU structure To open the main menu (illustration below) , press MENU on the remote control. Guide Genre Search Setup TV Programmes 1st Layer Library Media Player Toshiba Place Function Press MENU. Programme Timers 2nd Layer Press C c / B. Press C c. 3rd Layer Press OK. Press BbC c.
SETTING UP YOUR TV • When you select No, skip to step 16. h Before switching on the TV make sure that your aerial is connected and any decoder / media recorder, if applicable is connected and in standby. Press OK, and the Network Type screen will appear. Press C or c to select Wireless. Connection Type Select a connection method. Quick Setup a Wired Press the 1 button. Toshiba logo will appear. and after that, The Menu Language screen will appear.
English SETTING UP YOUR TV k Press B or b to select Security Key and press OK. Input the Security Key by using the Software Keyboard (page 40). To save your setting, press the BLUE button. This item is grayed out when Encryption is None. In step 9, when you select Assisted Setup; Press OK, and the Assisted Setup screen will appear. Press B or b to select the desired AP and press OK. NOTE: Check the MAC address on the label of the AP or in the manual, and select your AP.
SETTING UP YOUR TV Press OK. If your country supports Network Guide, The Guide Type screen will appear. TV Guide Selection s Press C or c to view the DTV (digital channel) or ATV (analogue channel) lists. T Use B or b to move through the list to select a channel, and then press OK to view. Electronic Program Guide accessed by the “GUIDE” key of your remote control: Select “MediaGuide” if you want to use the advanced rich media EPG provided through the network.
English SETTING UP YOUR TV With the exception of DTV Scan Type and DTV Modulation items, all of the following items will have 2 operating modes. The first is Auto where the values for each item are preset by the system. The second is an Input mode where you will be able to enter a single value in place of the pre-set value. If no channel is currently tuned and the Input state is chosen, a system default value will be shown.
SETTING UP YOUR TV Tuning In the System Setup menu, press b to select ATV Manual Tuning and press OK. System Setup The television can be tuned-in manually using ATV Manual Tuning. For example, you might use the feature if the television cannot be connected to a media recorder/decoder with a SCART lead or when you want to tune-in a station on another System. Menu Language Use C and c to move across the screen and select any of the ATV Manual Tuning options. Then use B or b to adjust the settings.
English SETTING UP YOUR TV g h Each signal will show on the television. If it is not your media recorder, press B or b again to restart the search. When your media recorder signal is found, press c to move along to Station. Use B, b, C and c to put in the required characters, e.g. VCR. Skip To prevent certain channels from being viewed, positions can be skipped. a b ATV Manual Tuning Station 1 I A C 2 0 V C R i Press OK to save. j Repeat for each position you want to tune.
SETTING UP YOUR TV Channels may be moved and saved to the position of your choice. a b NOTE: This feature varies depending on the Ant/Cable setting. Select ATV Manual Tuning from the System Setup menu. Manual Tuning With the list of channels showing, use B or b to highlight the channel you want to move and press c. ATV Manual Tuning Pos.
English SETTING UP YOUR TV Manual Tuning for DVB-C DTV Settings When Ant/Cable is set to Cable, DTV Manual Tuning items are as follows: Channels Frequency: Input a specific frequency to be scanned Modulation: Choose from one of five QAM modulation options Symbol Rate: Input a specific baud rate (KS/s) to be used for the manual scan The channel order may be changed to suit your personal preference. a b Select DTV Settings from the System Setup menu and press OK. Select Channels and press OK.
SETTING UP YOUR TV Analogue switch-off channel you wish to move and press OK to check. If you wish to move multiple channels at once, select another channel and check in the same way. Repeat as necessary. Once all desired channels have been checked, press the B or b buttons to place the focus at the position to which you wish to move the channels. The channels will be inserted above the highlighted channel. Press the GREEN button to execute the move.
English CONTROLS AND FEATURES General controls Selecting channels To select a channel, use the numbered buttons on the remote control. Quick Menu Quick Menu helps you access some options quickly, such as Picture Mode, Picture Size, More Information, Sleep Timer etc. Channels can also be selected using PU and Pu. To display on-screen information such as channel, input mode or stereo/mono signal, press . Press again to cancel. Press QUICK to display the Quick Menu and use B or b to select the option.
CONTROLS AND FEATURES Voice Enhancement Voice Enhancement emphasises the frequency range of the speaker’s voice, making it easier to catch what they are saying. Volume controls and sound mute Volume Press 2+ or 2– to adjust the volume. Sound Mute Press once to turn the sound off and again to cancel. a In the Advanced Sound Settings menu, press B or b to select Voice Enhancement. b Press C or c to select On or Off.
English CONTROLS AND FEATURES Audio Level Offset Headphone Settings Sometimes there can be large changes in volume when switching from a DTV 5.1ch to a DTV 2ch, an ATV channel, or an external input. Using the Audio Level Offset feature reduces these volume differences. This setting is used to set the sound output when headphones are connected. a b Speaker Link Set the volume level usually used when watching a DTV 5.1ch programme. Tune to a channel which is DTV 2ch, ATV or an external input.
CONTROLS AND FEATURES English Widescreen viewing Depending on the type of broadcast being transmitted, programmes can be viewed in a number of formats. WIDE 4:3 Use this setting when watching a widescreen DVD, widescreen video tape or a 16:9 broadcast (when available). Due to the range of widescreen formats (16:9, 14:9, 20:9 etc.) black bars may be visible on the top and bottom of the screen. Use this setting to view a true 4:3 broadcast.
English CONTROLS AND FEATURES NATIVE This setting will show the picture without overscan, i.e. WYSIWYG. PC NORMAL This setting will show the picture without overscan, i.e. WYSIWYG. This option is only available when watching a PC signal source via HDMI or PC terminal. PC WIDE This setting will show the picture without overscan or side panels. This option is only available when watching a PC signal source via HDMI or PC terminal. Dot by Dot Press the “Dot by Dot” is a non-scaling display.
CONTROLS AND FEATURES Picture preferences You can customize current picture mode settings as desired. For example, while selecting “Dynamic”, if you change the following items, such as Backlight, Contrast, Brightness, Colour, Tint, Sharpness and the Advanced Picture Settings items, your new settings are saved for “Dynamic” picture mode. Most of the picture controls and functions are available in both digital and analogue modes. PLEASE NOTE: Features not available will be grayed out.
English CONTROLS AND FEATURES Base Colour Adjustment Auto Brightness Sensor The Base Colour Adjustment feature allows the adjustment of individual colours to suit personal preference. This can be useful when using an external source. When the Auto Brightness Sensor is activated, it will automatically optimise the backlighting levels to suit ambient light conditions. a In the Advanced Picture Settings menu, press B or b to select Base Colour Adjustment and press OK.
CONTROLS AND FEATURES Expert Picture Settings DNR allows you to “soften” the screen representation of a weak signal to reduce the noise effect. This feature is available when the Picture Mode option is Standard, Hollywood Day, Hollywood Night, and Hollywood Pro. a b Select DNR from the Noise Reduction menu. Press C or c to select Low, Middle, High, Auto or Off.
English CONTROLS AND FEATURES White Balance-Window Display This feature displays a special Window Pattern to be used when adjusting white balance with a measuring device. a In the Expert Picture Settings menu, press B or b to select White Balance and press OK. b Press B or b to select Window Display and press C or c to select On. c Press EXIT to close. White Balance-Setting Type You can choose from two types of White Balance adjustment.
CONTROLS AND FEATURES Automatic Format (Widescreen) Toshiba has integrated picture calibration systems into its LCD televisions. Now you can enjoy the benefits of automatically calibrated gamma and white levels. In order to take advantage of these features the Toshiba colour analyzer TPA-1 is required. When this television receives a true Widescreen picture and Auto Format is On, it will automatically be displayed in Widescreen format irrespective of the television’s previous setting.
English CONTROLS AND FEATURES Picture Position The picture position may be adjusted to suit personal preference and can be particularly useful for external inputs. NOTE: The Picture Position feature cannot be selected in the DTV mode. a In the Preferences menu, press B or b to select Display Settings and press OK. b Press B or b to select Picture Position.
CONTROLS AND FEATURES Bluetooth™ and Wireless LAN devices operate within the same radio frequency range and may interfere with one another. If you use Bluetooth™ and Wireless LAN devices simultaneously, you may occasionally experience a less than optimal network performance or even lose your network connection. If you should experience any such problem, immediately turn off either your Bluetooth™ or Wireless LAN device.
English CONTROLS AND FEATURES Setting up the Network Easy Setup using PBC (Push Button Configuration) You can select the Network Type. a In the Preferences menu, press B or b to select Network Setup and press OK. b Press B or b to select Wireless Setup and press OK. c Press B or b to select Easy Setup and press OK. a Press MENU / C c to highlight Setup icon. b Press B / C c to highlight Preferences icon and press OK. c Press B or b to select Network Setup and press OK.
CONTROLS AND FEATURES NOTE: • Certain encryption types are only compatible with specific authentication types. - When Authentication is Open System, only WEP or None is compatible. - When Authentication is Shared Key, only WEP is compatible. - When Authentication is WPA-PSK or WPA2-PSK, only TKIP or AES is compatible. • When incompatible Authentication/Encryption pairings are detected, a warning message will be displayed, and no connection attempt will be made until the incompatibility is resolved.
English CONTROLS AND FEATURES Item Advanced Network Setup Description Status Connected is displayed when the TV is connected with the AP. Disconnected is displayed when the TV is not connected with the AP.
CONTROLS AND FEATURES Highlight Auto Setup and press C or c to select Off. IP Address Setup Auto Setup Manual setup a In the Preferences menu, press B or b to select Network Setup and press OK. b Press B or b to select Advanced Network Setup and press OK. c Press B or b to select DNS Setup and press OK. d Press B or b to select Auto Setup and press C or c to select Off. Off IP Address xxx . xxx . xxx . xxx Subnet Mask xxx . xxx . xxx . xxx Default Gateway xxx . xxx . xxx .
English CONTROLS AND FEATURES Network Connection Test Input operation on the remote control: Button This function checks the Internet connectivity. a b Inputs the selected character. 0-9 Inputs the number directly. BbCc Moves the character highlight. CC cc Moves the cursor. Z A message will appear to indicate if the connection was successful or if it could not be completed. Moves the cursor to the head of a character string. z Moves the cursor to the end of a character string.
CONTROLS AND FEATURES • Time-out ( 60 seconds ) • When the EXIT button on the remote control is pressed Apps Control Profile Device Registration Setup The Apps function allows you to control the TV from network connected Apps (Tablet or Smartphone) like a remote control. Once a User Name has completed authentication, it is stored in the TV along with the password. The upper limit for the number of Use Names that can be remembered is 256. You can delete User Names that are stored in the TV.
English CONTROLS AND FEATURES USB HDD Record Function • The power consumption during Active Standby is more than it during Normal Standby. • After the change from Power On state to Active Standby, there may be a period of several ten seconds which does not receive the operation from a remote control or external apparatus. This function can be used to record and play digital broadcast programmes. Read the precautions below before recording or viewing programmes using the USB HDD record function.
CONTROLS AND FEATURES How to set recordings via the Programme Guide To connect an USB HDD (not supplied): PLEASE NOTE USB1 or USB2 on the TV USB cable (not supplied) When a timed programme is about to start, an information screen will appear offering the option of watching or cancelling the programme. Other channels will not be available during the timed programme unless the programme timer is cancelled. USB HDD When you connect a USB HDD to the USB port on the TV, a prompt will appear.
English CONTROLS AND FEATURES To search for and record a programme using Genre Search: a To programme the timer: a Press MENU / C c / B / C c to highlight TV Programmes / Genre Search icons and press OK to access the Genre Search screen. Genre Search 10:50 Tue, 6 Apr b Movies 34 AB1 Hard Rain 31 PARIS PREMIERE Red Corner c Select the unprogrammed column (blank column) and press OK. The Edit Timer menu will appear.
CONTROLS AND FEATURES a • As the displayed programme time is calculated from the actual recording information, it may not match the recording time on the USB HDD. Press , the information screen will appear giving details of the channel and programme currently being viewed.
English CONTROLS AND FEATURES b c Press B or b to select the title you want to view. A preview of the content selected can be seen on the preview screen. To protect or unprotect a recorded programme: To change the order in which the titles are listed, press the BLUE button. Select the title of the programme you want to protect and press the GREEN button. icon appears next to the title and the programme is protected. Press OK. Viewing starts. ● icon appears next to the title currently being recorded.
CONTROLS AND FEATURES You can check the remaining capacity of the USB HDD using Remaining Capacity. Recording Setup Select Device Thu, 17 Feb 10:00 Fri, 18 Feb 10:00 Fri, 18 Feb 10:00 Fri, 18 Feb 10:00 Sat, 18 Feb 10:00 Sun, 18 Feb 10:00 Sun, 18 Feb 10:00 Sun, 18 Feb 10:00 Mon, 18 Feb 10:00 Press B or b to select One Touch Recording Time. One Touch Recording Time 1235 ITV London Programme End Time ASTRA 19.2°E TimeShift Size 10 July 2011 14:30(01:30) USB HDD3 Remaining Capacity: 86% (912.
English CONTROLS AND FEATURES To set the padding time for programmed recording start time and end time: a In the Recording Setup screen, press B or b to select Start Padding Time. b Press C or c to select a time. You can select from None, 3 minutes, 5 minutes, 10 minutes, 15 minutes, 30 minutes, and 45 minutes. Recording will start at the selected number of minutes prior to the recording start time. c Press B or b to select End Padding Time. d Press C or c to select a time.
CONTROLS AND FEATURES Discover new, exciting possibilities with Toshiba Smart TV - because just watching television is a thing of the past! TV used to be: sit down, relax and watch television. Toshiba Smart TV today is: sit down, relax, watch television and much, much more! Enjoy new possibilities, such as surfing the Web, chatting, browsing social networks, photo communities, video portals, news, sports results... the possibilities are almost endless and are increasing all the time.
English CONTROLS AND FEATURES Using Web Browser Using Skype The web browser on this TV lets you explore everything the web has to offer. Along with access to popular places, you'll be able to search for and browse your favorite sites. Skype-ready Toshiba TVs bring your family and friends closer to your home. Skype on your Toshiba TV allows you to share special moments no matter the distance. NOTE: • Certain services may not be currently available in your area.
CONTROLS AND FEATURES a b Press on the remote control, or press MENU / C c to highlight Toshiba Places icon and press OK. Press BbC c to select Skype icon and press OK. “Welcome to Skype” screen appears. Welcome to Skype Skype Name Press [OK] Password Press [OK] d You'll now be signed into your new account. NOTE: • Please ensure that you have entered your email address correctly. It is required in case you lose or forget your password. • If you forget your password, visit skype.com to retrieve it.
English CONTROLS AND FEATURES Contact List Below is all icon pictures in conversation window. Press B or b to select Contact List tab. Press c/ B b to select a contact.
CONTROLS AND FEATURES When pressing the GREEN button, the change status window is displayed as below. You can change your status by pressing the B or b button and then pressing OK. Exit by pressing the BACK button. You can send a contact request to a person displayed in the search results. Press B or b button to select a person and press OK.
English CONTROLS AND FEATURES Each call has an icon with it. The meaning of each icon is as follows: Icons Description Options Press B or b to select the Options tab and press OK. The Options page will appear.
CONTROLS AND FEATURES Hybrid TV Standard enables the TV to receive HbbTV services. TV services which support this feature often show “press RED” on the screen. NOTE: You need to configure a home network before using this feature (see page 12). Using Intel® Wireless Display Intel® Wireless Display (Intel® WiDi) is supported on this TV. You can use your TV as second display for PC with Intel® Wireless Display. a b Press QUICK to open the Quick Menu.
English CONTROLS AND FEATURES To exit Intel® Wireless Display: Exit Intel® Wireless Display by pushing the disconnect button on Intel® WiDi software or by pressing EXIT on the TV remote control. NOTE: If the PC has been inactive for some time, the Intel® WiDi connection will be disconnected automatically. Intel® Wireless Display Device Name The TV's Intel® Wireless Display device name can be changed.
CONTROLS AND FEATURES Using Media Player with USB When Auto Start is enabled, you will be asked if you want to start the Media Player whenever a USB device is inserted. If Auto Start is disabled (or if you want to connect to a DMS on the network), you must manually start the Media Player from the menu. English Basic operation To select a file in the Multi View: a b Press Bb C c to select a file or folder. Press OK to move to the next layer, or press BACK to return to the previous layer.
English CONTROLS AND FEATURES Viewing photo files (on a DLNA CERTIFIED™ Server or USB device) There are three types of viewing modes. Multi View (USB Photo) This view allows you to search for photos in a grid format. The pictures are displayed using thumbnail data in each image file. Single View In this mode, only files located in the selected directory will be displayed. This view allows you to change the photo content manually.
CONTROLS AND FEATURES To select a photo from Play List: a While in the Single View mode or Slide Show mode, you can select a different photo from the Play List. b Press QUICK to open the Quick Menu while in the Slide Show mode. a Press B or b to select Background Music and press C or c to select On. b The music file in the same folder as the displayed photo will start playing. Press QUICK to open the Quick Menu from Single View mode or Slide Show mode.
English CONTROLS AND FEATURES During playback: Viewing movie files (on a DLNA CERTIFIED™ Server or USB device) • Press W/w to pause. PAUSE may not be available depending on the contents, DMC or DMS. • To resume normal playback, press c (play). • To play in fast reverse or fast forward directions, press CC or cc during playback. Each time you press the CC or cc, the playback speed will change. • To locate a specific file, press Z or z repeatedly.
CONTROLS AND FEATURES To register your TV to a DivX® account: You can resume playback from where it was last stopped. This TV allows you to play back files purchased or rented from DivX® Video-On Demand (VOD) services. When you purchase or rent DivX® VOD files on the internet, you will be asked to enter a registration code. Press v while playing the movie to memorize the stopped position.
English CONTROLS AND FEATURES To playback DivX Plus HD content: • To play in fast reverse or fast forward directions, press CC or cc during playback. Each time you press the CC or cc, the playback speed will change. • This TV generates original chapter point in 10% increments for 10 chapters in total, that are accessible by using the Number buttons on the remote control. Playing music files (on a DLNA CERTIFIED™ Server or USB device) You can listen to music from a Multi View of available files.
CONTROLS AND FEATURES a Press QUICK to open the Quick Menu. b Press B or b to select Repeat. c Press C or c to select Off, All or 1. Mode Description Off Files in the same folder are played back once. All Files in the same folder are repeatedly played back. 1 The same file is repeatedly played back. d English Other features To set the repeat mode: Panel Lock Panel Lock disables the buttons on the television. All buttons on the remote control can still be used.
English CONTROLS AND FEATURES The timers On Timer The feature allows you to set the television to turn on automatically to a preset channel at a certain time of day or after a certain length of time. Programme Timers – digital only This feature will set the television to go to a specific channel at a certain time. It can be used to view a particular programme, or by setting the mode to daily or weekly, can be used to view a series of programmes. a b c d Press MENU / C c to highlight Function icon.
CONTROLS AND FEATURES a In the On Timer menu, select Enable On Timer. b Press C or c to select Off. c Press B or b to highlight Done and press OK. Sleep Timer The television can be set to turn itself Off after a certain length of time. a Press MENU / C c to highlight Function icon. b Press B / C c to highlight Sleep Timer icon and press OK. c d e Use the number buttons to set the desired time.
English CONTROLS AND FEATURES Digital on-screen information To display More Information: When viewing in digital mode, the on-screen information and programme guide provide access to programme details for all available channels. a Press QUICK to open the Quick Menu. b Press b to highlight More Information and press OK. On-screen Information icons Information Icon a Press , the information screen will appear giving details of the channel and programme currently being viewed.
CONTROLS AND FEATURES You can choose the desired EPG system between the Broadcast Guide or MediaGuide that needs a internet connection. English Using EPG (Electronic Programme Guide) Genre selection/searching From the Guide screen, you can use the genre selection and search features. a b In the Guide screen, press QUICK. Press B or b to highlight Genre Colour in the Quick Menu and press OK.
English CONTROLS AND FEATURES This will tune to live TV for the particular show. • Rovi Corporation and/or its subsidiaries and related affiliates are not in any way liable for the accuracy or availability of the program schedule information or other data in the Rovi Guide system and cannot guarantee service availability in your area.
CONTROLS AND FEATURES English Digital settings – parental control Parental Setup In order to prevent viewing of unsuitable films and programmes, channels and menus can be locked in digital mode. These can then only be accessed with a security code PIN. The Parental Control feature allows you to block programmes according to their rating levels. If a PIN has been set, you will need to enter it before adjusting the level. Parental PIN Setup a Press MENU / C c to highlight Setup icon.
English CONTROLS AND FEATURES Digital settings – Channel Options Skip channels This feature allows you to set channels that will be skipped when Pu or PU are used to tune. Selecting favourite channels a From the Quick Menu / Channel Options menu, it is possible to create a list of the digital channels that are watched most. Press LIST / C c to select the Favourite Channel list. b In the Quick Menu, press b to select Channel Options and press OK. c Press c repeatedly to highlight the skip (8) box.
CONTROLS AND FEATURES Subtitles In digital mode, this feature will show subtitles on the screen in the selected language provided they are being broadcast. a In the DTV Settings menu, press B or b to select Subtitle and Audio and press OK. b Press b to select Subtitle Display and press C or c to select On or Off. Common Interface The Common Interface Slot, situated on the side of the television, enables the insertion of a CAM (Conditional Access Module) and card.
English CONTROLS AND FEATURES Software Upgrade and Licences System Information and Reset TV Searching for New Software System Information If preferred, software upgrades can be searched for manually using Search for New Software. This feature can be used to check the version of software currently installed. When in DTV mode, it includes additional diagnostic information such as signal strength, signal quality, centre frequency, modulation, etc.
CONTROLS AND FEATURES Sampling Clock Adjusting the Sampling Clock alters the number of pulses per scan, this will clear vertical lines on the screen. Horizontal and Vertical Position Connect the PC (as shown in the ‘Connecting a computer’ section) and ensure that a picture is showing on the television screen. The picture position may now be adjusted to suit personal preference. a Press MENU / C c to highlight Setup icon. b Press B / C c to highlight Preferences icon and press OK.
English CONTROLS AND FEATURES Input selection and AV connections Labeling video input sources These input labels are shown in the input selector. You can label video inputs according to the devices you have connected to the TV. See page 8 for a detailed image showing recommended connections. Most media recorders and decoders send a signal through the SCART lead to switch the television to the correct Input socket.
CONTROLS AND FEATURES When connecting a surround sound amplifier to the digital audio output (Sony/Philips Digital Interface Format [S/PDIF]), the following options can be selected or adjusted. a b English Using HDMI CEC Control Digital Audio Output This is a new feature that uses CEC technology and allows you to control Toshiba HDMI CEC Control compatible devices from the television remote control via HDMI connection (page 10).
English CONTROLS AND FEATURES NOTE: • These functions depend on the device connected. • If you select the HDMI CEC Control input source from the popup window, some HDMI CEC Control devices may automatically turn on. • If the HDMI cable from connected equipment is changed, Enable in the HDMI CEC Control Setup menu may need to be reset to On.
TEXT SERVICES Navigating pages using Auto This television has a multi-page text memory, which takes a few moments to load. It offers two Modes of viewing text – Auto will display Fastext, if available. List will save your four favourite pages. If Fastext is available, four coloured titles will appear at the base of the screen. To access one of the four given subjects, press the relevant coloured button on the remote control.
English TEXT SERVICES Control buttons Below is a guide to the functions of the remote control text buttons. k To display the index/initial page: Press k to access the index/initial page. The one displayed is dependant on the broadcaster. TEXT To display a page of text: Press TEXT to display text. Press again to superimpose text over a normal picture. Press again to return to normal television viewing. Channels cannot be changed until this has been done.
PROBLEM SOLVING English Questions and Answers Below are the answers to some of the most common queries. Sound Question Answer Why is there no sound or picture? Check the television is not in standby mode. Check the mains plug and all mains connections. Why is there a picture but no sound? Check all lead connections. No sound or unacceptable format sound may be received. Check the volume has not been turned down or that sound mute has not been selected. Check shared audio settings.
English PROBLEM SOLVING Question Picture Why are the colours wrong when an NTSC source is played? Answer Connect the source via a SCART lead and play. Select Colour System from the Setup menu. a Set the Colour to Auto and exit. b Go to the Picture menu and adjust the tint. Why don’t the controls of the television Check that Panel Lock is not On.
PROBLEM SOLVING English Question Answer Why doesn’t the USB HDD work? Your country/area may not support the USB HDD function. Why isn't Skype launched? Check that the recommended video camera (page 50) is connected to the TV. Ensure the network cable connection (page 12). Check the Network setting of TV. Turn off the TV and unplug the power cord. After 1 minute, plug the power cord in and turn on the TV.
English INFORMATION Information Before connecting any external equipment, turn off all main power switches. If there is no switch, remove the mains plug from the wall socket. Signal information for Mini D-sub 15 pin connector Pin No. Signal name Pin No. Signal name Pin No.
INFORMATION English Acceptable video or PC signals through the HDMI terminals The HDMI inputs on this TV only accept VGA, SVGA, XGA, WXGA, and SXGA signal formats which are compliant with VESA as shown in the table below. Since some PCs and HDMI or DVI devices input signals which are different from the resolution and frequency described in the table below, the following phenomenon may occur; incorrect display, false format detection, picture position failure, blur, or judder.
English INFORMATION Media Player Supported Format Media Player Photo Media Format JPEG File Extention .jpg .jpeg Video codec Audio codec JPEG USB DMS yes yes – USB Data compatibility: JPEG Exif ver 2.2 Maximum viewable resolution: • JPEG 15360 × 8640 (Base-line) 1024 × 768 (Progressive) • BMP 9600 × 6400 Maximum number of files: 1000 / folder yes no – DMS Data compatibility: JPEG Exif ver 2.2 Maximum viewable resolution: 4096 × 4096 Maximum number of files: 1000/folder – MPO BMP .mpo .
INFORMATION Movie Media Format File Extention Audio codec USB DMS MPEG-1/2 Layer2 yes MPEG-1/2 Layer3 Dolby Digital (AC-3) PCM ADPCM no MPEG-1 Video MPEG-2 Video MPEG-4 part2 H.264 (MPEG-4 AVC) MPEG-1/2 Layer2 yes MPEG-1/2 Layer3 Dolby Digital (AC-3) L-PCM MPEG-2/4 LC-AAC MPEG-4 HE-AAC no .flv .swf Sorenson H.263 (FLV1) H.264 (MPEG-4 AVC) MPEG-1/2 Layer3 MPEG-2/4 LC-AAC L-PCM ADPCM yes no .3gp MPEG-4 part2 H.264 (MPEG-4 AVC) MPEG-2/4 LC-AAC AMR yes no JPEG L-PCM ADPCM yes no DivX .
English INFORMATION License Information • • • • • • • Manufactured under license from Dolby Laboratories. Dolby and the double-D symbol are trademarks of Dolby Laboratories. HDMI, the HDMI logo, and High-Definition Multimedia Interface are trademarks or registered trademarks of HDMI Licensing LLC in the United States and other countries. This product contains Adobe® Flash® Player software under license from Adobe Systems Incorporated. Copyright © 1995-2009 Adobe Systems Incorporated.
INFORMATION English Cleaning the screen and cabinet… Turn off the power, and clean the screen and cabinet with a soft, dry cloth. We recommend that you do not use any proprietary polishes or solvents on the screen or cabinet as this may cause damage. Disposal… The following information is only for EU-member states: Disposal of products The crossed out wheeled dust bin symbol indicates that products must be collected and disposed of separately from household waste.
English INFORMATION Specifications and accessories Receiving systems DVB-T Broadcast systems/channels UK UHF 21-68 Broadcast systems/channels PAL-I UHF UK21-UK69 France VHF 05-10 (VHF 01-05) UHF 21-69 PAL-B/G UHF E21-E69 VHF E2-E12, S1-S41 Germany VHF 05-12 UHF 21-69 SECAM-L UHF F21-F69 VHF F1-F10, B-Q Austria VHF 05-12 UHF 21-69 SECAM-D/K UHF R21-R69 VHF R1-R12 32RL 40RL 78 W 98 W Standby power consumption (approx.) 0.