DVD VIDEO PLAYER & VIDEO CASETTE RECORDER SD-V390-S-TU OWNER’S MANUAL Before connecting, operating or adjusting this product, please read this instruction booklet carefully and completely. ©2002 Toshiba Corporation This device does not tape-record copy protected DVD Video Discs.
Safety Precautions CAUTION: The apparatus should not be exposed to water (dripping or splashing) and no objects filled with liquids, such as vases, should be placed on the apparatus. CAUTION RISK OF ELECTRIC SHOCK DO NOT OPEN FCC WARNING: This equipment may generate or use radio frequency energy. Changes or modifications to this equipment may cause harmful interference unless the modifications are expressly approved in the instruction manual.
CAUTION: PLEASE READ AND OBSERVE ALL WARNINGS AND INSTRUCTIONS IN THIS OWNER’S MANUAL AND THOSE MARKED ON THE UNIT. RETAIN THIS BOOKLET FOR FUTURE REFERENCE. This set has been designed and manufactured to assure personal safety. Improper use can result in electric shock or fire hazard. The safeguards incorporated in this unit will protect you if you observe the following procedures for installation, use, and servicing. This unit does not contain any parts that can be repaired by the user.
Table of Contents Introduction Safety Precautions . . . . . . . . . . . . . . . . . . . . . . . . . 2 IMPORTANT SAFETY INSTRUCTIONS . . . . . . . . . . 3 Table of Contents . . . . . . . . . . . . . . . . . . . . . . . . . . 4 Before Use . . . . . . . . . . . . . . . . . . . . . . . . . . . . . . 5-6 Playable Discs . . . . . . . . . . . . . . . . . . . . . . . . . . . 5 Precautions . . . . . . . . . . . . . . . . . . . . . . . . . . . . . 6 Notes on Discs . . . . . . . . . . . . . . . . . . . . . . . . . .
Before Use Title (DVD only) The main film content or accompanying feature content or music album. Each title is assigned a title reference number enabling you to locate it easily. Video CD (VCD) (8 cm / 12 cm disc) Audio CD (8 cm/12 cm disc) In addition, this unit can play a DVD-R, CD-R or CD-RW that contains audio titles, MP3 or JPEG files. Notes – Depending on the conditions of the recording equipment or the CD-R/RW disc itself, some CD-R/RW discs cannot be played on the unit.
Before Use (Continued) Precautions Handling the unit When shipping the unit The original shipping carton and packing materials come in handy. For maximum protection, re-pack the unit as it was originally packaged at the factory. Cleaning discs Fingerprints and dust on the disc can cause poor picture quality and sound distortion. Before playing, clean the disc with a clean cloth. Wipe the disc from the center out.
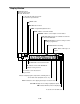
Front Panel Cassette Compartment (VCR deck) Insert a video cassette here. Remote Sensor Point the DVD+VCR remote control here. Display window Shows the current status of the DVD+VCR. OPEN/CLOSE Opens or closes the disc tray. CHANNEL (v/V) To scan up or down through memorized channels. DVD/VCR indicator Indicates the active deck. DVD/VCR SELECT Toggles control between the DVD deck and the VCR deck.
Display Window DVD DVD inserted. VCD Video CD inserted CD Audio CD inserted. A y B Indicates A-B repeat mode. ALL Indicates repeat all mode. ANGLE active. MP3 MP3 disc inserted. PROG. Programmed playback active. TITLE Indicates current title number. CHP/TRK Indicates current chapter or track number. VCR DVD+VCR functions are available and channels are selected at DVD+VCR. TIMER DVD+VCR is in timer recording or a timer recording is programmed. REC DVD+VCR is Recording. CDREC DVD to VCR copy is in progress.
Remote Control DVD/VCR select button POWER Select the output source (DVD or VCR) to view on the TV screen. Switches DVD+VCR ON and OFF. 0-9 numerical buttons - Opens and closes the disc tray. - Ejects the tape in the VCR deck. Selects numbered options in a menu. INPUT SELECT PROGRAM To select the VCR deck’s source (Tuner, LINE 1, or LINE 2). ANGLE Accesses or removes Program menu.
Rear Panel DVD/VCR OUT (VIDEO/AUDIO (Left/Right)) Connect to a TV with video and audio inputs. LINE 1 (VIDEO IN/AUDIO IN (Left/Right)) Connect the audio/video output of an external source (Audio system, TV/Monitor, Another VCR). COMPONENT OUT (Y Pb Pr) Connect to a TV with Y Pb Pr inputs. ANALOG OUT (Left/Right) (DVD OUT) Connect to a TV, amplifier, receiver, or stereo system. Video Output Select Switch Select either S-VIDEO or COMPONENT, depending on how you connect DVD Player to the TV.
Connections z z z Depending on your TV and other equipment you wish to connect, there are various ways you could connect the DVD+VCR. Use connections described on pages 11-14. Please refer to the manuals of your TV, VCR, Stereo System or other devices as necessary to make the best connections. For better sound reproduction, connect the DVD+VCR’s DVD/VHS AUDIO OUT jack to the audio in jacks of your amplifier, receiver, stereo or audio/video equipment. See Optional, Preferred TV Connections on page 13-14.
Connections (Continued) Basic TV Connections Rear of TV Make one of the following connections, depending on the capabilities of your existing equipment. z ANTENNA INPUT AUDIO INPUT L VIDEO INPUT R RF coaxial connection Connect the RF.OUT jack on the DVD+VCR to the antenna in jack on the TV using the 75-ohm Coaxial Cable supplied (R). R Note If you use this connection, tune the TV to the DVD+VCR’s RF output channel (CH 3 or 4). How to set the DVD+VCR’s RF output channel 1.
Connections (Continued) Optional, Preferred TV Connections z S-VIDEO INPUT Notes You can ONLY watch and listen to DVD playback through the connections shown below. When using the COMPONENT VIDEO OUT jacks, set the video output select switch to COMPONENT. When using the S-VIDEO OUT jack, set the video output select switch to S-VIDEO.
Connections (Continued) Optional, Preferred TV Connections Rear of DVD+VCR Note You can ONLY listen to DVD playback using COAXIAL (X), OPTICAL (O) and AUDIO OUT (A2) connections. The tuner and VCR will still be heard through the RF.OUT (R) or DVD/VHS AUDIO OUT (A1) jack. (See page 12.
Before Operation - VCR Part Some of these functions will be displayed every time the VCR is operated. ❶ ❷ ❸ PLAY SP HI-FI JUL 5 , SAT ❹ ❺ CH 4 STEREO 2:15 PM ❻ ❶ TAPE SPEED DISPLAY ❼ If the Extended Data Service (XDS) signals are provided along with normal TV signal in your area or during playback of a tape recorded with Extended Data Service (XDS) signals, the station ID, program title and program details are shown on the TV screen.
Before Operation - VCR Part (Continued) Setting the VCR Setup Menu Channel Selection VCR MENU and the MAIN menu will 1 Press appear. Press v/V to select the SETUP menu, then 2 press ENTER. The SETUP menu will appear. This DVD+VCR is equipped with a frequency synthesized tuner capable of receiving up to 181 channels. These include VHF channels 2-13, UHF channels 14-69 and CATV channels 1-125.
Before Operation - VCR Part (Continued) Setting the Clock Manual Clock Set Things to know before starting z z There are cases where the TV station does not send or sends wrong date and/or time information and the DVD+VCR sets the incorrect time. If this happens we recommend that you set the clock manually. The clock uses the 12-hour system. (Be sure to set AM and PM correctly.) The initial Clock Setting is JANUARY 1, 2003, 12:00 AM.
Before Operation - DVD Part Temporary Feedback Field Icons General Explanation This manual gives the basic instructions for operating the DVD+VCR. Some DVDs require specific operation or allow only limited operation during playback. When this occurs, the symbol appears on the TV screen, indicating that the operation is not permitted by the DVD+VCR or is not available on the disc. TITLE CHAPT TRACK ALL On-Screen Display A The general playback status can be displayed on the TV screen.
Before Operation - DVD Part (Continued) Picture You can set your own Personal Preferences on the DVD+VCR. TV Aspect 4:3 Letterbox: Select when a standard 4:3 TV is connected. Displays theatrical images with masking bars above and below the picture. 4:3 Panscan: Select when a standard 4:3 TV is connected. Displays pictures cropped to fill your TV screen. Both sides of the picture are cut off. 16:9 Wide: Select when a 16:9 wide TV is connected. General Operation 1 2 Press SETUP. The setup menu appears.
Before Operation - DVD Part (Continued) Sound Dynamic Range Control (DRC) Digital Audio Output With the DVD format, you can hear a program’s soundtrack in the most accurate and realistic presentation possible, thanks to digital audio technology. However, you may wish to compress the dynamic range of the audio output (the difference between the loudest sounds and the quietest ones). Then, you may listen to a movie at a lower volume without losing clarity of sound. Set DRC to On for this effect.
Before Operation - DVD Part (Continued) Parental Control Area Code Rating Enter the code of a country/area whose standards were used to rate the DVD video disc, referring to the list (See “Country/Area Code List”, page 43.). Movies on DVDs may contain scenes not suitable for children. Therefore, discs may contain Parental Control information that applies to the complete disc or to certain scenes on the disc.
Operation with tape Normal Playback Search Preparation: This function lets you quickly and visually search for a desired tape section in either direction: forward and reverse. z z z z Turn on the TV. Tune the TV to the DVD+VCR output channel (CH 3 or 4) or set the TV’s source selector to VIDEO. If a direct VIDEO/AUDIO connection is made between the DVD+VCR and the TV, set the TV’s source selector to VIDEO. Set the Output Source to VCR as shown in Setting the Output Source on page 6.
VISS (VHS Index Search System) Normal Recording The VHS INDEX SEARCH SYSTEM enables you to locate the beginning of any recording made on this VCR. Whenever a recording begins, an invisible INDEX mark is recorded on the tape. Preparation: z z z VISS Scan VISS SCAN lets you search out each VISS mark on the recorded tape and play 5 seconds before advancing to the next VISS mark. a cassette tape that has VISS signals 1 Insert marked. the VISS button once during PLAYBACK 2 Press or STOP mode.
Operation with tape (Continued) Timer Recording 10 This DVD+VCR can be programmed to record up to 8 programs within a period of 1 year. For unattended recording, the timer needs to know the channels to be recorded and the starting and ending times. Things to know before starting z z If you try to set the program timer before setting the clock, PLEASE SET THE CLOCK appears for a moment and then CLOCK menu appears on the TV screen. Set the time and date before proceeding.
Operation with tape (Continued) Programming can be checked whenever the DVD+VCR is turned on. 1 Press VCR MENU and the MAIN menu will appear. 2 Use v/V to choose the PROGRAM menu. Press ENTER and the PROGRAM menu will appear. the desired recording speed (SP or SLP) by 3 Set pressing SP/SLP. The tape speed will appear on the TV screen. 4 Press REC/OTR twice. REC/OTR repeatedly to select the 5 Press recording time length.
Operation with tape (Continued) Dubbing and Editing Copying from DVD to VCR If you wish to edit or dub your camcorder (or another VCR) recordings to this DVD+VCR, the rear (or Front) panel mounted Audio and Video (A/V) input jacks make the connections quick and easy. These direct A/V jacks will also provide better picture results than using the RF jack on the rear panel. This unit allows you to copy the contents of a DVD to a VHS tape.
Operation with tape (Continued) MTS (Multi-Channel TV Sound) This DVD+VCR is equipped with the VHS Hi-Fi audio sound system for recording and playback. The information below gives a brief description of Hi-Fi audio and how to record and play a tape in the Hi-Fi audio mode. This DVD+VCR will decode MTS stereo and bilingual (SAP) off-the-air broadcast sound signals.
Operation with tape (Continued) Tape Counter Memory Feature Additional Information Real-Time Counter z In manual recording, Timer recording, One-touch Timer Recording, playback, or fast forward modes, the DVD+VCR automatically starts rewinding the tape at the end of the tape. The cassette will stop at the beginning of the tape and be ejected, and the DVD+VCR will turn itself off. z After you have finished using the DVD+VCR, rewind, eject, and remove the cassette.
Operation with DVD and Video CD Playback Setup z z z DVD VCD2.0 General Features VCD1.1 Turn on the TV and select the video input source connected to the DVD+VCR. Audio system: Turn on the audio system and select the input source connected to the DVD+VCR. Set the Output Source to DVD as shown in Setting the Output Source on page 6. 1 your chosen disc in the tray, with the label 2 Load facing up. When a double-sided DVD is inserted, make sure Press OPEN/CLOSE to open the disc tray.
Operation with DVD and Video CD (Continued) General Features (continued) Still Picture and Frame-by-frame playback DVD VCD2.0 VCD1.1 1 Press PAUSE/STEP during playback. The DVD+VCR will now go into PAUSE mode. 2 With a DVD, you can advance the picture frame by frame by pressing PAUSE/STEP repeatedly on the remote control. 3 To return to playback, press PLAY. Time Search DVD 0:16:57 -:--:-- The Time Search function allows you to start playing at any chosen time on the disc.
Operation with DVD and Video CD (Continued) CHAPT DVD TITLE VCD2.0 TRACK Zoom VCD1.1 ALL If you press ZOOM repeatedly, the magnification level increases up to six steps. The Repeat Chapter icon appears on the TV screen. 2 Use b/B/v/V buttons to move through the zoomed picture. The Repeat Title icon appears on the TV screen. 3 To exit Repeat mode, press REPEAT a third time. 3 Press CLEAR to resume normal playback or return to the paused image. The Repeat Off icon appears on the TV screen.
Operation with DVD and Video CD (Continued) Special DVD Features Subtitles DVDs may contain menus that allow you to access special features. To use the disc menu, press MENU. Then, press the appropriate number button to select an option. Or, use b/B/v/V buttons to highlight your selection, then press ENTER. If DVD 1 Press TOP MENU. If the current title has a menu, the menu will appear on the screen. Otherwise, the disc menu may appear.
Operation with Audio CD Playing an Audio CD 1 Press and hold REW or FWD for about two seconds during playback. Insert a disc and close the tray. The menu appears on the TV screen. CD The player will now go into SEARCH mode. M M mM m m 2 Press REW or FWD repeatedly to select the required speed: X2, X4, X8 (backward) or X2, X4, X8 (forward). 3 Search speed and direction are indicated on the menu screen.
Operation with MP3 Disc Playing an MP3 disc MP3 z The DVD Player can play MP3 formatted recordings on CD-ROM, CD-R or CD-RW discs. Before playing MP3 recordings, read the notes on MP3 Recordings on right. 1 z Insert a disc and close the tray. The MP3/JPEG/WMA choice menu appears on the TV screen. z z WMA Press v/V to select the MP3 then press ENTER. 2 The MP3 menu appears on the TV screen. z Program TRACK 2.MP3 TRACK 3.MP3 TRACK 4.MP3 1. 2. 3. 4. TRACK 5.MP3 TRACK 6.MP3 TRACK 7.
Operation with JPEG Disc . > Moving to another File JPEG z This DVD Player can play discs with JPEG files on it. Make sure the resolution of the JPEG files is less than 2 mega pixels (2M). Press SKIP ( ) or SKIP ( ) once during viewing to advance to the next file or to the previous file. Repeat All/Off z z z Notes Depending upon the size and number of the JPEG files, it could take a long time for the DVD player to read the disc’s contents.
Operation with WMA Disc Playing an WMA disc WMA The DVD Player can play WMA formatted recordings on CD-ROM, CD-R or CD-RW discs. z 1 z Insert a disc and close the tray. The MP3/JPEG/WMA choice menu appears on the TV screen. WMA v/V to select the WMA then press ENTER. 2 Press The WMA menu appears on the TV screen. Program TRACK 1.WMA TRACK 2.WMA TRACK 3.WMA TRACK 4.WMA TRACK 5.WMA TRACK 6.WMA TRACK 7.WMA 56:35 Clear All 1 OFF WMA menu v/V to select a track then press PLAY.
CD MP3 JPEG WMA VCD2.0 VCD1.1 Programmed Playback with Audio CD, MP3, JPEG or WMA Disc CD MP3 JPEG WMA Programmed Playback with Video CD VCD2.0 VCD1.1 Program allows you to store your favorite tracks/files (or files) for a particular disc in the player memory. Program can contain 32 tracks (Audio CD/Video CD) or 60 tracks (MP3/JPEG/WMA disc). Note On a Video CD with PBC, you must set PBC to Off on the setup menu to use the Program function. See page 20. 1 2 Insert a disc and close the tray.
Programmed Playback (Continued) Repeat Programmed Tracks/All/Off CD MP3 WMA 1 To repeat the track currently playing, press REPEAT. The Repeat Track icon appears on the menu screen. 2 To repeat all tracks on the program list, press REPEAT two times. The Repeat All icon appears on the menu screen. 3 To cancel Repeat mode, press REPEAT repeatedly until the Repeat Off icon appears on the menu screen. .
Additional Information - DVD Part Press INSTANT REPLAY during playback and the disc will reverse picture search through 10 seconds of playback. And then the playback will start from the point again. Screen Saver A screen saver image appears when you leave the DVD Player in stop mode for about five minutes. Video Mode Setting DVD VCD2.0 VCD1.1 z With certain discs, the playback picture may be flickering or Dot Crawl is shown on straight lines.
Troubleshooting Check the following guide for the possible cause of a problem before contacting service. Cause Symptom Correction No power. z The power cord is disconnected. z Plug the power cord into the wall outlet securely. The power is on, but the DVD+VCR does not work. z No disc is inserted. No tape is inserted. z Insert a disc or tape. (Check that the disc or tape indicator in the display window is lit.) No picture. z The TV is not set to receive DVD+VCR signal output.
Troubleshooting (Continued) Cause Correction Some channels are skipped over when using CH/TRK (+/-) z Those channels were deleted with the CH. ADD/DEL option. z Use CH. ADD/DEL. to restore channels. See “Channel Selection” on page 16. Picture and sound of broadcasting channel are weak or missing. z Antenna or cables are loose. z Tighten connections or replace cable. z Wrong TUNING BAND option is being used. z Try all TUNING BAND options. See “Channel Selection” on page 16 for details.
Language Code List Enter the appropriate code number for the initial settings “Disc Audio”, “Disc Subtitle” and/or “Disc Menu” (See page 19).
Country/Area Code List Code AD AE AF AG AI AL AM AN AO AQ AR AS AT AU AW AZ BA BB BD BE BF BG BH BI BJ BM BN BO BR BS BT BV BW BY BZ CA CC CF CG CH CI CK CL CM CN CO CR CS CU CV CX CY CZ DE DJ DK DM DO DZ EC EE EG EH Country/Area Andorra United Arab Emirates Afghanistan Antigua and Barbuda Anguilla Albania Armenia Netherlands Antilles Angola Antarctica Argentina American Samoa Austria Australia Aruba Azerbaidjan Bosnia-Herzegovina Barbados Bangladesh Belgium Burkina Faso Bulgaria Bahrain Burundi Benin Ber
Specifications General Power requirements Power consumption Dimensions (approx.) Mass (approx.) Operating temperature Operating humidity Signal system AC 120V , 60 Hz 23W 430 X 97.5 X 293 mm (16.9 x 3.9 x 11.5 inches) (w x h x d) 4.8 kg (10.58 lbs) 5˚C to 40˚C (41˚F to 104˚F) 5 % to 90 % NTSC Inputs ANTENNA IN VHS VIDEO IN (LINE1, 2) VHS AUDIO IN (LINE1, 2) Antenna or CATV input, 75 ohms 1 Vp-p 75 ohms, sync negative, RCA jack x 2 -6.
LIMITED WARRANTY DVD VIDEO PLAYER Limited Ninety (90) Day Warranty TACP/THI warrant this product against defects in materials or workmanship for a period of ninety (90) days after the date of original retail purchase. During this period, TACP/ THI will repair or replace a defective product or part, at their option, with a new or refurbished product or part without charge to you. You must deliver the entire product to a TACP/THI Authorized Service Station.
LIMITED WARRANTY DVD VIDEO PLAYER (Continued) How to Obtain Warranty Service (1) Refer to the troubleshooting guide in your owner’s manual. This check list may solve your problem. (2) In the U.S.A., only call the TACP toll free number 800-631-3811, or if in Hawaii or Canada see listing below within (30) days after you find a defective product or part. (3) Arrange for the delivery of the product to the TACP/THI/TCL Authorized Service Station or TACP Return Center.
PRODUCT SAFETY SERVICING GUIDELINES FOR VIDEO PRODUCTS CAUTION : DO NOT ATTEMPT TO MODIFY THIS PRODUCT IN ANY WAY, NEVER PERFORM CUSTOMIZED INSTALLATIONS WITHOUT MANUFACTURER’S APPROVAL. UNAUTHORIZED MODIFICATIONS WILL NOT ONLY VOID THE WARRANTY, BUT MAY LEAD TO YOUR BEING LIABLE FOR ANY RESULTING PROPERTY DAMAGE OR USER INJURY. SERVICE WORK SHOULD BE PERFORMED ONLY AFTER YOU ARE THOROUGHLY FAMILIAR WITH ALL OF THE FOLLOWING SAFETY CHECKS AND SERVICING GUIDELINES.
SERVICING PRECAUTIONS CAUTION : Before servicing the VCR+DVD covered by this service data and its supplements and addends, read and follow the SAFETY PRECAUTIONS. NOTE : if unforeseen circumstances create conflict between the following servicing precautions and any of the safety precautions in this publications, always follow the safety precautions. Remembers Safety First: General Servicing Precautions 1.