
Installation Guide
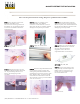

STEP 1: Turn off power and remove
the lamps and ballast cover.
Disconnect the incoming power from
the ballast, trim the tombstone wires,
and remove the ballast if desired or
required by law.
STEP 3: Place the RetroStrip magnetic
driver into the fixture, and ground driver.
Where required, driver and boards should
be permanently affixed to the fixture with
self-tapping screws provided.
STEP 4: Connect the new driver to
the incoming power.
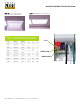
STEP 7: Magnets are built-in for easy
installation. Magnets holders also slide
out. To permanently adhere to the
fixture, use self-tapping screws
provided.
STEP 8: Place the magnetized LED boards
into the fixture evenly and align with
existing lamp sockets/tombstones. Use
self-tapping screws where required. LED
bars “Plug and Play” connection whips
should face the same direction that the
driver harness is coming out of the ballast
cover for connection.
STEP 5: Apply the retrofit sticker.
STEP 6: Select your color temperature
on the magnetized switch on harness.
See color kelvin temperature
suggestion chart in kit. Place
magnetized switch into the fixture.
STEP 2: Select your wattage on the
driver DIP switch. See detailed
instruction on back of sheet on how to
select and change your wattage. Default
wattage is set as per kit part number.
*Please read safety instructions before starting. Always have a qualified electrician install kits.
(856) 444-0662 • howard@totalleds.com • www.totalleds.com
OPTIONS: 35K, 40K, 50K
STEP 9: Connect wire harness to the
“Plug and Play” boards. Replace the
ballast cover and connect the wire
harness so it is accessible through
the end of ballast cover.
*Two bar fixture
*Two bar fixture
MAGNETIC RETROFIT KIT INSTALLATION