
Dual Flush Toilet Installation Manual


5
ENGLISH
Lock
Unlock
Gasket
Tank Wall
Mounting
Nut
Flanged
Supply Line
Coupling
Nut
Flat
Washer
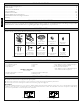
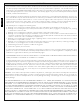
FILL VALVE INSTRUCTIONS
Gasket
Tank Wall
Mounting
Nut
Cone
Seal
Flat Washer
Coupling
Nut
Copper Tube
1) Shut off the water supply. Flush the toilet and remove any remaining water
from the tank. Reverse the tank installation instructions to remove it from the
bowl. Remove the old fill valve.
2) Install new fill valve by sliding the threaded portion of the shaft through the
hole in the bottom of tank.
3) Thread mounting nut onto exposed shaft under the tank and tighten nut.
WARNING! Do not over-tighten.
4) Connect the water supply (see Ill. 1 or Ill. 2). Pipe dope is not recommended.
Attach the refill tube to the valve and clip the other end to the overflow pipe.
Ill. 2
Ill. 3
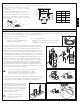
Replacement Installation
Water Level Adjustment
1) Remove the tamper proof key (see Ill. 3) and turn the upper half of the valve
counter-clockwise to unlock it (see Ill. 4). Pull up the valve and set it to the
desired water level, then turn it clockwise until the valve snaps into the locked
position.
2) Turn on the water supply.
N OTE: The tamper proof key is optional and may be used to prevent further
adjustment.
Ill. 1
Ill. 4
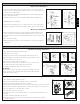
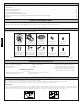
Fill Valve Servicing Instructions
1) Turn off the water supply, then flush the toilet.
2) Snap off the cover (see Ill. 1).
3) Gently press the float arms inward and remove the float (see Ill. 2).
4) While holding the valve with one hand, twist the cap 1/8 turn counter-
clockwise and remove it (see Ill. 3).
5) Lift out the center tube as shown (see Ill. 4).
6) Remove the strainer from the center tube as shown (see Ill. 5). Clean
the strainer and cap by rinsing them off under a faucet.
7) Carefully reassemble the valve in the reverse order.
IMPORTANT:
Note the position of the cap when it’s properly assembled to the body.
The ribs on the cap are in line with the float chamber and the refill port
is aligned as shown (see Ill. 6).
Ill. 1 Ill. 2 Ill. 3
RIBS IN LINE
WITH FLOAT
CHAMBER
RIBS
REFILL PORT
FLOAT
CHAMBER
Ill. 6
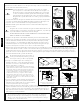
1) Turn off water supply and flush the toilet.
2) Remove the tank lid and place it upside down on a clean surface.
3) Note the orientation of the flush valve for reassembly.
4) Turn the upper half of flush valve counter-clockwise and pull it up to remove it (see Ill. 1).
5) Remove the clear rubber seal gasket and rinse under running water to clean (see Ill. 2).
6) Place the gasket back on the flush valve (see Ill. 3).
7) Install the flush valve back on the base.
8) Rotate the flush valve so that the white button is on the left and the blue button is on
the right.
9) Carefully, install the tank lid back on the tank.
10) Flush the toilet several times using each push button to verify proper operation.
Check for leakage.
Flush Valve Servicing Instructions
Ill. 2
Ill. 3
FILL VALVE / FLUSH VALVE SERVICING INSTRUCTIONS
Ill. 1
Ill. 4
Ill. 5