
Owner's Manual
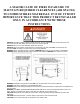
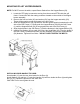

MOUNTING PELLET HOPPER/BURNER:
NOTE: DO NOT remove the white, square Burner Gasket from the Hopper/Burner (56).
1. Locate the RTD plug-in connector coming from the mounted RTD inside the grill
frame. Connect this with the mating connector located on the outside of the hopper
burner assembly.
2. Remove the four hex bolts (62) and washer (63) from the hopper assembly (56).
These will be used to mount the hopper to the grill Frame.
3. Slide the Hopper/Burner (56) square tube into the square opening located on the left
side of the Grill Frame (1). Gently push the Hopper/Burner (56) into the Grill Frame
(1) until the Hopper/Burner (56) is snug against the end of the Grill Frame (1).
4. Align the bolt holes in the Grill Frame (1) with the Nutzerts in the Hopper/Burner (56).
5. Install a Flat Washer (63) on each of the four Hex Head Bolts (62). From the inside of
the Grill Frame (1) install these Bolts (62) with Washers (63) into the Hopper/Burner
(56) Nutzerts. Tighten all four Bolts – DO NOT OVER TIGHTEN THE BOLTS.
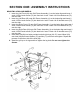
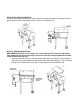
INSTALLING DOOR HANDLE TO DOOR:
Insert handle (13) onto the two slots located in the Door (9).
Install Washer (16) and Nut (17) onto the Handle (13) bolt from inside the Door (9) and tighten
the nut (17). Repeat the process on the other side.
CAUTION: Do not over tighten the nuts.