
user manual

III. CARE & MAINTENANCE:
WARNING: Disconnect electrical power supply before cleaning any parts of
of the unit.
a. CLEANING THE EXTERIOR & INTERIOR:
Exterior stainless steel should be cleaned with warm water, mild soap and a soft cloth. Apply
with a dampened cloth and wipe in the direction of the metal grain. Avoid the use of strong
detergents and gritty abrasive cleaners as they may tend to mar and scratch the surface.
Do Not use cleansers containing chlorine, this may promote corrosion of the stainless steel.
For stubborn odor spills, use baking soda and water (1 TBSP baking soda to 1 pint water ratio).
For cleaning stainless steel interiors the use of baking soda as described above is recom-
mended. Use on breaker strips as well as door gaskets. All interior fittings are removable
without tools to facilitate cleaning.
b. CLEANING THE CONDENSER:
The self-contained condensing unit requires regularly scheduled cleaning to keep the finned
condenser clean of lint and dust accumulation.
To clean the self-contained condenser, first disconnect electrical power, then access the coil:
TBC5 & TBC13: Remove the front louver panel at bottom.
TBC1H/TBC1HR: Remove the louver assembly on the top/front of the cabinet.
Vacuum or brush any dirt, lint or dust from the finned condenser coil, the compressor and
other cooking system parts. If significant dirt is clogging the condenser fins, use compressed
air to blow this clear.
IV. CHANGING THE PRINTER PAPER:
Printer paper is available from Traulsen or your local Hobart Service office. It’s also avail-
able at most office supply outlets.
Traulsen Part Number: 400-60003-00
Office Depot Item Number: 302-224
Staples Item Number: PMF-5233
The label printer uses a special peel-off label stock:
Traulsen Part Number: 400-60004-00 (225 labels per roll)
To reload the paper, begin by opening the cover to access the printer(s). Remove the empty
paper roll and place a new roll on spindle. Position the paper such that the paper feeds
from the back of the roll. This allows the thermal sensitive side of the paper to be on the
upper surface as it feeds through the printer. The ends of the spindle are installed in the
roll holders on each side of the paper cradle.
Gently pull the feed roller tension arm slightly forward. It is located on the top of the printer
and will open about 90 degrees.
Feed paper down into the loading slot directly behind the fed roller tension arm.
Return the feed roller tension arm to its original position. If this is not closed the printer will
not operate. Labels are loaded in the same manner. NOTE: After turning the chiller on
the label printer will automatically orient the next label for printing.
I. INSTALLATION CHECKLIST:
Remove the crate and wooden pallet using a 3/4” socket wrench. Do not lay
the unit on its front, side or back.
Install in a level location away from extreme heat or cold. Allow adequate
clearance for proper airflow.
Install legs or casters (TBC5 & TBC13), or seal to floor (TBC1H). The caster
bolts require a 1/2” socket wrench.
WARNING: The cabinet must be blocked and stable before installing
legs or casters.
Remove the plastic ties used to secure the interior slides on models TBC5
and TBC13 during shipping.
Select a dedicated electrical outlet of the proper amperage.
NOTE: Do not cut or remove the grounding prong from the plug or use an
extension cord.
* TBC5 includes a NEMA 5-15P cord set.
* TBC13 includes a NEMA L-14-20P cord set.
* TBC1H & TBC1HR must be hardwired.
Insure there are no obstructions blocking the louver panel. This will allow
for sufficient air flow and maintenance access.
NOTE: Model TBC13 requires 6” clearance on the left and right sides.
Insure that a floor drain or optional condensate evaporator is provided for
models TBC13 and TBC1H.
TBC1H/TBC1HR require a remote condensing unit capable of providing
18,700 BTU/hr @ -10
0
F evaporator temp in a 90
0
F environment.
NOTE: Proper line sizing should be determined by a qualified refrigeration
technician.
Install ramp on model TBC1H/TBC1HR after sealing to the floor.
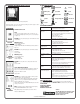
II. PAN & APPROX. CHILL CAPACITY:
Model 18”x26”
Pan
12”x20”
Pan
Product
Weight
TBC5 5 10 100
TBC13 13 26 200
TBC1H 1 Rack 1 Rack 300
NOTE: Actual weight of product that can be safely chilled within FDA
guidelines varies greatly depending upon product density and pan.
Instructions for the installation, use & care of:
TBC Series Blast Chillers
TBC5 Undercounter Model
TBC13 Reach-In Model
TBC1H/TBC1HR Roll-In Model
Quality Refrigeration
OWNER’S MANUAL
TR35941 P/N 375-60311-00 (rev. 3-13)