
user manual
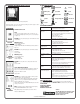

VI. GLOSSARY OF ICONS:
VII. TROUBLESHOOTING:
No display on control. a. Check power supply and circuit breaker.
b. System problem. Call for service.
Cycle time longer than
expected.
a. Check if door is closed.
b. Excessive volume or depth of product loaded.
c. Pan covered with a lid, plastic wrap or foil that is not in
direct contact with the product.
d. Dirty condenser coil.
e. Product is of a high density.
f. Evaporator coil iced and defrost needed.
Auto start does not work. a. Probe n/a. Press DONE to release probe for use.
b. Probe not placed in product.
c. Food probe placed in product below 100
0
F.
d. Damaged or defective probe.
Chill cycle starts with no
product present.
a. Probes started automatically due to their temp rising to
100
0
F or more.
Unwanted product
freezing.
a. DONE product not removed and new chill cycle started.
Remove product when Done.
b. Chill cycle By Time set for too long.
c. High water content food. Use DELICATE method.
Food drying out during
chilling.
a. Food chilled uncovered.
Printer not printing. a. Printer is out of paper.
b. Printer paper may be installed incorrectly. Verify that the
thermal sensitive side of the paper.
c. Feed door open.
d. Paper does not feed or jams behind the paper feed slot in
the cover. Remove paper, reinstall correctly.
Condensation on exterior
surface.
a. Check door alignment and gasket for proper seal.
b. Check door sweep for proper adjustment (roll-ins).
c. Electric door heater malfunction. Call for service.
Product temp appears
cooler than expected.
a. Product temperatures within batches often vary. Verify
product temperature using a thermometer.
b. Probe placed incorrectly. Relocate probe.
c. Product has very small mass (ex. chicken tender) use chill
by time.
d. Product held at room temperature too long prior to being
placed in chiller. Verify actual product temp.
VIII. SERVICE & PARTS:
Please visit our website @ traulsen.com for additional service and parts information.
From our home page click on the SERVICE & PARTS tab, and select one of the following:
SERVICE FINDER
SERVICE PARTS MANUALS
OPERATOR MANUALS
WARRANTY REGISTRATION
IV. CHANGING THE PRINTER PAPER:(continued)
Press the red feed button to feed paper through the printer.
Replace the printer cover or close the printer door, taking care that the paper or label is
passed through the paper slot on it’s front.
V. OPERATION:
Quality Refrigeration
© 2013 Traulsen - All Rights Reserved
Traulsen
4401 Blue Mound Road Fort Worth, TX 76106
Phone: (800) 825-8220 or (817) 625-9671
Parts Fax: (817) 817-740-6748
Website: traulsen.com
Chill By Temp
Chill By Time
Chill By Product
Product
Toolbox
Standard Chill
Speed Chill
Delicate Chill
Energy Saving Chill
User
Defrost
Probe
Time Zone
Print Record
Print Label
STARTING A CHILL CYCLE
AUTO:
1) Place probe in product (must be above 90 degrees F). The
chiller will automatically begin a chill cycle in 30-seconds (target
37 degrees F).
OPTIONAL: Press any active probe(s) to enter the PRODUCT and/
or USER names.
MANUAL (by temp):
1) Place probe(s) in product.
2) Select MANUAL.
3) Adjust target TEMP and CHILL METHOD (if desired, default 37
degrees F).
OPTIONAL: Press any active probe(s) to enter PRODUCT and/or
USER names.
4) Press START.
MANUAL (by time):
1) Load product in chiller.
2) Select MANUAL.
3) Adjust target TIME.
OPTIONAL: Press any time zone to enter product and or user
names.
4) Press START.
CYCLE COMPLETION & PRINTING
Upon any probe reaching the target temperature the chiller will
beep for 20-seconds and the button beneath this probe will
change from CANCEL to DONE.
1)Press DONE.
OPTIONAL: Press PRODUCT and/or USER to enter the product
and/or user names, if not done previously.
2)Press RECORD and/or LABEL (if equipped with optional label
printer) to receive a cycle data printout and/or adhesive label.
Repeat for additional copies if needed.
3)Press DONE to return to the RUN (if additional probes are active
or done) or IDLE screens.
NOTE: Cycle data can also be downloaded via the USB port by
selecting DATA MANAGEMENT in the TOOLBOX.
Many default settings can be adjusted, see full size owner’s
manual for additional details.
IDLE MODE
STARTING A CHILL
CYCLE
THE RUN SCREEN
DATA
MANAGEMENT