EN-1 Digital camera What your 3 year warranty means Great care has gone into the manufacture of this product and it should therefore provide you with years of good service when used properly. In the event of product failure within its intended use over the course of the first 3 years after the date of purchase, we will remedy the problem as quickly as possible once it has been brought to our attention.
EN-2 READ THIS FIRST Trademark Information Microsoft® and Windows® are U.S. registered trademarks of Microsoft Corporation. Pentium® is a registered trademark of Intel Corporation. Macintosh is a trademark of Apple Computer, Inc. SDTM is a trademark. Photo Explorer and Photo Express are trademarks. Other names and products may be trademarks or registered trademarks of their respective owners. Product Information Product design and specifications are subject to change without notice.
EN-3 SAFETY INSTRUCTIONS Read and understand all Warnings and Cautions before using this product. Warnings If foreign objects or water have entered the camera, turn the power OFF and remove the batteries. Continued use in this state might cause fire or electric shock. Consult the store of purchase. If the camera has fallen or its case has been damaged, turn the power OFF and remove the batteries. Continued use in this state might cause fire or electric shock.
EN-4 Cautions Insert the batteries paying careful attention to the polarity (+ or –) of the terminals. Inserting the batteries with its polarities inverted might cause fire and injury, or damage to the surrounding areas due to the battery rupturing or leaking. Do not fire the flash close to anyone’s eyes. This might cause damage to the person ’ s eyesight. Do not subject the LCD monitor to impact. This might damage the glass on the screen or cause the internal fluid to leak.
EN-5 Notes on Battery Usage When you use the battery, carefully read and strictly observe the Safety Instructions and the notes described below: Different battery types and surrounding temperatures may affect the battery performance. Avoid using batteries in extremely cold environments as low temperatures can shorten the battery life and reduce camera performance. The battery may feel warm when using the camera for an extended period of time or using the flash continuously.
EN-6 CONTENT INTRODUCTION ................................... 7 VIDEO MODE....................................... 30 Package Contents............................... 8 Recording Video Clips ........................ 30 Playing Back Video Clips ................... 30 GETTING TO KNOW YOUR CAMERA.... 9 Front View.......................................... 9 Rear View........................................... 10 LCD Monitor Information....................... 11 PREPARING YOUR CAMERA...............
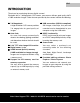
EN-7 INTRODUCTION Thank you for purchasing the new digital camera! Equipped with a 7.0 Megapixels CCD sensor, your camera delivers good quality, 3072 x 2304 resolution images. Other features provided by the camera include the following: 7.0 Megapixels USB connection (USB 2.0 compliant) A high-resolution CCD sensor provides Still images, video clips, that you have 7.0 megapixels for good quality of recorded can be downloaded to your images. Auto flash computer using the USB cable.
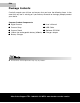
EN-8 Package Contents Carefully unpack your kit box and ensure that you have the following items. In the event that any item is missing or if you find any mismatch or damage, promptly contact your dealer. Common Product Components: Digital Camera User’s Manual Camera Strap USB Cable Camera Pouch Lithium ion rechargeable battery (650mA) Battery Charger Software CD-ROM Charger adapter Accessories and components may vary by retailer. After Sales Support TEL: 1800 623 432 WEB: www.
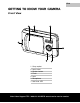
EN-9 GETTING TO KNOW YOUR CAMERA Front View 2 3 4 1 5 7 6 1. Strap eyelet 2. Lens cover 3. Shutter button 4. Flash 5. Lens 6. Microphone 7. Self-timer LED After Sales Support TEL: 1800 623 432 WEB: www.traveler-service.
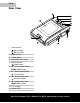
EN-10 Rear View 11 9 8 10 7 6 5 K O 4 1 2 3 1. Focus switch Macro mode Normal mode 2. USB terminal 3. Tripod socket 4. Battery/SD card cover 5. OK OK button Zoom button 6. Arrow button (Down) MODE Mode button 7. Arrow button (Right) 8. Arrow button (Left) Flash button Self-timer button 9. Arrow button (Up) MENU Menu button 10. LCD monitor 11. Status LED After Sales Support TEL: 1800 623 432 WEB: www.traveler-service.
EN-11 LCD Monitor Information Camera Mode 1. Internal memory/SD memory card indicator [ INT ] Status of internal memory [ ] Status of SD memory card 2. Remaining battery status ] Full battery power [ [ ] Medium battery power ] Low battery power [ [ ] No battery power 3. Flash mode [Blank] Auto [ ] Red-eye Reduction [ ] Forced Flash ] Flash Off [ 4. Focus area 5. Image size [ ] 3072 x 2304 [ ] 2560 x 1920 [ ] 1600 x 1200 [ ] 640 x 480 6. Possible number of shots 7.
EN-12 Video Mode 1. 2. 3. 4. 5. Video mode Recordable movie time available SD memory card indicator (if present) Battery power indicator Focus area 3 2 00:00:33 1 4 5 Image Playback 1. 2. 3. 4. Playback mode SD memory card indicator (if present) Battery power indicator Playback information 2 1 3 100-0001 4 Size EV. 2007.01.01 2560 x 1920 0.3 00:00 0001 Video Playback 1. 2. 3. 4. 5. 6. 7.
EN-13 PREPARING YOUR CAMERA Installing the Battery We highly recommend you to use the specified rechargeable lithium-ion battery to realize the full capability of your digital still camera. Make sure that the power of the digital still camera is off before inserting or removing the battery. 1. Make sure your camera is off. 2. Slide the battery / SD card cover lock. 3. Insert the battery in the correct orientation shown.
EN-14 Loading an SD Memory Card Your camera comes with 16 MB of internal memory (14 MB available for image storage), allowing you to store images and video clips in the camera. However, you can also expand the memory capacity by using the SD memory card. SD memory card provide removable, reusable storage for images and video clips. 1. Make sure your camera is off. 2. Slide the SD card/battery cover lock. 3. Insert the SD memory card. If the card cannot be inserted, check the orientation. 4.
EN-15 Attaching the Camera Strap To prevent accidental slippage during the use, always use the camera strap. Attach the camera strap as follows: 1. Thread the small loop of the strap through the strap eyelet on the camera. 2. Pull the large loop through the small loop until the strap is firmly secured.
EN-16 GETTING STARTED Turning the Power On/Off Load the batteries and insert an SD memory card before starting. J J To turn the camera open until it clicks, To turn the camera closed until it clicks, on, slide the lens cover uncovering the lens. off, slide the lens cover covering the lens. ON J OFF The power is turned off automatically when the camera has not been operated for a fixed period time. To resume the operation condition, turn the power on again.
EN-17 Choosing the Screen Language Follow the steps below to choose the desired language. 1. Slide the lens cover open until it clicks to turn on the camera. The camera mode (default preview) is displayed. 2. Press the / MENU button to enter [Setup] in any mode. 3. Select [Language] with the / buttons, then press the OK button. The Language setting screen will be displayed. 4. Select the displayed language with the / buttons, then press the OK button. The setting will be stored. 5.
EN-18 Formatting an SD Memory Card or Internal Memory The term “Formatting” means preparing an “SD Memory Card” to record images; this process is also called “initialization ” . This utility formats the internal memory (or memory card) and erases all stored images and data. 1. Slide the lens cover open until it clicks to turn on the camera. The camera mode (default preview) is displayed. 2. Press the / MENU button to enter [Setup] in any mode. 3.
EN-19 PHOTOGRAPHY MODE Shooting Images - The Basics 1. Slide the lens cover open until it clicks to turn on the camera. The camera mode (default preview) is displayed. 2. Compose the image on the monitor screen so that the main subject is within the focus frame. 3. Press the shutter button to capture the image. A 0.3 01/01/2007 00:00 The actual captured image appears to be larger than the one on LCD after image captured.
EN-20 Possible Number of Recordable Images The frame counter indicates the approximate number of images that can be stored on the SD memory card. The number of recordable images may vary depending on the recorded subject, the capacity of the memory card, there are files other than images or when the recording is made while switching the picture quality or resolution.
EN-21 Using the Zoom Function This camera is equipped with 4x digital zoom. You can enlarge the subjects by pressing continuously the OK / button. A useful feature as it is, however, the more the image is magnified, the grainer the image may become. To capture a zoomed image, perform the following steps: 1. Slide the lens cover open until it clicks to turn on the camera. The camera mode (default preview) is displayed. 2. To activate the digital zoom, press continuously the OK / button.
EN-22 Setting Focus Images can be captured by sliding the focus switch to set the focus modes: [ or [ ] macro ] normal mode. 1. Slide the lens cover open until it clicks to turn on the camera. The camera mode (default preview) is displayed. 2. Slide the focus switch to your desired focus mode. 3. Compose your scene and press the shutter button. The table below will help you choose the appropriate focus mode: Focus mode Normal Macro Description This mode is suitable for scenery and portrait shooting.
EN-23 Using the Flash The flash is designed to function automatically when lighting conditions warrant the use of flash. The camera has four flash modes:Auto Flash (default), Red Eye, Forced Flash and No Flash. You can take an image using a desired flash mode to suit your circumstances. 1. Slide the lens cover open until it clicks to turn on the camera. The camera mode (default preview) is displayed. 2. Toggle / until your desired flash mode appears on the LCD monitor. 3.
EN-24 Using the Self-Timer The self-timer can be used in situations such as group shots. When using this option, you should either mount the camera on a tripod (recommended) or rest it on a flat, level surface. 1. Secure the camera to a tripod or place it on a stable surface. 2. Slide the lens cover open until it clicks to turn on the camera. The camera mode (default preview) is displayed. 3. Toggle / until your desired self-timer mode appears on the LCD monitor. OFF 10s 2s 10+2s [ No Indication] 4.
EN-25 Adjusting the Exposure (EV Compensation) You can manually adjust the exposure determined by the digital camera. Use this mode when the proper exposure cannot be obtained, for example, when the contrast (different between light and dark) between the subject and the background is extremely large. The EV compensation value can be set in the range from –2.0EV to +2.0EV. 1. Slide the lens cover open until it clicks to turn on the camera. 2. Press the / MODE button to enter the [ ] Movie mode. 3.
EN-26 Scene Mode Selection You can select the scene mode according to the shooting scene. There are 6 available modes in this scene mode. [ A ] Auto: Select this mode to adjust point-and-shoot action. [ ] Sport: [ ] Night: [ [ [ Select this mode when you want to photograph fast-moving subjects. Select this mode when you want to capture people with an evening or night scene background.
EN-27 PLAYBACK MODE - THE BASICS Viewing Images You can display the still images you have just captured at a time. 1. Slide the lens cover open until it clicks to turn on the camera. ] 2. Press the / MODE button twice to enter [ Playback mode. The last recorded image appears on the LCD monitor. 3. Use or to select the desired images. To view the previous image, press the button. To view the next image, press the button. 4. To exit from playback mode, press the (MODE) button. 100-0001 Size EV.
EN-28 Magnifying Images While reviewing your images, you may enlarge a selected portion of an image. This magnification allows you to view fine details. The zoom factor displayed on the screen shows the current magnification ratio. T 2.0X T T 1. Slide the lens cover open until it clicks to turn on the camera. ] 2. Press the / MODE button twice to enter [ Playback mode. The last recorded image appears on the LCD monitor. To view the previous image, press the button.
EN-29 Slideshow Display The slide show function enables you to play your images back automatically in sequential order. This is very useful and entertaining feature for reviewing recorded images and for presentations. 1. Press the / MODE button twice to enter [ ] Playback mode. 2. Press the / MENU button. The playback menu is displayed. 3. Select [Slide Show] with the / buttons, then press the OK button. 4. Select / to set the playback interval, then press the OK button. The slideshow starts. 5.
EN-30 VIDEO MODE Recording Video Clips This mode allows you to record video clips with sound via built-in microphone. 1. Slide the lens cover open until it clicks to turn on the camera. 2. Press the / MODE button to enter the [ ] Movie mode. 3. Press the shutter button to start recording. 4. To stop recording, press the shutter button again. 00:00:33 When recording a video clip, the flash cannot be used. Playing Back Video Clips You can play back recorded video clips.
EN-31 PLAYBACK MODE – ADVANCED FEATURES Deleting Images/Video Clips Use this function to delete one or all images/video clips stored in the internal memory or memory card. Please note that the deleted images or video clips cannot be recovered. Exercise caution before deleting a file. Deleting at Playback Mode 1. Press the / MODE button twice to enter [ ] Playback mode. J The last image will be displayed on the screen. 2. Select the image you want to erase with the / buttons. 3. Press the / MENU button.
EN-32 Protecting Images/Video Clips Set the data to read-only to prevent images from being erased by mistake. Protecting Images 1. Press the / MODE button twice to enter [ ] Playback mode. J The last recorded image appears on the LCD monitor. 2. Select the image that you want to protect with the / buttons. 3. Press the / MENU button. J The playback menu is displayed. 4. Select [Protect] with the / buttons, then press the OK button. 5. Select [Single] or [All] with the / buttons, then press the OK button.
EN-33 Setting the DPOF DPOF (Digital Print Order Format) allows you to embed printing information on your memory card. By using DPOF, you can select an image to be printed and then specify how many prints or which image you would like. Take your memory card to a DPOF enabled printer that accepts memory cards. The DPOF/card-compatible printer will read the embedded information on the memory card and print your images as specified. 1. Press the / MODE button twice to enter [ ] Playback mode. 2.
EN-34 10.Select [Print Enable] with the / buttons, and press the OK button. 11.Select [Execute] with the / buttons, and press the OK button. J This creates a file containing the DPOF information, and when the operation is finished, the screen returns to the playback mode. J The DPOF icon [ ] is displayed on each image that have set up DPOF settings. 1 J J J 100-0001 The date that is printed on the photo is the date set on the camera.
EN-35 TRANSFERRING FILES FROM YOUR DIGITAL CAMERA TO COMPUTER After using USB cable to establish a USB connection between the camera and your computer, you can use your computer to share recorded images or video clips with your family or friends via e-mail or post them on the Web. In order to do this, you must install the USB driver onto your computer first. Note that before you begin to install the software, you need to check your system according to the table as shown below.
EN-36 Step 1: Connect the digital camera to your computer 1. Slide the lens cover open until it clicks to turn on the camera. 2. Connect one end of the USB cable to an available USB port on your computer. The USB screen appears on the screen. 3. Use / to select [PC], then press the OK button. 4. From the Windows desktop, double click on “My Computer”. 5. Look for a new “Removable disk” icon. This “Removable disk” is actually the memory card in your camera.
EN-37 EDITING SOFTWARE INSTALLATION Installing Photo Explorer Ulead® Photo Explorer provides a simple and efficient way to transfer, browse, modify and distribute digital media. Acquire photos, video or sound clips from various digital device types and easily browse or add personal descriptions; make timely modifications; or distribute the media through the medium of your choice: E-mail, Print, Slideshow Presentations.
EN-38 USING THE DIGITAL CAMERA AS A PC CAMERA Your digital camera can act as a PC camera, which allows you to videoconference with business associates, or have a real-time conversation with friends or family. To use the digital camera for videoconferencing, your computer system must include the items as below: Microphone Sound card Speakers or headphones Network or Internet connection Video conferencing (or video editing) software is not included with the digital camera.
EN-39 Step 3: Run your application software (i.e. Windows NetMeeting) To use Windows NetMeeting for videoconferencing: 1. Go to Start Æ Programs Æ Accessories Æ Communications Æ NetMeeting to launch the NetMeeting program. 2. Click the Start Video button to view live video. 3. Click the Place Call button. 4. Type the e-mail address or the network address of the computer that you are calling. 5. Click Call.
EN-40 MENU OPTIONS Camera Menu This menu is for the basic settings to be used when capturing still images. 1. Slide the lens cover open until it clicks to turn on the camera. The camera mode (default preview) is displayed. 2. Press the / MENU button. The [Capture] menu is displayed. 3. Select the desired option item with the / buttons, then press the OK button to enter its respective menu. 4. Select the desired setting with the / buttons, then press the OK button. 5.
EN-41 White Balance This sets the white balance capturing under a variety of lighting conditions and permits images to be captured that approach the conditions that are seen by the human eye. * [ Blank ] Auto * [ ] * [ * [ * [ Daylight ] Cloudy ] Tungsten ] Fluorescent ISO This sets the sensitivity for capturing images. When the sensitivity is raised (and the ISO figure is increased), photography will become possible even in dark locations, but the more pixelated (grainier) the image will appear.
EN-42 Video Menu This menu is for the basic settings to be used when recording video clips. 1. Slide the lens cover open until it clicks to turn on the camera. 2. Press the / MODE button to enter the [ ] Movie mode. 3. Press the / MENU button. J The [Video Output] menu is displayed. 4. Select the desired option item with the / buttons,then press the OK button to enter its respective menu. 5. Select the desired setting with the / buttons, then press the OK button. 6. To exit from the menu, press the button.
EN-43 Playback Menu In the [ ] mode, set which settings are to be used for playback. 1. Press the / MODE button twice to enter [ ] Playback mode. 2. Press the / MENU button. J The playback menu is displayed. 3. Select the desired option item with the / buttons, then press the OK button to enter its respective menu. 4. Select the desired setting with the / buttons, then press the OK button. 5. To exit from the menu, press the button.
EN-44 Setup Menu Set your camera ’ s operating environment. You can select according to your preference for the camera settings in Setup of Capture/Video/ Playback Menu. Navigate the options you wish to configure by using the / button. Date/Time This sets the date and the time. Refer to section in this manual titled “Setting the Date and Time” for further details Format Erases all images and reformats the SD card loaded in your camera. Protected mages are also erased.
EN-45 SPECIFICATIONS Item Image Sensor Effective pixels Image size Description CCD 7.0 Mega pixels Still image: 3072 x 2304, 2560 x 1920, 1600 x 1200, 640 x 480 Video clip: 320 x 240 Image quality Still image: Fine, Standard, Economy Movie image: Economy Recording media 16MB internal memory (14MB available for image storage) SD memory card (Up to 2GB) File format EXIF 2.2 & DCF 1.0, DPOF 1.1, Motion-JPEG, JPEG Lens F-no.: 3.2 Focal length: 7.
EN-46 TROUBLESHOOTING GUIDE Symptom The power does not turn on. The camera suddenly powers down. The image is not captured when the shutter button is pressed. The flash does not fire. Cannot transfer files over a USB connection. Possible causes Solutions / Corrective Actions * The batteries have run out. * Load new or fully charged * The batteries are not oriented batteries. correctly. * Load the batteries in the correct * The battery cover is not closed direction. properly.
EN-47 CONNECTING TO A PICTBRIDGE COMPLIANT PRINTER If a printer that supports PictBridge is available, images can be printed by connecting the digital still camera directly to the PictBridge-compatible printer without using a computer. Connecting the camera to the printer 1. Connect the USB port on the camera and the USB jack on the printer with the supplied USB cable, then turn on your camera and the printer. The screen for selecting the USB mode is displayed. 2.
EN-48 3. If you select [Select] in the previous step, the figure shown on the right hand side will appear. J Select the multi images that you want to print simultaneously with the / buttons. J Select the [Print Num.] (up to 99) with the / buttons. J After selecting the desired image and printing number, press the OK button to confirm. 4. Select [Exit] with the / buttons, and press the OK button. 5. Select [Print] with the / buttons, and press the OK button to start printing. 6.
EN-49 A. Information on Disposal for Users (private households) 1. In the European Union Attention: If you want to dispose of this equipment, please do not use the ordinary dust bin! Attention: Your product is marked with this symbol. It means that used electrical and electronic products should not be mixed with general household waste. There is a separate collection system for these products.
EN-50 After Sales Support TEL: 1800 623 432 WEB: www.traveler-service.