EN SurfTab® duo W2 OPERATING INSTRUCTIONS
Contents 1) About the SurfTab ………………………………………………………… 4 2) Safety information………………………………………………………… Operational safety…………………………………………………………… Repair……………………………………………………………………… Intended operating conditions……………………………………………… Power supply………………………………………………………………… Care and maintenance……………………………………………………… Information on the memory capacities indicated…………………………… 5 5 6 7 7 7 7 3) Technical specifications…………………………………………………… 8 4) Package contents………………………………………………………… 9 5) Controls and ports……………………………………………………
12) Downloading applications from the Windows Store…………………… 23 13) Transferring files between the SurfTab and other devices……………… 24 Transferring files via Bluetooth……………………………………………… 24 Transferring files between the SurfTab and a PC…………………………… 25 14) Connecting the SurfTab to a television………………………………… 26 Connecting to a television via HDMI cable………………………………… 26 Connecting to a television via Miracast……………………………………… 26 15) Reset …………………………………………………………………… 27 16) Switching off the SurfTab……………………………………………
We hope you enjoy your TrekStor SurfTab duo W2. Please read the following sections carefully to familiarise yourself with the functions of this product and how to operate it. IMPORTANT! Always follow the safety information in Section 2. IMPORTANT! Please keep these instructions in a safe place, and pass them on to the new owner if the device change hands. Up-to-date product information can be found on the TrekStor website: www.trekstor.de For more products and accessories, visit: www.trekstor-onlineshop.
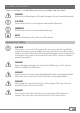
2) Safety information These instructions use the following warning symbols and key words: a r r i DANGER Indicates possible danger to life and/or danger of severe, irreversible injuries. CAUTION Follow instructions to avoid injuries and material damage. WARNING Follow instructions to avoid material damage. NOTE Further information about the use of the device.
a DANGER Do not cover the device or charger during operation or while charging. This may cause the device/charger to overheat and potentially catch fire! u CAUTION This device can generate high sound volumes. Never listen at high volumes for long periods. Doing so can result in immediate or gradual hearing damage. Remember: Permanent hearing damage may only emerge later in life. You may become used to listening to high volumes over time, making them appear normal to you.
Intended operating conditions j m e h Protect the device from extremely high or low temperatures and fluctuations in temperature. Use it at an ambient temperature between 10º C and 40º C. Do not place the device near a heat source and protect it from direct sunlight. Never expose the device to humidity, condensation or moisture. Ensure you use and store the device in a dust-free environment.
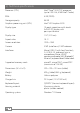
3) Technical specifications Processor (CPU): Intel® Core™ M-5Y10C processor (up to 2.00 GHz, 4 MB Intel® Cache) RAM: 4 GB (DDR3) Storage capacity: 64 GB Graphics processing unit (GPU): Intel® HD Graphics 5300 Display type: 10-point capacitive multi-touch Full-HD IPS display with pen input feature Display size: 11.6" (29.5 cm) Aspect ratio: 16 : 9 Screen resolution: 1920 x 1080 Camera: 5 MP (auto focus)/2 MP webcam Interfaces: Micro-USB 3.
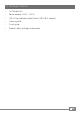
4) Package contents • SurfTab duo W2 • Power adapter (100 V – 240 V) • USB 3.
EN 10 Designed in Germany Made in China E E F G H I TrekStor GmbH, Kastanienallee 8-10 64653 Lorsch, Germany SurfTab duo W2 N M.No.
P Q R S 11 EN
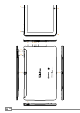
5) Controls and ports A) B) C) D) E) F) G) H) I) J) K) L) M) N) O) Front camera Windows button Status LED Microphone Speaker Audio port Micro-HDMI socket Charging socket Micro-USB socket (USB 3.
6) Starting up the SurfTab for the first time Charging the SurfTab Please fully charge your SurfTab before you use it for the first time. To charge the SurfTab, connect the SurfTab to a power socket using the power adapter. i The maximum battery life is reached after approximately ten charging cycles. Switching on the SurfTab Press the on/off switch for approximately 2-3 seconds to switch on the SurfTab. A configuration assistant will appear.
7) Using the keyboard Removing the tablet from the keyboard When shipped from the factory, the tablet is docked to the keyboard. To remove the SurfTab from the keyboard, please proceed as follows: a) Bring the tablet upwards until it is standing at a 90° angle to the keyboard. b) Holding the keyboard down with one hand, pull the tablet up and away from the keyboard. While doing this, try as far as possible not to press on the keys, but rather on one of the free areas at the keyboard edges.
Reconnecting the tablet to the keyboard To reconnect the tablet to the keyboard, please proceed as follows: a) Align the hinge fitting on the keyboard so that the tablet dock is pointing vertically upwards. b) Next, lower the tablet vertically and place the keyboard dock on the tablet dock. Push the tablet carefully until it locks. i The tablet is locked in place if it cannot be pulled vertically upwards and away from the keyboard without the use of considerable force.
Special keys and function keys for operating the SurfTab To simplify operation, the keyboard has numerous special keys and function keys for controlling the SurfTab. Fn key The Fn key is used to enable the additional function keys (blue symbols). These additional function keys include the F1 to F12 keys, the "Page Up" and "Page Down" keys, the keys for controlling display brightness (sun symbol, and "+" and "-") and the key for locking the SurfTab (padlock symbol).
Function keys in the top row of keys Mute Volume Volume + Previous track Play/Pause Next track Switch keyboard language (several languages must be installed) E-mail Search Share Devices Open Settings Open Context menu The touchpad The touchpad performs the functions of a mouse. Move the mouse pointer on the touch surface by swiping your finger across the surface in the desired direction.
8) Action Center The Action Center is a bar with quick links to some important SurfTab functions, which you can show or hide. To access the Action Center, swipe your finger from the right edge of the screen towards the centre or click/tap the memo icon in the bottom right-hand corner. i The Action Center includes, among other things, a quick link to what is known as "Tablet mode". If you tap this function, the Start menu is enlarged in the display, making fingertip operation considerably easier.
9) Accessing and using the Start menu You’re already familiar with the Start menu from your desktop PC at home. It acts as the starting point for all the important contents of your SurfTab. Below you can read some useful information about the Start menu’s basic functions.
Accessing the Start menu To display the Start menu, tap the Windows icon in the bottom left of the display or press the Windows key on the keyboard. Tapping/pressing a second time will hide the Start menu. i If you have activated tablet mode (see note in Section 8), all the pinned items from the app area of the Start menu will be magnified and distributed across the entire screen. To access the navigation list of the Start menu, tap the menu icon (three horizontal lines) in the top left of the screen.
Organising and removing apps To access edit mode for a particular live tile, place your finger on the live tile you want and keep it there until it is highlighted (the background becomes darker, the live tile stands out visually). Two edit symbols now appear at the corners of the tile. To remove the live tile from the app area of the Start menu, tap the pin symbol in the top-right corner of the highlighted tile.
11) Connecting the SurfTab to the Internet Connecting to a stationary wireless network (WiFi) a) Call up Settings (see Section 10). b) In Settings, tap "Network & Internet". c) In the next screen, tap "Wi-Fi" on the left. d) Drag the WiFi slider from "Off" to "On". The SurfTab searches for all available wireless networks nearby and then displays them as a list. e) Tap the network that you wish to connect to.
12) Downloading applications from the Windows Store The Windows Store is available in the app area of the Start menu (see Section 9). You can identify the Windows Store by its icon, a shopping bag featuring the Windows logo. The following two requirements must be met in order to access the Windows Store: 1. You must be connected to the Internet. Here, you need to follow the instructions in Section 11. 2. You must have a Microsoft account and be signed in with it.
13) Transferring files between the SurfTab and other devices Transferring files via Bluetooth a) Activate the Bluetooth function on the device you want to connect, and allow the device to become visible to other devices if necessary. To do so, refer to the operating instructions of the device to be connected. b) Go to Settings (see Section 10). c) In Settings, tap "Devices", and in the following window tap "Bluetooth" on the left.
Transferring files between the SurfTab and a PC You will need an external storage device such as a USB stick to transfer files between your SurfTab and a computer. Direct data transfer between the SurfTab and a PC via USB cable is not possible. You can choose whether to connect a USB stick directly to one of the two USB-A ports on the keyboard, or whether to use a USB host adapter cable and the Micro-USB socket on the SurfTab itself.
14) Connecting the SurfTab to a television You can transfer the image and sound from the SurfTab to a suitable television via HDMI cable or Miracast. Connecting to a television via HDMI cable To connect the SurfTab to a suitable television via HDMI, you require an appropriate cable (Micro-HDMI to HDMI, available in specialist shops). Connect the SurfTab and the television using the cable and, on the television, select the correct HDMI input as the source (the HDMI input to which the cable is connected).
15) Reset If your SurfTab "freezes" and no longer responds, you can restart it. Press and hold down the on/off switch for at least 10 seconds until the device switches off. Wait for about 20 seconds and then turn the device on normally. 16) Switching off the SurfTab a) Open the Start menu by tapping the Windows icon in the bottom left of the display or by pressing the Windows key on the keyboard. b) Tap "Power" in the bottom area of the Start menu and then tap "Shut down". The SurfTab shuts down.
17) Notes on copyright and trademarks Copyright law prohibits the copying of the content of these operating instructions (illustrations, reference documents etc.), in whole or in part, without the permission of the copyright holder. The Bluetooth word mark and logos are registered trademarks owned by Bluetooth SIG, Inc. and any use of such marks by TrekStor GmbH is under license. Other trademarks and trade names are those of their respective owners.
Recycling t s Your device and its sales packaging consist of valuable raw materials, which must be recycled in the interest of environmental protection. Contact your city or municipal authority for information on the correct method of disposal. 19) Notes on liability and warranty The manufacturer shall reserve the right to constantly further develop the product. These changes may be made without any direct reference to them in the operating instructions.
E C D E C L A R AT I O N O F C O N F O R M I T Y As manufacturer and importer respectively: TrekStor GmbH Kastanienallee 8 - 10 D-64653 Lorsch, Germany ■ ■ ■ ■ ■ ■ ■ ■ ■ ■ ■ ■ ■ ■ ■ ■ ■ ■ ■ ■ ■ ■ ■ ■ ■ ■ ■ ■ ■ ■ ■ ■ ■ ■ ■ ■ ■ ■ ■ ■ ■ ■ ■ ■ ■ ■ ■ ■ ■ ■ ■ ■ ■ ■ ■ ■ ■ ■ ■ ■ ■ ■ ■ ■ ■ ■ ■ ■ ■ ■ ■ ■ ■ ■ ■ ■ ■ ■ ■ ■ ■ ■ ■ ■ ■ ■ ■ ■ ■ ■ ■ ■ ■ ■ ■ ■ ■ ■ ■ ■ ■ ■ ■ ■ ■ ■ ■ ■ ■ ■ ■ ■ ■ ■ ■ ■ ■ ■ ■ ■ ■ ■ ■ ■ ■ ■ ■ ■ ■ ■ ■ ■ ■ ■ ■ ■ ■ ■ ■ ■ ■ ■ ■ ■ ■ ■ ■ ■ ■ ■ ■ ■ ■ ■ ■ ■ ■ ■ ■ ■ ■ ■ ■ ■ ■ ■ ■ ■ ■ ■ ■ ■ ■ ■ ■ ■ herewit
Supportinformationen Sollten Sie Fragen zu Ihrem TrekStor Produkt haben, gehen Sie bitte wie folgt vor: • Überprüfen Sie anhand der Produkteigenschaften und der Funktionen Ihres Gerätes (auf der Verpackung ersichtlich), ob Sie die richtigen Einstellungen vorgenommen haben. • Lesen Sie aufmerksam die gesamte Bedienungsanleitung. • Informieren Sie sich auf unserer Website www.trekstor.de über aktuelle Informationen zu Ihrem Produkt (z. B. neu verfügbare Firmware-Updates).