Quick Installation Guide TEW-638PAP 1.
Table of Contents English 1. Before You Start 2. Hardware Installation 3. Power-over-Ethernet Installation 1 1 2 8 Troubleshooting 10 Version 01.08.
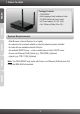
1. Before You Start Package Contents TEW-638PAP ? ? Multi-Language Quick Installation Guide ? CD-ROM (Utility and User's Guide) ? AC Power Adapter (12V DC, 0.5A) ? Cat. 5 Ethernet Cable (0.6m / 2ft.) System Requirements Web Browser: Internet Explorer (6 or higher) ? ? A computer with a network adapter or wireless adapter properly installed ? A router with an available network LAN port ? An available DHCP Server – routers usually have a built-in DHCP server ? Power over Ethernet (PoE) Switch (e.g.
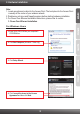
2. Hardware Installation Note: 1. Locate an optimum location for the Access Point. The best place for the Access Point is usually at the center of your wireless network. 2. Disable any anti-virus and firewall programs before starting hardware installation. 3. For Power-Over-Ethernet installation instructions, please refer to section 3. Power-Over-Etherent installation. For Windows Users 1. Insert Utility CD-ROM into your computer's CD-ROM drive. 2. Click Run Setup.exe (Windows 7/Vista only) 3.
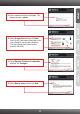
. Connect the provided RJ-45 cable from a LAN port on your Router to the LAN port on the TEW-638PAP. Then click Next. 6. Connect a RJ-45 cable from a LAN port on your Router to the Ethernet port on your computer. 7. Connect the Power Adapter to the Access Point and then to a power outlet. Verify that the power switch is set to the on position. and then click Next. 8. Select the TEW-638PAP from the list and then click Configure.
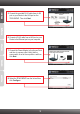
9. Enter a password and then click Login. The default password is admin. 10. Select Access Point and then click Next. Note: For AP Client setup, please refer to the User's Guide for step by step instructions. The User's Guide can be found on this product's CD-ROM. 11. Select Dynamic IP Address Configuration and then click Configure. 12. Select Manual setup and then click Next.
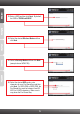
13. Enter a SSID and then click Next. By default, the SSID is TRENDnet638PAP. 14. Select the desired Wireless Mode and then click Next. 15. Select a Security Mode and then click Next (example shows WPA-PSK). 16. Select the desired WPA mode, enter characters for your Pre-Shared key and then click Next. For WPA-PSK or WPA2-PSK, the Pre-Shared Key must be between 8 and 63 ASCII or 64 HEX characters. Make sure to copy down the Pre-Shared Key.
17. Click Save (optional). 18. Give the file a name, then click Save (optional). 19. Click Configure to apply the settings. 20. Click Exit.
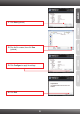
21. Click Yes to exit. 22. Connect the 2dBi detachable antennas to the TEW-638PAP. Note: to connect a wireless computer to the TEW-638PAP, please refer to the first question in the troubleshooting section. Your Installation is complete For detailed information regarding the TEW-638PAP’s configuration and advanced settings, please refer to the Troubleshooting section, User's Guide on the Utility CD-ROM, or TRENDnet's website at http://www.trendnet.com.
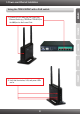
3. Power-over-Ethernet Installation Using the TEW-638PAP with a PoE switch 1. Connect a RJ-45 cable from the Power-OverEthernet Switch (e.g. TRENDnet TPE-80WS) to the LAN port on the Access Point. 2. Verify that the wireless, LAN, and power LEDs are on.
Using the TEW-638PAP with the TPE-111GI 1. Connect the Power Cord to the Injector. 2. Connect the Injector to the DC 48V IN connector on the TPE-111GI. Then connect the Power Cord to an outlet. 3. Connect a CAT-5 cable from a switch to the TPE-111GI's DATA IN port. 4. Connect a CAT-5 cable from the TEW-638PAP's LAN port to the TPE-111GI's POE OUT port 5. Verify that the wireless, LAN, and power LEDs are on.
Troubleshooting 1. All the settings are correct, but I can not make a wireless connection to the Access Point. 1. Double check that the wireless LED on the Access Point is lit. 2. Power cycle the Access Point. Unplug the power to the Access Point. Wait 15 seconds, then plug the power back in. 3. Contact the manufacturer of your wireless network adapter. Make sure the wireless network adapter is configured with the proper SSID. The default SSID of the Access Point is TRENDnet638PAP.
5. I do not have a DHCP server or DHCP is disabled on my network and I am unable to configure the TEW-638PAP. What should I do? 1. Go to the TCP/IP settings on your computer and assign a static IP address on your computer's network adapter in the subnet of 192.168.10.x. Since the default IP address of the TEW-638PAP is 192.168.10.100, do not assign a static IP address of 192.168.10.100 on your computer's network adapter. 2. Open Internet Explorer and enter http://192.168.10.100 into the address bar. 6.
GPL/LGPL General Information This TRENDnet product includes free software written by third party developers. These codes are subject to the GNU General Public License ("GPL") or GNU Lesser General Public License ("LGPL"). These codes are distributed WITHOUT WARRANTY and are subject to the copyrights of the developers. TRENDnet does not provide technical support for these codes. The details of the GNU GPL and LGPL are included in the product CD-ROM. Please also go to (http://www.gnu.org/licenses/gpl.
GPL/LGPL informações Gerais Este produto TRENDnet inclui software gratuito desenvolvido por terceiros. Estes códigos estão sujeitos ao GPL (GNU General Public License) ou ao LGPL (GNU Lesser General Public License). Estes códigos são distribuídos SEM GARANTIA e estão sujeitos aos direitos autorais dos desenvolvedores. TRENDnet não presta suporte técnico a estes códigos. Os detalhes do GNU GPL e do LGPL estão no CD-ROM do produto. Favor acessar http://www.gnu.org/licenses/gpl.txt ou http://www.gnu.
Copyright © 2010. All Rights Reserved. TRENDnet.