Federal Communication Commission Interference Statement This equipment has been tested and found to comply with the limits for a Class B digital device, pursuant to Part 15 of the FCC Rules. These limits are designed to provide reasonable protection against harmful interference in a residential installation. This equipment generates, uses and can radiate radio frequency energy and, if not installed and used in accordance with the instructions, may cause harmful interference to radio communications.
CE Mark Warning This is a Class B product. In a domestic environment, this product may cause radio interference, in which case the user may be required to take adequate measures. Protection requirements for health and safety – Article 3.1a Testing for electric safety according to EN 60950 has been conducted. These are considered relevant and sufficient. Protection requirements for electromagnetic compatibility – Article 3.
TABLE OF CONTENT About This Guide ..........................................................................................................1 Purpose......................................................................................................................1 Overview of this User’s Guide ....................................................................................1 Unpacking and Setup....................................................................................................
ABOUT THIS GUIDE Congratulations on your purchase of this IEEE 802.11g Wireless LAN Access Point. This manual helps to features the innovating wireless technology that can help you build a wireless network easily! This manual contains detailed instructions in operation of this product. Please keep this manual for future reference. With a WLAN (IEEE 802.11g) Access Point, a mobile computer can share data with another mobile computer in a wireless way.
UNPACKING AND SETUP This chapter provides unpacking and setup information for the Access Point. Unpacking Open the box of the Access Point and carefully unpack it. The box should contain the following items: One Wireless PoE Access Point One Quick Installation Guide One external power adapter One CD-Rom (User’s guide) If any item is found missing or damaged, please contact your local reseller for replacement.
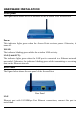
HARDWARE INSTALATION Front panel The figure below shows the LED Indicator of the Wireless LAN Access Point. Power: This indicator lights green when the Access Point receives power. Otherwise, it turns off. WLAN: The indicator blinking green whiles the wireless LAN activity. LAN (Link/ACT): The indicator lights green when the LAN port is connected to a Ethernet network successful. Otherwise, the indicator blinking green while transmitting or receiving data on the Ethernet network.
RESET The Reset function is to reset the setting back to factory default setting, once you press the “RESET” button more than 5 seconds. Power Connect the Power Adapter DC plug to the AP’s power jack. Antenna One external dipole antenna. Hardware connections Connecting with power adapter 1. Plug in network cable to the Ethernet port of the Switch/Hub, and plug in the other end to the Ethernet port of the Wireless Access Point. 2.
CONFIGURING THE WIRELESS LAN ACCESS POINT The Wireless Access Point has a Web GUI interface for the configuration. The AP can be configured through the Web Browser. A network manager can manage, control and monitor the AP from the local LAN. This section indicates how to configure the AP to enable its functions. Login to the Wireless AP through WLAN Before configuring the Wireless AP through WLAN, make sure that the SSID, Channel and the WEP was set properly.
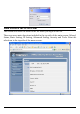
Main Screen of the Access Point The screen will show the status of the AP when you login to the AP. There are seven main functions included in the top side of the main screen: Wizard, Status, Basic Setting, IP Setting, Advanced Setting, Security and Tools. Point the selections in the top side of the menu screen.
Wizard Setup wizard is provided as the part of the web configuration utility. User can simply follow the step-by-step process to get Access Point configuration ready to run in 4 easy steps by clicking on the “Wizard” button on the function menu. The following screen will appear. Please click “Next” to continue. Step 1: Set Password User can change the password and then click “Next” to continue. Step2: Set WLAN Connection Please type the name of SSID and select the Channel. Then, click “Next” to continue.
Step 3: Set WEP Encryption If user wants to enable WEP, please click “Enabled”. Then, select the key size of WEP encryption and enter the key value in the key text box. Please click “Next” to continue. Step 4: Restart The Setup wizard is now completed. The new settings will be effective after the Access Point restarted. Please click “Restart” to reboot the Access Point. If user does not want to make any changes, please click “exit” to quit without any changes.
Status This page as below shows the following information. Firmware Version: Shows the current firmware version and released date code. LAN: Shows the Mac address, IP address (default: 192.168.1.100), Subnet Mask, Gateway Address. The current LAN traffic calculated in terms of number of packets sent and received by AP through wired connection is also displayed. Wireless: Shows the Mac address, current SSID, the status of Encryption Function (Enable or Disable), the current using channel.
View Log: Once clicked, the page will change to login page. The login page records every event and the time that it happens. User may clear the entries recorded in the log by clicking the “Clear Log” button, and refresh the screen to show the latest log entries by clicking the “Refresh” button.
Basic Setting This is the page allow user to change the access point settings. . AP Name: The name of the AP, which can be used to identify the Access Point among the all the Access Points in the wireless network. Mode: The WLAN AP supports five operation mode for Access Point, AP Client, WDS (Wireless Distribution System), AP+WDS and Repeater mode. Access Point Mode Configure the AP to Access Point mode; with this mode, WLAN clients can access LAN or other WLAN clients through this AP.
AP mode configuration Channel: The channel that AP will operate in. Channel 1 to 11 is North America (FCC) version, 1 to 13 is European (ETSI) version. SSID: Service Set Identifier, which is a unique name shared among all clients and nodes in a wireless network. The SSID must be identical for each clients and nodes in the wireless network. Authentication Type: The authentication type default is set to Open system. There are six options: Open system; Shared Key; WPA-PSK, WPA2-PSK, WPA and WPA2.
Note: When the WEP security is enabled, all the wireless clients that wish to connect to the Access Point must also have WEP enabled with the identical WEP Key value entered. WPA-PSK / WPA2-PSK: If WPA-PSK or WPA2-PSK is selected, user needs to set the key in the passphrase field as the below screen. The key length should be 8 characters at least.
WPA / WPA2: If WPA or WPA2 is selected, the below screen is shown. Please set the length of the encryption key and the parameters for the RADIUS server. RADIUS Server 1: Enter the IP address of and the Port used by the Primary Radius Server, enter the Shared Secret, which is used by the Radius Server. RADIUS Server 2: (optional) Enter the IP address of and the Port used by the Secondary Radius Server, enter the Shared Secret, which is used by the Radius Server.
AP Client mode Configure the AP to AP Client mode; the AP will be a wireless Ethernet adapter transforms any Ethernet-enabled devices to have the wireless function. AP Client mode configuration SSID: Service Set Identifier, which is a unique name shared among all clients and nodes in a wireless network. The SSID must be identical for each clients and nodes in the wireless network.
Authentication Type: The authentication type default is set to Open system. There are four options: Open system; Shared Key; WPA-PSK and WPA2-PSK. User may want to set to Shared Key when the clients and AP in the same wireless network enable the WEP encryption. All the nodes and hosts on the network must use the same authentication type. WEP Key: To disable WEP security, click on the “Disable” option. To enable WEP security, there are 2 types to select – 64bits and 128 bits.
WPA-PSK / WPA2-PSK: If WPA-PSK or WPA2-PSK is selected, user needs to set the key in the passphrase field as the below screen. The key length should be 8 characters at least. Apply: For the changes made to any of the items above to be effective, click “Apply”. The new settings are now been saved to Access Point and will be effective once the Access Point restarts. Note: For entering to the Web Setting page after changing to AP Client mode, change your PC/Notebook IP address to 192.168.1.x.
WDS mode With WDS (Wireless Distribution System) mode, user can use wireless media to communicate two or more LANs through the AP with WDS mode, all of the LAN will be combined in the WDS group, for example: Single WDS group application: When there are three APs joined to the WDS group, one of the AP in WDS mode will be the Master, the other two APs will be the Slave, all of the APs in the WDS group must use the same wireless channel and the same security setting, the Master need to fill all the Slave’s MAC
Multiple WDS group application: When there are five APs to be join into two separated WDS group, the member of WDS group 1 is AP-A, AP-B and AP-C, and member of the WDS group 2 is AP-C, AP-D and AP-E, the AP-C will join both of WDS group 1 and WDS group 2, each WDS Group 1 will be one master and the other will be slave.
Master setting (AP-A, WDS Group 1) Slave setting (AP-B, WDS Group 1) Master setting (AP-C, WDS Group 2) Slave setting (AP-D and AP-E, WDS Group 2) WDS mode configuration for Example-2 20
AP+WDS mode With WDS+AP mode, user can use wireless media to communicate two or more LANs through the AP with WDS+AP mode, all of LAN will be combined in the WDS group and WLAN client can access to the AP with AP+WDS mode. AP configuration WDS configuration Please refer the AP mode and WDS mode for detail configuration.
Repeater mode Configure the AP to Repeater mode; the AP will be a wireless LAN repeater that will be extended the WLAN coverage range. Repeater mode configuration SSID: Service Set Identifier, which is a unique name shared among all clients and nodes in a wireless network. The SSID must be identical for each clients and nodes in the wireless network.
Site Survey: This button allows user to enable the Site Survey function to scan for the available wireless network (wireless clients and Access Points) and establish wireless communications with one. Selected one of them in list to establish communications and click “Connect” button. Authentication Type: The authentication type default is set to Open system. There are four options: Open system; Shared Key; WPA-PSK and WPA2-PSK.
WPA-PSK / WPA2-PSK: If WPA-PSK or WPA2-PSK is selected, user needs to set the key in the passphrase field as the below screen. The key length should be 8 characters at least. Apply: For the changes made to any of the items above to be effective, click “Apply”. The new settings are now been saved to Access Point and will be effective once the Access Point restarts.
IP Setting This page allows user to configure the IP and DHCP settings of the Access Point. The default IP address of this access point is 192.168.1.100 with the subnet mask of 255.255.255.0. User can type in other values for IP Address, Subnet Mask and Gateway and click “Apply” button for the changes to be effective. User can also set the Access Point to obtain the IP from a DHCP server, but it is not recommended.
Advanced Setting This page contains configurations for advanced users, which the change reflects the wireless performance and operating modes. Beacon Interval: To set the period of time in milliseconds that AP sends out a beacon. Default is 100 milliseconds. RTS Threshold: To set the size of RTS/CTS packet size. Default is 2432 bytes. Fragmentation Threshold: To set the number of bytes used for the fragmentation boundary for directed messages. Default is 2436 bytes.
Mode Setting: To setting the AP operation mode for 802.11g only or 802.11b/802.11g mix mode TX Rates: Select one of the wireless communications transfer rates, measured in megabytes per second, based upon the speed of wireless adapters connected to the WLAN. Security This page is where user configures the security features supported by this Access Point. Password: Allow user to change the new login password. Here are the necessary steps: 1. Enter the new password in the “AP Password New:” field. 2.
The maximum number of MAC addresses that can be stored is 50. User can browse through the MAC address saved by selecting the MAC Filter List. For any changes made in the security page, click “Apply” for the changes to be effective. Tools Four functions are provided in this page, Backup, Restore Settings, Restore default settings and Firmware Upgrade.
TECHNICAL SPECIFICATIONS General Standards IEEE 802.11b/g IEEE 802.3u 10/100BASE-TX Fast Ethernet IEEE 802.3af Power over Ethernet Signal Type: DSSS (802.11b) OFDM (802.
Antenna: 1 x 2 dBi Dipole Antenna Physical and Environmental DC inputs DC 7.5V /1A Power Consumption 4.
Limited Warranty TRENDnet warrants its products against defects in material and workmanship, under normal use and service, for the following lengths of time from the date of purchase. Wireless Three years If a product does not operate as warranted above during the applicable warranty period, TRENDnet shall, at its option and expense, repair the defective product or deliver to customer an equivalent product to replace the defective item. All products that are replaced will become the property of TRENDnet.
32